 |
| 3 | ||
| | ||
| Teachers’ Toolkit in Nature Studies – primary school The publication is created within the European project "SEN Power", which includes five organizations: Prosveta-Sofia Foundation, Instituto Politecnico de Santarém (Portugal), Agrupamento de Escolas Cidade do Entroncamento-Escola Secundaria com 3º Ciclo do Entroncamento (Portugal), National Association of Resource Teachers NART (Bulgaria) and Antalya Provintial Directorate of National Education (APDNE). The project is implemented within the Erasmus program according to Grant Agreement No. 2022-1-BG01-KA220-SCH-00085065 with Human Resources Development Center, the Erasmus National Agency for in Bulgaria. Authors: © Elena Lazarova. (for Prosveta-Sofia Foundation) © Ana Torres, Bento Cavadas, José Maurício Dias e Nelson Mestrinho (for Instituto Politecnico de Santarém) © Isabel Correia, Paula Couto( for AECE) © Mariana Bancheva(for NART) © Pinar Bayram ( for APDNE) Editors: Elena Lazarova The publication is available at ?? The images and graphics used are open and premium licensed by Shutterstock and original images of the partners. Reproduction is authorized provided the source is acknowledged. Publisher: © Prosveta-Sofia Foundation, Sofia, 2024 ISBN (pdf) This publication reflects the views only of the author, and the Commission cannot be held responsible for any use which may be made of the information contained therein. | ||
| 4 | ||
| | ||
| 5 | ||
| | ||
| Preface
Welcome to the Nature Studies for All (NS4ALL) toolkit designed to support educators in teaching Nature Studies topics from the primary school curricula to special needs students. This manual is a culmination of extensive research, collaboration, and practical experience aimed at equipping educators with the necessary tools, strategies, and resources to foster an inclusive and supportive learning environment. Teaching students with special needs requires not only a deep understanding of diverse learning abilities but also a commitment to adapting teaching methods to meet each student’s unique requirements. The purpose of this manual is to serve as a valuable guide for educators, enabling them to create individualized, effective, and engaging learning experiences. Purpose and Scope The primary goal of this toolkit is to provide a structured and accessible collection of training resources that address the diverse needs of special education students. It comprises 46 lesson plans for teaching difficult topics in Nature Studies at primary school level. The toolkit also contains supplementary materials which support and enhance the presentations of the different topics. Acknowledgements This manual has been developed with the invaluable input of educators and practitioners from primary schools and the special education community. We extend our heartfelt gratitude to everyone who contributed their expertise, insights, and experiences to this project. Special thanks to all the primary school teachers from Bulgaria, Portugal and Turkey who piloted the lesson plans and developed their own lesson plans. Their role of peer reviewers who ensured that the content is accurate, relevant, and practical was of major importance for the success of the project. How to Use This Manual We recommend starting with SEN Power Methodology to build a foundational understanding of one of the target groups of the project, namely students with specific learning difficulties, autism spectrum disorder and attention deficit hyperactivity disorder. As you progress through the manual, you will find two extensive collections of suggestions for introductory activities (energizers) and closing activities (relaxing activities) which appear later in the lesson plans but you can opt for replacing the suggested ones in the lesson plans choosing from the two collections. Then, you come to the 46 lesson plans which provide step-by-step instruction of how to present the topics to all students, but considering the specifics of the students from the target group. Each lesson plan is designed to stand alone with the concrete topic and a reference to grade it is meant to be used in, allowing you to easily reference the material as needed. Interactive elements and practical tips such as using manipulatives, real-world examples, worksheets, videos and e-games are included throughout the toolkit to reinforce learning and provide hands-on experience. Our Vision We envision a world where all students, regardless of their abilities, have access to quality education that empowers them to reach their full potential. By using this toolkit, we hope you will feel more confident and equipped to make a meaningful impact in the lives of special needs students. Thank you for your dedication and commitment to inclusive education. Together, we can create a more equitable and supportive learning environment for every student. Elena Lazarova Researcher and project manager Prosveta – Sofia Foundation Bulgaria | ||
| 6 | ||
| | ||
| Introduction “It was in the mid-90s that neurodiversity as a formal concept and a rights movement began to emerge. Aided by the internet, autistic people and those with other conditions were able to connect and began sharing their experiences: what they had in common, how their lives differed. A recurring theme was how many felt marginalised, pushed out of a society that embraced only typical ways of being in the world. The phrase “neurological diversity” cropped up in their discussions, which along with “neurodiversity” appeared in magazine articles later that decade. Neurodiversity has clear parallels with biodiversity. It champions difference and the validity of individuals. It holds that a vaguely defined majority can be described as neurotypical, with brains that operate in a broadly similar way. Others, meanwhile, are neurodivergent, with brains that are built and work somewhat differently. Neurodivergent people may be diagnosed with a range of conditions, and many co-occur in the same individual. There is no definitive list, but autism (and what was once known as Asperger’s syndrome) and attention deficit hyperactivity disorder (ADHD) are common, as are dyslexia, a learning difficulty that affects reading and writing, and dyspraxia, which manifests as difficulties in movement and coordination.” Ian Sample Science editor, The Guardian The SEN Power project team fully shares the ideas and findings of the article (read the full text here). We believe that You can teach everything to everyone but not with the same means and not for the same time. This is how we came up with the SEN Power project idea and the design of the NS4ALL toolkit. | ||
| 7 | ||
| | ||
| Instruction to teachers
The “SEN Power” project was developed as an effort to support all students (but especially students with specific learning difficulties, with autism spectrum disorders and hyperactivity/attention deficit disorders) so that they learn better topics from the Mathematics and Nature Studies curricula. It is addressed to students aged from 7 to 11 years old. ... In the SEN Power project we designed the present teacher’s toolkit Nature Studies for All (NS4ALL) where you will find detailed lesson plans and all accompanying materials needed to present the topic to your students. The activities make use of non-formal education teaching approaches. Using them in class may be stressful at the beginning. The following words of advice could significantly help you in order to properly implement the trainings.
| ||
| 8 | ||||||||||||
| | ||||||||||||
Class preparation for the training course and the training sessions
The HOPES&FEARS/ GROUP CONTACT session is to be held at the beginning of the school year prior to the planned training sessions making use of the resources in the Teacher’s Toolkit.Hopes & Fears / Group Contract>
| ||||||||||||
| 9 | ||||||
| | ||||||
| ||||||
| 10 | ||
| | ||
Opening a training sessionWe all know that if you eager to do an activity and start doing it with positive expectations, the outcomes are far more likely to be better and the intervention – to be more efficient. Students may come to class either with great interest, or not be interested at all. Sometimes the teacher may face notable resistance if he/she begins directly with the planned theme. The students in the class may at first need to calm down or to be stimulated. There is a series of methods that can be used to start a training session:
| ||
| 11 | ||
| | ||
| NON-FORMAL EDUCATION Teaching methods In European projects – particularly within the frame of Erasmus - it is preferable to apply non-traditional teaching methods, which create a pleasant atmosphere in the class and turn learning into an interesting experience. In order to choose a method we have taken into consideration the aims of the resource. An appropriate method encourages students to identify situations in the reality of daily life and it gives them the opportunity to discuss issues as seen from their perspective. To ensure success of the method it is necessary to prepare it in the right manner. This manual consists of 38 resources distributed in three modules: Children’s Rights - Human Rights; Diversity and Social Inclusion; and Identity, Active Citizenship and Social Involvement. Each training resource consists of two tools: (a) Non Formal Education (NFE) Tool and (b) Digital Tool (DT). The NFE tool describes the “exercises” (activities) which should be utilized with the group. The DT is an extra tool which is to be used to enrich the NFE tool. Depending on the resource, the DT could be used either prior, during or after the implementation of the activities. The NFE tools used are somehow “repeatable”; the same tool (method) can be used in a variety of resources. The same principle accounts for the DT’s. The methods (NFE tools), which are applied in the present toolkit, are described below:
It has been established that team work in small groups of 4-6 students is a very effective working method. In small groups students have the opportunity to acquire knowledge, to comprehend and apply such knowledge while shaping attitudes and making choices. By discussing, participating and communicating in the group, students can develop and exercise appropriate skills. Organizing the class into small groups can be achieved in different ways: The educator explicates an activity and students shape small groups of 4-6 persons in which they practice different activities.
The educator introduces the topic, students discuss it in groups and present their conclusions to all members of the class. Students could work individually and afterwards discuss their conclusions in their group. By discussing in the class, an issue is raised and students are divided into small groups in order to discuss and propose solutions.
| ||
| 12 | ||
| | ||
| 2. Brainstorming
Brainstorming is a creative method aiming at expressing a variety of ideas. It can be applied for several reasons; most commonly it is used in order to cover as many aspects of the topic under discussion as possible. Brainstorming does not mean simply asking for ideas from others. For an effective brainstorming session there are a few rules to be followed:
Brainstorming is quite simple to utilize. The educator writes the topic or question on the blackboard, then explains the rules to the class setting a time limit, e.g. 5 minutes. Students are asked to begin. The educator writes the ideas on the blackboard quickly. If there is a gap established, the educator can fill it in his/her ideas. Depending on the ideas, they could be categorized, i.e. a few ideas could fall under the same “major” category. The next step is to process the ideas and move on to action. In some cases it may be necessary to ask students to specify some ideas. At this stage some ideas can be clarified, evaluated, chosen and ranked. This procedure is necessary in order to differentiate the ideas, i.e. if there is no differentiation during acceptance of ideas, there will probably be the impression that all ideas are equal and acceptable.
| ||
| 13 | ||
| | ||
| 3. Role-playing games
In role-playing games a certain situation is carried over from the real world into the frame of the role-playing game. Role-playing games are useful when we wish to analyze certain behaviors or to test new or alternative behaviors within a controlled and safe framework. In order to use the role-playing games it is necessary to have a warm and open-minded atmosphere in the class. It is important that all participants are aware of the meaning of the role-playing games and that they agree on certain basic rules in order to work together in a structured manner. Therefore, the educator has to explain in brief the methodology of the role-playing games and further on, the class has to set some rules for the students playing the roles, and for the students watching the performance, before the game starts. Then, the topic is defined as a certain situation and the participating characters are described in detail in order to help all participants to understand their roles. The different scenes should not last longer than a few minutes. Students, not participating actively in the role-playing game, function as observers and they are the audience. The educator acts as the coordinator or “director” and he/she is responsible for planning, carrying out and evaluating the activity. 4. Simulation 6. Case study A case study (UNSW Australia) is an account of an activity, event or problem that contains a real or hypothetical situation. Case studies can be used in order to help students understand how the complexities of real life influence decisions. A common case usually:
A case study is given to students as an example in order for them to implement an exercise, while at the same time trying to focus on the issue described. *All material used for the purposes of this project is located on the project’s website. Educators, and in some cases students, will be instructed to use the materials given in the description of each resource. 7. Guided Drama In guided drama students are presented a case as far as general settings and characters are concerned. They are guided through the framework of the plot by receiving descriptions of planned events (meetings) and of their tasks in the respected meetings (messages). They are encouraged to step in the shoes of the characters and, keeping to the provided information, are free to decide on the story, i.e. details of the plot, characters’ speech, etc. The printed information is distributed to the students shortly before the events; students read it and plan their actions and speech right away, similarly to ‘speed dating’ techniques. 8. Mind Map A mind map (Wikipedia) is a diagram used to visually organize information. A mind map is often created around a single concept, drawn as an image in the center of a blank page, to which associated representations of ideas such as images, words and parts of words are added. Major ideas are connected directly to the central concept, and other ideas branch out from those. Mind maps can be drawn by hand, either as "rough notes" during a lecture, meeting or planning session, for example, or as higher quality pictures when more time is available.
| ||
| 14 | ||
| | ||
|
9. Blue skies thinking Blue skies thinking is a well-known and widely used interactive method for generating ideas. It encourages participants to use their imaginations and be creative. It helps elicit numerous solutions to any given problem; for example, ‘what should I do in this situation?’ or ‘how can we overcome this obstacle?’. No evaluation of any kind is allowed in a ‘thinking-up’ session. If you judge and evaluate ideas as they are expressed, people will focus more on defending their ideas than on thinking up new and better ones. Everyone is encouraged to ‘think-up’ as many ideas as possible. ‘Wild’ or different
The more ideas, the better; strive for:
10. Snowballing Snowballing enables participants to think about their own responses and gradually reach out to those around them to consider the thoughts of others on an issue. | ||
| 15 | ||
| | ||
USE OF DIGITAL TOOLS
| ||
| 16 | ||
| | ||
EVALUATION
| ||
| 17 | ||||||||
| | ||||||||
| Energizers
 * The suggested energizers are different and some of them could take longer, but, as a rule, they are expected to last only a couple of minutes. With the preparation and the time needed to launch and do the described energizers, this is estimated to last 5 minutes. | ||||||||
| 18 | ||
| | ||
| Energizers |  1 - Break the Circle 1 - Break the Circle The teacher assigns randomly a number to each student, depending on the group size, i.e. for 20 students, numbers 1-4 are ok, so each group has 5 people (groups could be synthesized by the students with the same number, i.e. all having been assigned number ‘1’ or by students where each one has his/her own unique number 1-4; similarly and more fun is grouping by ingredient for a Greek salad, where every student is i.e. ‘tomato’, ‘cucumber’, ‘onion’, ‘oregano’, etc.) Once the groups have been formed, they make circles and the teacher randomly picks a number (or an ingredient) to step out of the circle and try to break in, while the others remaining are instructed to not let go of their hands no matter what. This can be repeated once more with another number stepping out. | |
| Energizers |  2 - Moo!!! 2 - Moo!!! The teacher assigns randomly in a piece of paper (turned upside down on their desks) each student with farm animal, i.e. ‘cow’, ‘horse’, ‘sheep’, ‘rooster’, etc. Once the students are informed of their animal role, they are instructed to walk around the room acting like the animal they are assigned (i.e. making its sound), in order to find their kind. | |
| Energizers |  3 - Amoeba 3 - Amoeba An evolution game! Everyone starts off as an amoeba, with the purpose of evolving to a human. All students walk around acting like an amoeba and when they meet with another amoeba, they play one round of rock/paper/scissors. Whoever wins evolves into a worm. When two worms meet they play again rock/paper/scissors and whoever wins turns into a wasp, but whoever loses goes back to becoming an amoeba. This continues until one becomes human. The evolution stages are: amoeba à worm à wasp à chicken à monkey à human. | |
| Energizers |  4 - Human chain 4 - Human chain Everybody stands up in a circle. They close their eyes and start moving towards the middle of the circle, holding their hands up. Whoever they touch with their hands, they hold and do not let go, so they make a knot. Then the facilitator asks the students to open their eyes and try to untangle themselves (make a circle) without letting go of their hands. | |
| Energizers |  5 - Fruit and vegetables 5 - Fruit and vegetables Students stand in a circle and the teacher distributes randomly pictures of fruits and vegetables (Handout 1, NS_grade1) among students. The teacher puts the two big posters from handout 1 (p.1&2) in opposite corners of the room (poster 1 Fruit; Poster 2 Vegetables). Step1: On ‘Go!” each student goes to the poster where he/she belongs to considering the picture he/she has received. Step2: On ‘Circle’ students make a circle again and exchange picture cards by handing their card to the student standing on their right. The game continues with Step 1, etc. | |
| 19 | |||||||||||
| | |||||||||||
| Energizers |  6 - Keep walking 6 - Keep walking The teacher instructs the students to walk in different manners covering the whole rook, i.e. walk like you are very happy, walk like a very heavy elephant, walk like you are 80 years old, walk like it’s raining cats and dogs, walk like a toddler, etc. | |
| Energizers |  7 - Connecting eyes 7 - Connecting eyes Participants stand in a circle. Each person makes eye contact with another person across the circle. The two walk across the circle and exchange positions, while maintaining eye contact. Many pairs can exchange at the same time, and the group should try to make sure that everyone in the circle is included in the exchange. Tip: Begin by trying this in silence and then exchange greetings in the middle of the circle. Variations: If the teacher considers, knowing the class atmosphere, that some students might be left not participating, i.e. they try to make eye contact but nobody responds to them and they have no chance to move from their initial position, the moderator could divide the class in 2 groups and introduce a competitive element – after the activity each group will be marked on the ‘team spirit thermometer’ (which could be printed on a A4 paper and the teacher marks the degrees with a marker). The more people you have left not participating in the ‘eye contact’ activity – the lower the degrees to be marked on the thermometer. | |
| Energizers |  8 - Find another seat: 8 - Find another seat: Have the students sit on chairs in a circle, with the number of chairs being one less than the number of students. The student without a chair stands in the middle and tells their name. Then the student calls out a characteristic or a colour, or type of clothing, e.g. “Everyone wearing orange!”. All participants who are wearing orange must get up and find another seat, but not the one immediately to their right or left. The student in the middle races to find a seat and the person left standing becomes the next caller in the middle. | |
| Energizers |  9 - Balloon pop 9 - Balloon pop Have everyone form a circle. Instruct the participants to put one piece of information about themselves, e.g. I have 2 sisters, or my mother is called Samy, on a small slip of paper, fold it, and put it in a blown up balloon. Throw the balloons in the middle of the circle and then have people take turns popping a balloon, reading the piece of paper, and guessing to whom the information applies. Participants could wander round the room asking ‘yes/ no’ questions to the other participants but not exactly the statement from the paper slip, e.g. they cannot ask “Have you got 2 sisters? But could ask “Have you got sisters?” and then “Have you got more than 1 sister?’, “Have got less than 3 sisters?”, etc. Game finishes when all participants have identified the author of the paper slip they have. *Note: this exercise should be used if there is enough time. | |
| 20 | ||||||||||||||
| | ||||||||||||||
| Energizers |  10 - Rope game 10 - Rope game Have the participants stand on the middle of a space cleared of desks, chairs, etc. Divide the room in a way that allows them easily to move from one half of the room to the other, e.g. by placing a long piece of rope on the floor. The teacher stands at one of the ends of the rope and calls out a characteristic, or a colour or a letter, e.g. “Everyone having blue eyes!”; “Everyone having 3 brothers”, “Everyone whose name begins with B”, etc. and points to the part of the room where the participants wearing orange/ having 3 brothers/ having B names have to move to. All participants who are wearing orange/ having 3 brothers/ having B names move to the respective part of the room; the ones who are not , have to go to the other part. Questions have to be constructed so that the class does not divide in groups having comparatively equal number of students, i.e. one of the groups should consist (in most cases) of one, two or few students. Debriefing: Participants are asked to share how they felt when they were part of a big group; and when they were standing alone (or were part of a very small group); what did they feel of themselves (as part of a small/ big group), and what their feelings were towards the group they were not part of. | |
| Energizers |  11 - Alphabetical order 11 - Alphabetical order Students make a circle with the chairs, take off their shoes and get on the chairs (one per person - the circle needs to be as close as possible). Standing on the chairs and just moving from one to another one without getting off, students have to arrange themselves in alphabetical order according to their name. As soon as they are ready, teacher will check if they are right; if not they continue until they are right. | |
| Energizers |  12 - Body spelling 12 - Body spelling Option 1 Teacher asks students to write their name in the air using different parts of their body, for example with the hand/leg/elbow/nose. Option 2 The teacher assigns the students the task of writing the name of a plant in the air, using different parts of the body (hand, leg, elbow, nose, etc.) Option 3 If time allows, the teacher divides the class into several groups and each group receives the name of a plant which is to be written with the participants' bodies, e.g. Tulip. | |
| Energizers |  13 - Simon says 13 - Simon says Teacher tells the group that they should follow instructions when he/she starts the instruction by saying “Simon says...”. If the teacher does not begin the instructions with the words “Simon says”, then the group should not follow the instructions! The teacher begins by saying something like “Simon says clap your hands” while clapping their hands. The participants follow. The teacher speeds up the actions, always saying “Simon says” first. After a short while, the “Simon says” is omitted. Those participants who do follow the instructions anyway are ‘out’ of the game. The game can be continued for as long as it remains fun. | |
| Energizers |  14 - I am going on a trip 14 - I am going on a trip Everyone sits in a circle. Start by saying “I’m going on a trip and I’m taking a hug”, and hug the person to your right. That person then has to say “I’m going on a trip and I’m taking a hug and a pat on the back”, and then give the person on their right a hug and a pat on the back. Each person repeats what has been said and adds a new action to the list. Go round the circle until everyone has had a turn. | |
| 21 | ||||||||||||||
| | ||||||||||||||
| Energizers |  15 - Animal roundup 15 - Animal roundup The teacher tells to the class to silently think of an animal. Then he/she tells to the group that without talking, they need to arrange themselves on a line from largest to smallest animals. Group members can only make gestures and the noise of their animal. After they have finished, teacher ask to the students to say the animal they were supposed to be to see if the order is correct. | |
| Energizers |  16 - Back to back 16 - Back to back Participants find a pair of similar size and weight. They sit on the floor, back to back with their pair. They hold their arms. They have to get up, while keeping the arms and backs together. After trying once-twice with their pair they switch pairs. They can repeat this process with other pairs for a few times. | |
| Energizers |  17 - Toaster or Rock Star 17 - Toaster or Rock Star The group starts in a circle with one person in the center. The person in the center points at someone in the circle and says “Toaster” or “Rock star”.
| |
| Energizers |  18 - Mosquito game 18 - Mosquito game The group stands in a circle and the facilitator tells a story about a plague of mosquitoes and that everybody has to kill the mosquitoes so as they don’t get malaria. The facilitator puts up a mosquito on the head of a person who must lower in order to avoid the mosquito. The two persons next to that person must clap their hands above his/her head to kill the mosquito, but the mosquito escapes and it goes on. When the group is already doing the game well and quickly, the facilitator will add more mosquitoes until it is almost impossible for the group to catch as many mosquitoes. | |
| Energizers |  19 - Grab the finger 19 - Grab the finger In a circle, place right finger on next person s left palm. Try to grab a finger before yours gets grabbed. After doing several times switch; place left finger on next person s right palm and repeat the process for a few times. | |
| 22 | |||||||||||||||||||||||||||||||||||||||||||||||||||||||||||||||||||||||||||||||||||||||||||||||||||||||||||||||||||||||||||||||||||||||||||||||||||||||||||||||||||||||||||||||||||||||||||||||||||||||||||||||||||||||||||||||||||||||||||||||||||||||||||||||||||||||||||||||||||||||||||||||||||||||||||||||||||||||||||||||||||||||||||||||||||||||||||||||||||||||||||||||||||||||||||||||||||||||||||||||||||||||||||||||||||||||||||||||||||||||||||||||||||||||||||||||||||||||||||||||||||||||||||||||||||||||||||||||||||||||||||||||||||||||||||||||||||||||||||||||||||||||||||||||||||||||||||||||||||||||||||||||||||||||||||||||||||||||||||||||||||||||||||||||||||||||||||||||||||||||||||||||||||||||||||||||||||||||||||||||||||||||||||||||||||||||||||||||||||||||||||||||||||||||||||||||||||||||||||||||||||||||||||||||||||||||||||||||||||||||||||||||||||||||||||||||||||||||||||||||||||||||||||||||||||||||||||||||||||||||||||||||||||||||||||||||||||||||||||||||||||||||||||||||||||||||||||||||||||||||
| | |||||||||||||||||||||||||||||||||||||||||||||||||||||||||||||||||||||||||||||||||||||||||||||||||||||||||||||||||||||||||||||||||||||||||||||||||||||||||||||||||||||||||||||||||||||||||||||||||||||||||||||||||||||||||||||||||||||||||||||||||||||||||||||||||||||||||||||||||||||||||||||||||||||||||||||||||||||||||||||||||||||||||||||||||||||||||||||||||||||||||||||||||||||||||||||||||||||||||||||||||||||||||||||||||||||||||||||||||||||||||||||||||||||||||||||||||||||||||||||||||||||||||||||||||||||||||||||||||||||||||||||||||||||||||||||||||||||||||||||||||||||||||||||||||||||||||||||||||||||||||||||||||||||||||||||||||||||||||||||||||||||||||||||||||||||||||||||||||||||||||||||||||||||||||||||||||||||||||||||||||||||||||||||||||||||||||||||||||||||||||||||||||||||||||||||||||||||||||||||||||||||||||||||||||||||||||||||||||||||||||||||||||||||||||||||||||||||||||||||||||||||||||||||||||||||||||||||||||||||||||||||||||||||||||||||||||||||||||||||||||||||||||||||||||||||||||||||||||||||||
| Energizers |  20 - Chief of clan 20 - Chief of clan Everyone stands in a circle. One participant closes his/her eyes or steps out of the room. He/She will have to guess who is the chief of the clan. One participant volunteers to be the secret Chief (quietly, so the "guesser" can't hear anything). The chief begins an action such as snapping fingers, patting the tummy, or slapping knees, and everyone in the circle imitates him/her. The guesser returns to the room and tries to figure out who the chief is. As the guesser looks around, the chief changes the action avoiding being detected. | |
| Energizers |  21 - Name game with balls 21 - Name game with balls Students stand in a circle. The teacher gives a ball to one of the students. He/she holds the ball, then says the name of another participant and passes them the ball. After a few passes, the teacher adds one more ball in the game, and then – another one. This way there will be 2/3/4 balls in the air at a time and all participants will be calling each other’s names | |
| Energizers |  22 - Names and adjectives 22 - Names and adjectives Participants stand in a circle; they think of an adjective to describe character or how they are feeling. The adjective must start with the same letter as their name, for instance, “I’m Maria and I’m merry”. Or, “I’m Alexander and I’m amazing.” As they say this, they can also mime an action that presents the adjective in a meaningful way. (N.B. In the national language versions of the TM there should be used popular names for the country and relevant adjectives in the respective language). Variation (use if time allows): The game could also be used a memory game (concentration game) to check if the rest of the group has remembered the ‘name-adjective’ pairs. After several rounds (each participant repeating his name and adjective, the teacher/ a game master, checks if the group remembers the ‘names-adjectives’ fixed pairs by saying the name of one of the students, e.g. ‘Maria’; Maria steps forward to the middle of the circle and the rest of the group are expected to come up with the adjective previously linked to the name by saying “Maria is merry”. If they cannot guess, the participant in the circle (Maria) might mime again the adjective as a tip. | |
| Energizers |  23 - Building words 23 - Building words Students work in pairs and each pair is given a letter from the word "Biodiversity". (Appendix 1) Each letter is numbered, starting at 1 and ending at 14, there are as many numbers as letters. At this stage do not tell the pupils what the word is. Pupils should create a collage of what they understand biodiversity to be by covering each letter with pictures they tear out of plants and animals and the places where they live. Images can be taken from newspapers, magazines, old calendars and tourist brochures. Once the collage is finished, the students will hold the letters with adhesive gum on the previously prepared placard of the room and together READ the constructed WORD. | |
| Energizers |  24 - Flashcards Games 24 - Flashcards Games Create a set of picture cards, related to the topic: The influence of air, light, temperature, water, soil on the life of plants and animals (Appendix 1), which will be scattered on the walls of the classroom at the students’ height. Learners are invited to move around the room to first look at the various flashcards and then select one, which they take down from the wall and take with them to their seat. When everyone has selected a picture, one by one each student will show their picture and justify their choice. | |
| Energizers |  25 - Plastic, Plastic, Plastic ... 25 - Plastic, Plastic, Plastic ... In a large group, students are challenged to look around and name 3 things near them that are made of plastic, or contain plastic. The learners are reminded that they can also pay attention to their clothes for this they just have to look at the labels of their clothes, if the labels say for example "polyester", "polyamide", "acrylic", "elastane", it means that this clothes are made of plastic. | |
| Energizers |  26 - Water cycle 26 - Water cycle Explain to the kids the process of the water cycle (evaporation, condensation, precipitation) in simple terms. Play some music and have the kids dance around the play area. When the music stops, call out one of the water cycle stages. When a stage is called out, the kids must quickly freeze in place, acting out the corresponding stage (e.g., spinning to represent evaporation or forming a group to mimic precipitation). Continue playing the music and calling out stages intermittently. | |
| Energizers |  27 - Translation movement of the Earth 27 - Translation movement of the Earth The teacher asks students to group closely within a circle. Then the teacher calls one student and gives them a picture of the sun (annex 1). The student moves to the centre of the circle. Next, the teacher gives another student a picture of the Earth. The Earth student is instructed to perform the movement of the Earth around the sun (a translation movement). The teacher explains the characteristics of the translation movement (fig.1). When the Earth student finishes the translation movement, he/she passes the Earth image to another student, who takes their turn to simulate the Earth’ translation movement, and so on, until all students repeat this movement. The Sun student could also pass the Sun image to other students and so on (fig. 1) | |
| Energizers |  28 - How to melt ice? 28 - How to melt ice? Arrange 4 tables far apart in the room. Divide the students into 4 groups - in each group there should be 1 student who only records what the other are doing. Give each group materials which include paper towels and a specific number (3 -4) of ice cubes on a plate. Encourage students to use the materials to try and melt the ice quickly! Tell them they have 5 minutes to work. After the allotted 5 minutes have passed, end the game appropriately. Time – 6 min. | |
| Energizers |  29 - How to make a wave? 29 - How to make a wave?
| ||
| Energizers |  30 - Living plant 30 - Living plant The teacher, together with the resource teacher, prepare a box in advance, in which they fold the printed pictograms from Appendix 4 – pictograms for the Living Plant game. The game begins with the teacher choosing one student to play the role of a 'living plant'. The teacher gives an instruction: - I will point a student who will come out in front of the class and will draw a piece of paper from the box. When he/she sees what is on it, they have to name the corresponding part of the plant. The piece will be attached with the help of the teacher to our living plant (the student playing this role). Thus our living plant will be created. The game starts with an instruction: - ............... stand in front, please (names a student from class). Draw out a piece of paper." After drawing out the piece of paper, the student says which part of the plant is shown in the pictogram and with the help of double-sided tape attaches it to the appropriate places on the "living plant" - on the feet/shoes the symbol for roots, on the feet - the symbol for stem, on the hands - for the leaves, on the fingers - for the blossom and fruit. When the "living tree" is completed with all parts after the students have drawn and attached the symbols on the "Living Plant", everyone sings a song with the key words from the lesson (plant, stem, leaf, blossom, fruit) to the Frere Jacques tune/ Are You Sleeping? as to the beat of the melody the students bow to their feet when they sing 'root', point to their feet when they sing 'stem', shake their hands when they sing 'leaf', and their fingers for blossom and fruit. Time - 5 minutes | |
| Energizers |  31 - Microbes 31 - Microbes The teacher asks students: What do we know about germs/microbes? How do we protect ourselves from them? The teacher explains what is the relationship between health and hygiene, visually showing how germs make us sick through the following task-experiment: Germs are only afraid of soap and a toothbrush. That is why we regularly wash our clothes, clean our houses, brush our hands and teeth. That's the only way we can get rid of germs. To show what hygiene is and how people should take care and protect themselves from germs in their daily life, play the following game: 1. Ask a student to wash his/her hands thoroughly and dip them in clean water. Obviously, the water will remain clean. After that ask him/her to dig hands into dirt or sand and dip hands again in a soapy solution in another container – it’ll be seen that the water turns cloudy and black. Here are the germs - the soap caught them. 2. The easiest way to convey germs is through touch. Tell the students that you have made a focus and you have magnified the microbes so that they can be seen. Paint your hand with easy-to-wash paint. Shake hands with one of the students, who will shake hands with another, and so on until the last one. This is an easy way to visualize how disease-causing bacteria pass from one person to another. Of course, transmission of the germs can also happen by air-droplet route. To make it comprehensive for the students, explain that when we sneeze or cough, droplets come out of our mouths and when they get into the air, they can infect another person. That's why we have to put our hand over our mouth and turn the other way so as not to put the people around us at risk. Time - 5 minutes. | |
| Energizers |  32 - Habitats 32 - Habitats Habitats Print Appendixes 1 and 2 for each group. If the teacher decides, the cards can be colored and cut out in advance during the art classes. Card game - students are divided into 2 groups, and each group has its own leader, who receives 24 cards with different images of animals and plants (Appendix 1) and 3 sheets with the images of Appendix 2. The group leader gives the cards to the students and is responsible for their correct placement on previously prepared boards with the images of earth, air, water. The teacher can explain that the pictures in Appendix 2 show land, water and air as a habitat where animals and birds live and point out that the cards also include amphibians that live both in water and on land . The task of each group is to arrange as quickly as possible by gluing the cards of plants and animals that live on the ground, in the water and in the air. The game is won by the team that has arranged correctly most of the cards on their board. Time - 5 minutes | |
| Energizers |  33 - Ball game 33 - Ball game This is a game that includes all parts of the body that will be studied in the lesson. Preparation: Move the tables by the walls of the room and divide students into 3 teams; ask the members of each team to linie up behind each other. Put 3 chairs in front of each team, locating them at a distance from each other, so that they play the role of obstacles on the way. You also needed is 3 disposable plates, 3 light plastic balls and a whistle* (to be used as a signal to turn around). Instructions:
* The whistle could be replaced by clapping the hands. | |
| Energizers |  34 - Who will fill more water in the container? 34 - Who will fill more water in the container? Students are divided in teams and each team is instructed to stand in a column. A large empty container with a measuring scale (eg a transparent bucket for measuring the amount of water) is placed opposite each team. Another bucket full of water is placed next to each team. Each team gets one large cup; the cups for the teams are the same, e.g. 300 ml. The teacher launches the game and the first competitors from the teams scoop up as much water as possible with their cups, then walk to the large containers and pour the water into it, trying not to spill water on the way, and walking as quickly as possible. Afer that they return to their teams and pass the cup to the next participant. The activity continues until the teacher signals the end of the game. The duration should be determined in advance and it should take into consideration the number of students in the teams, so that most students can participate. After the end of the game, the amounts of water in the teams’ containers are compared. The team who have collected more water win the game. | |
| Energizers |  35 - Ice cubes 35 - Ice cubes Location: Classroom/Interior No. of participants: All the students in a class. Organisation: Students work in pairs. Materials: Container with ice cubes; dry paper towels. The students organise themselves into pairs. Each pair is given an ice cube which they try to melt using only their hands as quickly as possible. The pair that manages to completely break up the ice cube wins. | |
| Energizers |  36 - I know my colleagues 36 - I know my colleagues Location: Classroom/Interior No. of participants: All the students in a class. Organisation: To the sound of music, students move randomly around the room. Materials: Radio or computer with background music, A4 sheets of paper with the outline of a human face and felt-tip pens. Game description: Each pupil writes their name legibly on a sheet of A4 paper on which the outline of a human face has already been drawn. The sheets are spread out randomly on the floor, along with a felt-tip pen for each. To the sound of calm music, the students walk freely around the room. When the music stops, each student has to stand in front of the sheet with the name of a classmate. While the music is still playing (about 30 seconds), each student draws a physical feature of their classmate's face on the sheet in front of them (e.g. their eyes). As soon as the music starts again, the students walk back through the pages and, when the music stops, they continue to complete the face in front of them. So on and so forth until the teacher has finished this part of the activity (this will happen when the teacher notices that the faces have a lot of elements drawn on them). Each "owner" of their portrait picks it up and looks at how their classmates have represented them. Collectively, reflection on how we know others and how they know us... the depth of the reflection depends on the time available and the characteristics of the group. Collectively, reflection on how we know others and how they know us... the depth of the reflection depends on the time available and the characteristics of the group. | |
| Energizers |  37 - Move like me! 37 - Move like me! Play rhythmic music, e.g. https://www.youtube.com/watch?v=kVi8ICWu3WI , and give instructions to the students what to do. All actions are repeated twice; when chanting the words for the first time, the shows the movement as a guide, and the students repeat the words and movements. When the line is repeated, student chant the words on their own and do the movement. When chanting Animals in Action, everyone choose what animal to imitate. ● Run, run, run like a cheetah (the teacher chants and shows the action) ● Run, run, run like a cheetah (students chant and do the action) ● Swing, swing, swing like a monkey (twice: 1st time –teacher; 2nd time - students) ● Fly, fly, fly like an eagle (twice) ● Rows, rows, rows like a sea turtle (twice) ● Animals in action (twice) ● Animals in action (twice) ● Animals in action (twice) ● Climb, climb, climb like a squirrel (twice) ● Spin, spin, spin like a duck (twice) ● Move, move, move like a gorilla (twice) ● Step, step, step like an elephant (twice) ● Animals in action (twice) ● Animals in action (twice) | |
| Energizers |  38 - Good morning - good afternoon 38 - Good morning - good afternoon Location: Classroom/Interior No. of participants: All students in a class Organization: Students standing in a circle Material: A blindfold Game description: The teacher draws a student to go into the middle blindfolded. The other students hold hands and walk around the circle. The blindfolded student touches a classmate who has to say "good morning" or "good afternoon". At this point, the blindfolded student tries to find out who their classmate is. If they do, they switch and so on until the teacher decides to keep the game going. | |
| Energizers |  39 - My body 39 - My body Location: Classroom No. of participants: All students in a class Organisation: Students in a standing circle Materials: None Game description: Start the game with all the students and teacher forming a standing circle. The teacher starts the game by saying the name of a body part. The student next to him/her (it doesn't matter if they're left or right) will place their hand on the body part the teacher says and name another body part and the next student will place their hand on the named body part and so on, until everyone has named a body part and placed a named body part. You mustn't repeat body parts, whoever does it, loses and leaves the game. | |
| Energizers |  40 - Who am I? 40 - Who am I? Location: Classroom No. of participants: All the students in a class Organisation: Students get into groups in pairs. Materials: woollen yarn; pieces of cardboard or paper with animal and plant figures printed on them to put around each student's neck. Discovering animals and plants; Materials: woollen thread and drawings of animals and plants. Procedures: Each pupil puts a piece of yarn round their neck with a name tag and a drawing/figure of an animal/plant facing their back. In pairs they will ask each other questions to find out which animal or plant it represents. The number of questions should be agreed beforehand. Ex: Badge with a drawing of an apple tree with apples. Questions: Is it a plant or an animal? Animal Is it a small or large plant? Large Does it bear fruit? Yes Are the fruits red? Yes Are they apples? Yes The tree is called an apple tree. | |
| Energizers |  41 - Means of transport 41 - Means of transport Location: Classroom/Interior No. of participants: All the students in a class Organisation: Students in seated circles With the group sitting in a circle, the teacher says the name of some means of transport and points to one of the students. The chosen student has to say the name of the means of transport they heard and add another one to his/her choice. The classmate next to him/her must say the means of transport already named and add another, and so on, until someone gets the sequence wrong. No means of transport may be repeated. Example: Teacher - car; Student 1 - car and motorbike; Student 2 - car, motorbike and bicycle; Student 3 - car, motorbike, bicycle and scooter and so on. | |
| Energizers |  42 - Back-to back drawing 42 - Back-to back drawing Location: Classroom No. of participants: All the students in a class Organisation: Students divided into pairs. Materials: A5 sheet of paper and pens. Picture cards (may or may not be associated with the subject or theme of the lesson) Game description: Students in pairs sit with their backs to each other. One of the students in each pair is given a sheet of paper and a pen and the other pair is shown a picture of something that is easy to draw (a flower, a house). The student who has the picture must describe the illustration for his / her partner to draw, without saying what it is. They are allowed to describe shapes, sizes and textures, but not what it is, e.g. "Draw a rose". Once the drawings are finished, they are compared with the original to see if the communication was good. Working time - 10 min. | |
| Energizers |  43 - Guided movement 43 - Guided movement Suggestion Play a game of "turn", "half-turn" and "quarter-turn" movements from a starting position common to all (it could be a dance with repetitive movements) or a team game: blindfold a student from each team and their mates have to give them clues to get to a previously agreed point or play an individual game, like a "labyrinth" (starting point and finding the route to the end point). | |
| Energizers |  44 - Mimicking animals 44 - Mimicking animals The teacher instructs students to mimic the movements of animals in the following sequence: fox, dog, hare, hedgehog.
Figure 1. Fox (Credits: Pexels.com) Figure 2. Dog (Credits: Pexels.com) Figure 3. Hare (Credits: Wikipedia) Figure 4. Hedgehog (Credits: Pixabay) | |
| Energizers |  45 - The dinosaur energizer 45 - The dinosaur energizer Ask each student to think of their favourite dinosaur and be ready to share it with the class. Then, organize the students in a straight line, standing side by side. Now, each student should imitate the dinosaur movement following these steps:
After everyone has had a turn, gather the students for a brief discussion. Ask them to share what they noticed about the different types of dinosaur movements. Discuss how the structure and size of each dinosaur might have influenced its way of moving. As an alternative: If the school has a large enough sandpit, a short activity could be organised to make students realise the relationship between the way humans move and the marks registered on the ground. This activity would consist of asking students to freely produce footprints in the sand as a result of walking (A) or running (B) (Figure 3). Figure 3. Walking and running footprints. The aim of this exploration would be to realise that the higher the speed of movement, the further apart the footprints tend to be arranged on the track, as well as more aligned (B), as opposed to walking, where consecutive footprints tend to be closer together and more side by side (A). Some engaging questions are:
At this stage the teacher can organise a more structured demonstration, with a chosen student, to compare the two situations. | |
| Energizers |  46 - Mimicking extinct animals 46 - Mimicking extinct animals The teacher instructs students to mimic the movements of extinct animals in the following sequence: T-rex, Dodo, Smilodon. Figure 1. T-rex (Credits: wikipedia) Figure 2. Dodo (Credits: Wikipedia) Figure 3. Smilodon (Credits: Wikipedia) | |
| 23 | ||||||
| | ||||||
| Relaxing Exercises
|  * The suggested relaxing exercises are different and some of them could take longer, but, as a rule, they are expected to last only a couple of minutes. With the preparation and the time needed to do the relaxing activities and to end the lesson, this is estimated to last at most 5 minutes. | |||||
| 24 | ||
| | ||
| Relaxing Exercises |  1 - Guided fantasy 1 - Guided fantasy Students are asked to close their eyes (if comfortable) and, with the guidance of the facilitator, slowly imagine a scene of the past or future event. More and more details are used to describe the event with all senses and thoughts. A suggested brief script could be à Begin by breathing slowly and deeply… Think of yourself in a place where you feel relaxed and at ease… Create all the details in your mind, what do you see… what the sounds are like, the smells and colors of this special place… Are there any people …? | |
| Relaxing Exercises |  2 - Progressive muscle relaxation 2 - Progressive muscle relaxation To release tension from head to toe, students are asked to close their eyes (if comfortable) and focus on tensing and relaxing each muscle group for two to three seconds each. The teacher guides the students; he/she asks them to start with the feet and toes, then move up to the knees, thighs, rumps, chest, arms, hands, neck, jaw, and eyes—all while maintaining deep, slow breaths. Kelly Roper | |
| Relaxing Exercises |  3 - Guided breathing 3 - Guided breathing Teacher asks the students to close their eyes (if comfortable), inhale for a count of four, then exhale for a count of four (all through the nose, which adds a natural resistance to the breath). Then, with one hand on the chest and the other on the belly, the students can take a deep breath in through the nose and exhale through the mouth, ensuring this way that the diaphragm (not the chest) inflates with enough air to create a stretch in the lungs Jordan Shakeshaft | |
| Relaxing Exercises |  4 - Visualization using color/soothing sound 4 - Visualization using color/soothing sound Facilitator asks the students to imagine a favorite color that makes them feel peaceful and safe. They keep their imagine taking in that color with each breath and sending it throughout their entire body as they exhale. They continue until they visualize being filled with their special, relaxing color. The same exercise can be performed using soothing sound or aroma. Also, it is more effective if relaxing music is used. Kelly Roper | |
| Relaxing Exercises |  5 - Use a word that describes their feelings/thoughts 5 - Use a word that describes their feelings/thoughts Students are asked to close their eyes (if comfortable) for a minute and think of a word that describes their feelings/thoughts after finishing the resource. Then the students open their eyes and one by one say their word to the classroom | |
| 25 | ||||||||
| | ||||||||
| Relaxing Exercises |  6 - Bee breathing 6 - Bee breathing The teacher instructs the students to get in a comfortable position to practice bee breathing. They have to imagine that they are sitting on a leaf or a flower petal, to sit straight and allow the leaf or petal to gently support them. The teacher gives students the following instructions: Breathe in, allowing the air to just gently come in through your nose, filling up your lungs. As you breathe out, buzz like a bee. See how long your buzz can last. See how far your bee is going to fly before sitting down and resting again. Buzz. Buzz. Buzz. On the next breath, see if your bee can fly with a loud, strong buzz. On the next breath, see if your bee can fly with a soft buzz. When the exercise is finished, the teacher gives time for a short discussion: Does it feel different with a strong or a soft buzz? How does your body feel? Optional (use if time allows): After breathing practice, draw a picture of a bumblebee and the leaf or flower that you were “sitting on” in your imagination. This picture can be used as a relaxation practice reminder. When you see the picture, practice being like a Bee on a leaf and practice a Bee breath. | |
| Relaxing Exercises |  7 - Strong as a plant 7 - Strong as a plant All students spread out in the room and imagine they are plants (eg tulip, grass, oak, pine tree, etc.) but don’t tell the others what plant they are. They listen to the audio recording and with their actions imitate the movements of the plant in different weather conditions (rain, wind, storm, snow, calm weather, etc.) *The teacher plays the sounds from Annex 1 while students complete the activity. | |
| Relaxing Exercises |  8 - Seasons of the year 8 - Seasons of the year All players sit in a circle, but not too close to one another. The teacher moves like a plant during the seasons of the year. Winter: the plants are small, weak and are crunched together on the ground. Spring: through the stronger sunshine, the plants grow slowly and slowly rise. Summer: through the warm sun, the plants slowly open their arms, the flowers open their blooms are stand up straight. Autumn: the sun rays become weaker. The plants begin to slowly shrivel, the blooms and leaves begin to fall away. | |
| 26 | |||||||||||
| | |||||||||||
| Relaxing Exercises |  9 - Lion's breath 9 - Lion's breath Lion’s breath is a playful way to release and relax into more peaceful feelings. The trainer tells students that they are going to do a breath called the lion’s breath in order to let go of feelings or thoughts we no longer want. This breath is very helpful in getting those ideas out of us and pushing them far away. Instructions
| |
| Relaxing Exercises |  10 - Mountain range 10 - Mountain range Stand side by side in a line, in mountain pose, your feet hip-width apart. Each foot must touch the foot of the person on each side. Walk (as a group) across the room without separating their feet from your partner’s. Variation: Ask the students to walk on their toes. | |
| Relaxing Exercises |  11 - Breathing exercise 11 - Breathing exercise Teacher asks students to make a circle and do the following exercises, repeating each one few times and alternate them. Teacher can also add new ones. Breathing in raise your arms above your head and say “Elevator Up!” Breathing out, float your arms back down to your sides, saying “Elevator Down.” Repeat. Take three quick breaths in while wiggling your nose. Wiggle your nose on each breath in. Then wiggle your nose on each breath out. Hold your hand in front of your nose and hiss hiss hiss while breathing out. | |
| Relaxing Exercises |  12 - Warm back 12 - Warm back A piece of paper is stuck to each student’s back and they are given a pen. The paper is already prepared. Each piece of paper says: “I like………..”. Slow music is played and the students walk around and write characteristics about the person whom they like on the paper. Each child is allowed to look at the paper at the end and take it home. | |
| 27 | ||||||||||||||
| | ||||||||||||||
| Relaxing Exercises |  13 - Body massage 13 - Body massage The students stand in a circle: they need to follow all the movement the teacher does and massage themselves. The teacher starts to massage different parts of his/her body, starting from the head till the feet (it’s better if they take off their shoes). The teacher explains how the massage needs to be done, if delicate or more energetic. Optional: The teacher can also ask to the students to massage another classmate. | |
| Relaxing Exercises |  14 - Give me your energy 14 - Give me your energy The students stand in a circle. The teacher starts, pretending he/she is holding a ball on the hands and passing it to the student on his/her right; this one do the same, until the ball comes back to the teacher. The ball needs to be passed in a gentle way, as it is very precious. At the second round, the teacher passes the ball to students in another side of the circle, making a gesture and a noise. The students will do the same until everyone will have touched the ball at least once. The ball can be passed in any way (in form of kick, kiss…), pretending it becomes bigger or smaller depending on the will of the students. | |
| Relaxing Exercises |  15 - Moving like a toy 15 - Moving like a toy The teacher uses a magic word to change the students into many string-loaded (wind-up) toys. At the teacher’s signal, the toys start to move across the class, as many robots, to get their sits. They have to move more quickly at the beginning and then gradually more and more slowly, because their charge is finishing. Some of them will be frozen in the middle of the room, and the teacher has to give their cranks one more turn to help them reach their seats | |
| Relaxing Exercises |  16 - Pass the face 16 - Pass the face It is like the game "telephone" but instead of passing a word or sentence around the group, participants pass a facial expression. | |
| Relaxing Exercises |  17 - Circle massage 17 - Circle massage The group forms a circle and faces one direction. Each participant places his/her hands on the shoulders of the person in front of her/him. Each person then gives the person who is in front a shoulder massage. The person being massaged can give a feedback. After a few minutes, the group turns the other way so that the person who has been making the massage is then receiving it in return. | |
| 28 | |||||||||||||||||||||||||||||||||||||||||||||||||||||||||||||||||||||||||||||||||||||||||||||||||||||||||||||||||||||||||||||||||||||||||||||||||||||||||||||||||||||||||||||||||||||||||||||||||||||||||||||||||||||||||||||||||||||||||||||||||||||||||||||||||||||||||||||||||||||||||||||||||||||||||||||||||||||||||||||||||||||||||||||||||||||||||||||||||||||||||||||||||||||||||||||||||||||||||||||||||||||||||||||||||||||||||||||||||||||||||||||||||||||||||||||||||||||||||||||||||||||||||||||||||||||||||||||||||||||||||||||||||||||||||||||||||||||||||||||||||||||||||||||||||||||||||||||||||||||||||||||||||||||||||||||||||||||||||||||||||||||||||||||||||||||||||||||||||||||||||||||||||||||||||||||||||||||||||||||||||||||||||||||||||||||||||||||||||||||||||||||||||||||||||||||||||||||||||||||||||||||||||||||||||||||||||||||||||||||||||||||||||||||||||||||||||||||||||||||||||||||||||||||||||||||||||||||||||||||||||||||||||||||||||||||||||||||||||||||||||||||||||||||||||||||||||||||||||||||||
| | |||||||||||||||||||||||||||||||||||||||||||||||||||||||||||||||||||||||||||||||||||||||||||||||||||||||||||||||||||||||||||||||||||||||||||||||||||||||||||||||||||||||||||||||||||||||||||||||||||||||||||||||||||||||||||||||||||||||||||||||||||||||||||||||||||||||||||||||||||||||||||||||||||||||||||||||||||||||||||||||||||||||||||||||||||||||||||||||||||||||||||||||||||||||||||||||||||||||||||||||||||||||||||||||||||||||||||||||||||||||||||||||||||||||||||||||||||||||||||||||||||||||||||||||||||||||||||||||||||||||||||||||||||||||||||||||||||||||||||||||||||||||||||||||||||||||||||||||||||||||||||||||||||||||||||||||||||||||||||||||||||||||||||||||||||||||||||||||||||||||||||||||||||||||||||||||||||||||||||||||||||||||||||||||||||||||||||||||||||||||||||||||||||||||||||||||||||||||||||||||||||||||||||||||||||||||||||||||||||||||||||||||||||||||||||||||||||||||||||||||||||||||||||||||||||||||||||||||||||||||||||||||||||||||||||||||||||||||||||||||||||||||||||||||||||||||||||||||||||||||
| Relaxing Exercises |  18 - Making room 18 - Making room Participants are asked to raise their arms with palms facing up, imagining that they are pushing up the ceiling and are asked do a lot of strength in that direction to increase the space of the room where they are. Then they are asked to turn the arms down with palms facing down thinking that they are pushing down the floor. They are asked to push away the walls turning their left arm and palm to the wall on their left and their right arm and palm to the wall that’s on their right. | |
| Relaxing Exercises |  19 - Massage ball 19 - Massage ball One ball is given to each participant and, following the rhythm of a soft music, they place the ball between their back and a wall. They bend their knees slightly to relax the legs and better place their back. Then they move their body from top to bottom and from right to left and vice versa, moving the ball around their back. When making movements of their body, they will notice some more tense (and sometimes painful) spots. When they notice this they should stop and stay quiet keeping their back against the wall, making the desired pressure and holding for a while. Variation: Do not use the wall. Participants work in pairs and one holds 1 or 2 balls in their hands and makes the massage to the other and then they switch. | |
| Relaxing Exercises |  20 - Holding legs 20 - Holding legs Participants work in pairs. And you can put a quiet and relaxing music (or sounds like water falling down, sea waves, etc.). Half of the participants are asked to lie down face up, eyes closed, with their left leg extended on the floor and their right leg elevated. Another participant stands up and loops a towel around the heel of the other’s right foot and holds the ends of the towel in his/her hands, and makes soft and gentle movements (upwards and downwards, and sidewards) while the other totally relaxes his/her leg. Then they repeat the same process with the left leg. Then the participants switch roles. | |
| Relaxing Exercises |  21 - Listening the sounds of Nature 21 - Listening the sounds of Nature Free the room of classroom tables and chairs, leaning them against the walls to make the space spacious. Lying on the floor, the students are invited to close their eyes and silently listen to the sounds of nature, animals and objects, which the teacher has previously selected from YouTube. Once the moment is over, try to get the students to mention the sounds they have identified, the ones they liked the most or not, etc. | |
| Relaxing Exercises |  22 - Soap Bubbles 22 - Soap Bubbles By moving tables and chairs out of the classroom or using the gymnasium, put on some relaxing music/nature sounds through the computer and ask the children to distribute them around the room. Randomly give the students pieces to make soap bubbles, asking them to control their breathing in order to blow/make big soap bubbles that do not burst as soon as they start blowing. The students should remain in silence, concentrated on the music and breathing calmly moving around the space, observing the soap bubbles. | |
| Relaxing Exercises |  23 - The Four Seasons Dance 23 - The Four Seasons Dance Start by moving tables and chairs out of the room, leaving the space wide open, or use the gym or another large space in school. Switch on the computer with speakers, use the music "The Four Seasons" by Antonio Vivaldi" through Youtube. Students are invited to move freely around the space and imagine that they are plants, with roots (the feet) with the stem (the body) with flower (the head) and with leaves (the fingers of the hands). According to the sequence of the indications that are given that reproduce the life of a seed, the students will make corresponding movements, from sowing, with the seed under the ground, the seed germinating, the plant growing and finally the seed giving flower. | |
| Relaxing Exercises |  24 - Music From the Sea 24 - Music From the Sea Move tables and chairs out of the classroom, ask students to spread out around the room and find the position that is most comfortable for them. Silently, and listening to a relaxing music of the seabed from a video, which the teacher selects and projects, the learners imagine being a living being at the bottom of a calm and clean sea. This activity should not exceed 5 minutes. | |
| Relaxing Exercises |  25 - Raindrops 25 - Raindrops Close your eyes and imagine that you are a water drop that falls in the ocean when it is raining. Imagine how you can return to the cloud due to the water cycle process. | |
| Relaxing Exercises |  26 - Guided fantasy on a sunny day 26 - Guided fantasy on a sunny day Close your eyes and imagine you are on holiday, and the sun is smoothly warming your face. You feel it with all your senses: with your skin you feel the warm air, with your eyes you see the bright colours of the plants and the happy faces of people enjoying the lovely weather, with your nose you smell the blossoming flowers and herbs, with your tongue you taste the delicious summer fruit and vegetables, etc. Express how you feel. (5 min) | |
| Relaxing Exercises |  27 - What helps ice melt? 27 - What helps ice melt? Collect the materials used in the energizer and ask the students to wipe the tables with the paper to make them dry. Ask the students to take their seats. Ask groups to share the steps of the melting process within their group. Discuss what worked and why? Discuss also what they would do in a different way the next time! Time – 4 min. | |
| Relaxing Exercises |  28 - Which waves do we see and which do we hear? 28 - Which waves do we see and which do we hear?
Duration – 2 min. | ||
| Relaxing Exercises |  29 - Paper ball game 29 - Paper ball game Location: Classroom/ Indoor - Large space No. of participants: All students in a class Organisation: Students arranged in a circle. Materials: White A4 sheets of paper, one per student and one biros per student (each student has their own), quiet music. Description: With the students sitting in a circle, the teacher starts by handing out three sentences to each student: One thing they can do Something they like One thing they own Once this part of the exercise is over, the teacher starts to play some relaxing music and the ball of paper is passed calmly from hand to hand, until the teacher stops to the music and at that point the student who has the ball, unrolls the first (last) sheet of the ball and reads what is written and tries to identify to whom it belongs to. The teacher turns the music back on and the ball passes from hand to hand again. When the teacher stops the music again, the same thing is repeated, i.e. the student unrolls another sheet of paper, reads what is written on it and tries to guess to whom it belongs to. In a calm atmosphere, the game continues until the teacher stops it, or until all the sheets have been unrolled and all the students have played. When the students can't identify who the sheet belongs to, the teacher identifies him/her. | |
| Relaxing Exercises |  30 - Face and nose 30 - Face and nose Location: Classroom No. of participants: All the students in a class Organisation: Students seated in the classroom, each in their own place. Materials: None. With the students seated in a circle, the teacher starts by distributing three sentences to each student: The teacher starts by saying: There's a pesky old fly coming. It's landed on your nose. Try to get it out without using your hands. And just like that, it shrinks your nose. Make as many wrinkles in your nose as you can. Pull your nose up hard. O.K. You've pushed the fly away. Now you can relax your nose. Oops, here it comes again! See if you can swat it away! Wrinkle your nose tightly. Hold it as tight as you can. O.K., the fly is gone. 4 You can relax your face. Notice when you wrinkle your nose, your cheeks. Your mouth, forehead and eyes also helped and tightened up. So when you relax your nose, your whole face relaxes too. And that feels good. Oh-oh! This time the old fly is back. But now it's landed on your forehead. It makes lots of wrinkles. Try to catch it in the middle of all those wrinkles. Keep your forehead tight. OK, you can relax now. I'm glad the fly is gone. Now you can relax. Let your face be smooth; not a single wrinkle. Feel your face nice and smooth and relaxed. | |
| Relaxing Exercises |  31 - I love nature 31 - I love nature I love nature The teacher gives instruction to the students to close their eyes and while listening to the music try to imagine that they are walking in nature. Teacher asks them to remember what plants there are. Listening to the music lasts about 1 minute. The teacher then gives the floor to a few students to tell what plants they imagined, what they looked like, how big they were, did they have blossoms or were they just leaves. Time – 5 minutes | |
| Relaxing Exercises |  32 - I take care of my teeth 32 - I take care of my teeth I take care of my teeth The students get up from their desks and dance with the song, imitating the movements of the Blaguni by brushing their teeth with a brush and toothpaste: https://youtu.be/Gw8YKSz2tNI?feature=shared Time - 5 minutes. | |
| Relaxing Exercises |  33 - Ditch the shoes! 33 - Ditch the shoes! Do you know the phrase “stay grounded”? Adults use it quite often, but sometimes the easiest way to do that is to connect yourself to the ground again. If you are outside, consider taking your shoes off and walking through the grass. Take note of what the soft grass feels like and the dirt under your feet. Do also ensure there’s no glass, nails or anything else sharp in the vicinity before taking off your shoes. If you are in the classroom, just take of your shoes and enjoy walking around slowly. | |
| Relaxing Exercises |  34 - The world around me 34 - The world around me You will need handouts for all students. Students take their places and get relaxed listening to the sounds of the music. They are instructed to calm down and think about 5 things they can see, 4 sounds they can hear, 3 tastes they can taste, 2 scents they can smell, 1 thing they can to touch at the moment, and record them in the worksheet (Handout 6_1 or Handout 6_2). | |
| Relaxing Exercises |  35 - I need water 35 - I need water Find small images (A5 format or smaller) of plants, animals and people, as well as substances or objects of non-living nature (a ball, sand, a table, a book, etc.). Students go around the room and collect the pictures with the images of representatives of living nature (which need water to exist). The game is not competitive. The duration depends on the number of images printed or cut from old magazines. At the end of the game, the participants collect and arrange all the images in one place and formulate what they have in common - water is vital their existence. Another option is, instead of sorting the printed images, ask students to draw something that needs water within 1 minute and have them arrange the drawings as a collage of living nature organisms that need water to exist | |
| Relaxing Exercises |  36 - Nature lovers 36 - Nature lovers Close your eyes and imagine that you doing a nature walk - on the fields or in the mountains. Imagine all the details of what you see and feel: ● What vegetation do you see around you? ● What season is it and what colours are the plants? ● Are there animals in your picture – maybe you see beetles in the grass or hear the birds? ● Is there movement around you – maybe there is a slight breeze and the leaves of the trees are swaying, or a stronger wind is bending their trunks, or is it completely quiet and everything is still? ● Do you smell any aromas? ● Are there people around you? ● How do you feel? Now, keeping this picture in your mind, open your eyes and prepare for the rest of the day. | |
| Relaxing Exercises |  37 - Animal sounds 37 - Animal sounds Use the computer - Youtube - to access the sounds of the animals worked on in class. | |
| Relaxing Exercises |  38 - Hands and Arms 38 - Hands and Arms To the sound of calming/relaxing music, the students sit in their seats in the classroom and pretend they have a whole lemon in their left or right hand and the other hand over the one holding the lemon. The teacher will give the instructions: Now squeeze hard. Try to squeeze all the juice out of the lemon. Feel the force in your hands and arms as you squeeze. Now drop the lemon. Notice how your muscles feel when they're relaxed. Now take another lemon and squeeze it, again using one hand over the other. Try to squeeze this one harder than you did the first one. That's it! With force! Don't let a single drop remain. Squeeze hard. Now drop the lemon and relax. Notice how much better your hands and arms feel when they're relaxed. All right! | |
| Relaxing Exercises |  39 - Sounds game 39 - Sounds game To the sound of calming/relaxing music, the students sit in their seats in the classroom and pretend they have a whole lemon in their left or right hand and the other hand over the one holding the lemon. The teacher will give the instructions: Now squeeze hard. Try to squeeze all the juice out of the lemon. Feel the force in your hands and arms as you squeeze. Now drop the lemon. Notice how your muscles feel when they're relaxed. Now take another lemon and squeeze it, again using one hand over the other. Try to squeeze this one harder than you did the first one. That's it! With force! Don't let a single drop remain. Squeeze hard. Now drop the lemon and relax. Notice how much better your hands and arms feel when they're relaxed. All right! | |
| Relaxing Exercises |  40 - Senses 40 - Senses To the sound of calm music, the students are instructed to focus and write down on a sheet of paper five things they can see, four things they can touch, three things they can hear, two things they can smell and one thing they can taste. | |
| Relaxing Exercises |  41 - What would you do if ... 41 - What would you do if ... Ask students to think about what they would do if they were... Let each student think and say what they want to be and be able to do, using words or themes around the topic of the lesson plan. E.g. If I were the sun... if I were a star, if I were the night, if I were the ocean or let the students freely think and create. Give the students a few minutes to think in silence. Each student participates in two or three words in turn, according to the teacher's instructions. | |
| Relaxing Exercises |  42 - The Bottom of the Sea 42 - The Bottom of the Sea Show a YouTube video of the bottom of the sea with relaxing music. Ask each student to sit in their seat in the classroom, watch the fish move and relax, then close their eyes and imagine themselves as a little fish swimming calmly and peacefully at the bottom of the sea. Talk to the class about what they have watched and heard. | |
| Relaxing Exercises |  43 - Love Nature 43 - Love Nature Students watch a relaxing video with sounds and images from nature. After the video they share what they saw and heard and whether the contact with nature had a relaxing effect on them. https://youtu.be/4WO_p9YD30Q Duration – 5 min. | |
| Relaxing Exercises |  44 - Guided walking in a forest 44 - Guided walking in a forest Close your eyes and imagine you are walking in a forest. Feel a sense of calm and peace wash over you with each step you take. Imagine the sounds and the smells of the forest. | |
| Relaxing Exercises |  45 - Guided fantasy with dinosaurs 45 - Guided fantasy with dinosaurs Close your eyes and take a deep breath in. Slowly exhale and feel your body relax. Imagine that you are in a lush, green prehistoric landscape filled with tall trees, colourful plants, and the distant sounds of gentle dinosaur calls. In your mind, picture a gentle, friendly dinosaur, like a Brachiosaurus or a Triceratops, peacefully grazing or moving through the landscape. Notice the dinosaur’s size, shape, and the way it moves slowly and gracefully. Imagine the texture of its skin and the calm look in its eyes. Relax the most during this exercise. | |
| Relaxing Exercises |  46 - Find my friends 46 - Find my friends Close your eyes and imagine that you and your friends are the last dinosaurs on Earth. You are a pterosaur, a flying dinosaur. Imagine that you are calmly flying on ancient Earth trying to find your friends. | |
| Relaxing Exercises |  47 - Last dinosaurs 47 - Last dinosaurs Close your eyes and imagine that you and your friends are the last dinosaurs on Earth. You are a pterosaur, a flying dinosaur. Imagine that you are calmly flying on ancient Earth trying to find your friends. | |
| 29 | |||
| | |||
| Activities
|  | ||
| 30 | ||
| | ||
| Grade 1
| ||
| 31 | |||||||||||||||||||||||||||||||||||||||||||||||||||||
| | |||||||||||||||||||||||||||||||||||||||||||||||||||||
| 1 |  Grade 1 / Healthy lifestyle Grade 1 / Healthy lifestyle | ||||||||||||||||||||||||||||||||||||||||||||||||||||
| Developed by | Prosveta-Sofia Foundation | ||||||||||||||||||||||||||||||||||||||||||||||||||||
| Grade | 1 | ||||||||||||||||||||||||||||||||||||||||||||||||||||
| Duration | 65 | ||||||||||||||||||||||||||||||||||||||||||||||||||||
| Energizers | 5 - Fruit and vegetables Students stand in a circle and the teacher distributes randomly pictures of fruits and vegetables (Handout 1, NS_grade1) among students. The teacher puts the two big posters from handout 1 (p.1&2) in opposite corners of the room (poster 1 Fruit; Poster 2 Vegetables). Step1: On ‘Go!” each student goes to the poster where he/she belongs to considering the picture he/she has received. Step2: On ‘Circle’ students make a circle again and exchange picture cards by handing their card to the student standing on their right. The game continues with Step 1, etc. | ||||||||||||||||||||||||||||||||||||||||||||||||||||
| Relaxing Exercises | 1 - Guided fantasy Students are asked to close their eyes (if comfortable) and, with the guidance of the facilitator, slowly imagine a scene of the past or future event. More and more details are used to describe the event with all senses and thoughts. A suggested brief script could be à Begin by breathing slowly and deeply… Think of yourself in a place where you feel relaxed and at ease… Create all the details in your mind, what do you see… what the sounds are like, the smells and colors of this special place… Are there any people …? | ||||||||||||||||||||||||||||||||||||||||||||||||||||
| Objectives | Students will:
| ||||||||||||||||||||||||||||||||||||||||||||||||||||
| Preparation | Materials 1 potato A knife (to cut the potato) 2 saucers Table salt Water Plasticine Equipment Laptop and projector Preparation for the lesson 1. Make a color copy of all the pages from handout 1 in A4 size. Pages 1 and 2 are the posters for the energizer. Cut the rest of the pages following the grid lines, so that you get small picture cards with either a fruit or a vegetable on each one. If the picture cards are not enough for the students in the class, you can print some of the pages twice. NB You can laminate the picture cards in order to make use of them multiple times during the school year or print them on thick paper. 2. Print the pictures of different foods from handout 2 and cut them along the gridlines. 3. Print the pictures of different activities (personal hygiene habits) from handout 3 and cut them along the gridlines (picture and text). 4. Print handout 4 for each student. | ||||||||||||||||||||||||||||||||||||||||||||||||||||
| Introduction | We all like having fun with our friends, traveling, maybe reading books or watching television, eating delicious foods or simply playing outside. But, what is one very important thing that we need to have in order to do all these activities? It is not having a posh house or wealthy parents and loads of gadgets. It is being healthy. If you are in good health, you can do the activities that make you happy. And being healthy is not a matter of good luck. It depends, to a great extent, on us, on what we do and what we eat. | ||||||||||||||||||||||||||||||||||||||||||||||||||||
| Teaching and learning methods | Problem-based learning Discussion based learning Collaborative learning Case-based learning | ||||||||||||||||||||||||||||||||||||||||||||||||||||
| Interdisciplinary connections | Mathematics: reasoning skills Arts: making foods of plasticine Sports: learning about the importance of sports activities and hardening; practical activity (energizer) | ||||||||||||||||||||||||||||||||||||||||||||||||||||
| Resource teacher or other specialists activities | Almost all the steps of the lesson are comprehensible to most special needs students who have well-preserved cognitive abilities. The lesson does not comprise long written explanations. The role of the special needs teacher is to help target group students in case they are not able to cope with some of the tasks or steps. Modeling with plasticine and playing charade are activities that most students with learning difficulties enjoy a lot. | ||||||||||||||||||||||||||||||||||||||||||||||||||||
| New vocabulary | Hygiene, healthy habits, healthy diet, healthy lifestyle | ||||||||||||||||||||||||||||||||||||||||||||||||||||
| Work Flow |
What you need:
a) Nutrition – eating a variety of foods, especially vegetables and fruit, grains, legumes, dairy products and lean meat and fish. b) Exercise – hardening, sports c) Mental and physical health (e.g. not to be stressed when studying for an exam and not getting sick) – daily routine and personal hygiene Group 1 gets the flash cards from Handout 2 (different foods) or a pack of plasticine (to make the foods) and discusses which ones to include in a daily menu (5-day menu). Group 2 gets the task to brainstorm healthy habits related to sports and hardening and to act them without words as small sketches, e.g. a child pretends to be sleeping in a room with its window being open to have fresh air; a child goes hiking to the mountains during the weekend, or spends the day in the city park riding a bike, etc. Group 3 will organize a charade game for the rest of the class to illustrate the importance of personal hygiene. 15’ 4. The groups present the results of the tasks. 20’ Group 1 presents the daily menu to the class; students take turns to present the menus for the 5 days in groups of 2 or 3, depending on the number of people in the group, so that all students participate, e.g. one person holds the flash cards for breakfast, and the second one explains, for lunch they swap roles, etc.; or students can stick the flash cards on the whiteboard/ flipchart paper and describe the suggested weekly menu. Group 2 participants act the activities they have come up with, and the rest of the class have to guess what the representative of Group 2 have acted. Group 3 members take their turn to pick up a flash card from Handout 3 (but do not show it to the rest of the class) and act one of the personal hygiene habits. The class has to guess the habit. The teacher pins the flash card on the white board or the wall.
| ||||||||||||||||||||||||||||||||||||||||||||||||||||
| Reflection | Guided discussion: 5’
| ||||||||||||||||||||||||||||||||||||||||||||||||||||
| Notes | Experiment from step 1 https://www.youtube.com/watch?v=LwpgBf6YIDM | ||||||||||||||||||||||||||||||||||||||||||||||||||||
| Digital Resource | Video as a brain teaser Healthy vs. Unhealthy Habits video Healthy habits | ||||||||||||||||||||||||||||||||||||||||||||||||||||
| 32 | |||||||||||||||||||||||||||||||||||||||||||||||||||||
| | |||||||||||||||||||||||||||||||||||||||||||||||||||||
| 2 |  Grade 1 / Diversity in Nature: living and non-living things Grade 1 / Diversity in Nature: living and non-living things | ||||||||||||||||||||||||||||||||||||||||||||||||||||
| Developed by | AECE - Escola Básica da Zona Verde | ||||||||||||||||||||||||||||||||||||||||||||||||||||
| Grade | 1 | ||||||||||||||||||||||||||||||||||||||||||||||||||||
| Duration | 60 | ||||||||||||||||||||||||||||||||||||||||||||||||||||
| Energizers | 13 - Simon says Teacher tells the group that they should follow instructions when he/she starts the instruction by saying “Simon says...”. If the teacher does not begin the instructions with the words “Simon says”, then the group should not follow the instructions! The teacher begins by saying something like “Simon says clap your hands” while clapping their hands. The participants follow. The teacher speeds up the actions, always saying “Simon says” first. After a short while, the “Simon says” is omitted. Those participants who do follow the instructions anyway are ‘out’ of the game. The game can be continued for as long as it remains fun. | ||||||||||||||||||||||||||||||||||||||||||||||||||||
| Relaxing Exercises | 21 - Listening the sounds of Nature Free the room of classroom tables and chairs, leaning them against the walls to make the space spacious. Lying on the floor, the students are invited to close their eyes and silently listen to the sounds of nature, animals and objects, which the teacher has previously selected from YouTube. Once the moment is over, try to get the students to mention the sounds they have identified, the ones they liked the most or not, etc. | ||||||||||||||||||||||||||||||||||||||||||||||||||||
| Objectives | In the end of the lesson students should be able to:
| ||||||||||||||||||||||||||||||||||||||||||||||||||||
| Preparation | Materials:
Pre-preparation of the lesson: Line a classroom noticeboard with scenery paper, draw a line, dividing it in half and write the title living things on one part and non-living things on the other. Preparation of the lesson Suggest to students in a Study Support lesson or Art Education lesson – a visual arts activity.Explore magazines, leaflets, school books that are no longer in use and cut out images, of what they understand, about living beings and non-living elements. Ask them to cut out as many pictures as possible and not to repeat images. Each student keeps his / her cut-outs in a bag or envelope made from a sheet of magazine and writes their name on it. | ||||||||||||||||||||||||||||||||||||||||||||||||||||
| Introduction | Based on themes and/or issues related to living beings, arising from the students’ observation of their direct reality, experiences and disciplinary and non-disciplinary knowledge, the contents inherent in the plan will be worked in a sequenced and adjusted way to the different pace and learning profiles. Learners will participate and intervene according to the defined learning models, observing, exploring, researching, performing..., using the appropriate means and instruments to understand, consolidate and achieve the proposed objectives. | ||||||||||||||||||||||||||||||||||||||||||||||||||||
| Teaching and learning methods |
| ||||||||||||||||||||||||||||||||||||||||||||||||||||
| Interdisciplinary connections | Mother tongues– Reading and comprehension; Identifying essential information in oral texts on familiar topics. Showing curiosity and making judgements about what is heard. Discovering and understanding the meaning of words through the multiple relationships they can establish with each other. Discovering the meaning of unknown words from the verbal and non-verbal context. Maths - Recognising and applying the steps of the problem-solving process. Solving a problem from a given situation, in different contexts; Classifying objects according to their characteristics. Artistic Education - Visual Arts. Demonstrating expressive and creative skills in their plastic productions, showing the knowledge acquired. Producing dialogues about what they see and feel, in order to build multiple discourses and readings of reality(ies). Citizenship and Development - Sustainable Development; Environmental Education. | ||||||||||||||||||||||||||||||||||||||||||||||||||||
| Resource teacher or other specialists activities | All steps of the topic exploration are understandable for pupils with specific needs but with cognitive abilities. The lesson does not include long written explanations. The role of the support or special education teacher is to help pupils in the target group if they are unable to complete any of the tasks or steps, or feel disorientated in understanding something that may be being asked. | ||||||||||||||||||||||||||||||||||||||||||||||||||||
| New vocabulary | Living beings; non-living elements; plant living beings, animal living beings; farm animals, wild animals; pets; basic needs; characteristics. | ||||||||||||||||||||||||||||||||||||||||||||||||||||
| Work Flow | 1st STEP Promote a large group moment, involving pupils in answering the following questions:
It is important to emphasise that the questions are not intended to lead pupils to the exact answers at this point, but to stimulate discussion and reflection by drawing on prior knowledge. 2nd STEP Pair Work: Observe the result with the class, confirm and correct if necessary. 3rd STEP The whole class: Is it possible to see living things and non-living things in the same environment where we live? Involve pupils in a moment of sharing (those who want to) their experiences, giving them space to name living beings and non-living elements that exist in their home, in their street or even that they identify as existing in the school. 4th STEP Pair Work: Identify some of the most common animals in the neighbourhood: wild animals; farm animals and pets; Provide pictures of each type of animals. Each pair of students goes to a table in the room where there are several cards with pictures of different animals. Let the students select the cards according to their opinion what a pet, a farm or wild animal is. Finally, in turns the pairs show the whole class the pictures identifying the animals, what they are and where they live ... (Appendix 1). 5th STEP Individual or Pair Work: According to the students’ degree of autonomy, they should use their individual computers with internet connection. With the suggested activity on the wordwall, (Appendix 2) students should recognise needs and some care for plants and animals. 6th STEP This activity can be developed later in articulation with the Art Education Visual Arts lesson. Involve students in the construction of a model/scenario with living beings and non-living elements using plasticine modelling and/or waste material to model living and non-living beings in their habitats. | ||||||||||||||||||||||||||||||||||||||||||||||||||||
| Reflection | Guided discussion: What was the most important thing you think you have learnt today? Which activity did you enjoy the most?
| ||||||||||||||||||||||||||||||||||||||||||||||||||||
| Notes | https://wordwall.net/pt/resource/61667777/needs-and-care-of-the-living-beings-1 https://wordwall.net/pt/resource/61667770/needs-and-care-of-the-living-beings-2 https://wordwall.net/pt/resource/61667716/needs-and-care-of-the-living-beings-3 | ||||||||||||||||||||||||||||||||||||||||||||||||||||
| Digital Resource | |||||||||||||||||||||||||||||||||||||||||||||||||||||
| 33 | |||||||||||||||||||||||||||||||||||||||||||||||||||||
| | |||||||||||||||||||||||||||||||||||||||||||||||||||||
| 3 |  Grade 1 / Changes in Nature According to the Seasons Grade 1 / Changes in Nature According to the Seasons | ||||||||||||||||||||||||||||||||||||||||||||||||||||
| Developed by | Antalya Directorate Of Education | ||||||||||||||||||||||||||||||||||||||||||||||||||||
| Grade | 1 | ||||||||||||||||||||||||||||||||||||||||||||||||||||
| Duration | 60 | ||||||||||||||||||||||||||||||||||||||||||||||||||||
| Energizers | 15 - Animal roundup The teacher tells to the class to silently think of an animal. Then he/she tells to the group that without talking, they need to arrange themselves on a line from largest to smallest animals. Group members can only make gestures and the noise of their animal. After they have finished, teacher ask to the students to say the animal they were supposed to be to see if the order is correct. | ||||||||||||||||||||||||||||||||||||||||||||||||||||
| Relaxing Exercises | 22 - Soap Bubbles By moving tables and chairs out of the classroom or using the gymnasium, put on some relaxing music/nature sounds through the computer and ask the children to distribute them around the room. Randomly give the students pieces to make soap bubbles, asking them to control their breathing in order to blow/make big soap bubbles that do not burst as soon as they start blowing. The students should remain in silence, concentrated on the music and breathing calmly moving around the space, observing the soap bubbles. | ||||||||||||||||||||||||||||||||||||||||||||||||||||
| Objectives |
| ||||||||||||||||||||||||||||||||||||||||||||||||||||
| Preparation | Materials:
| ||||||||||||||||||||||||||||||||||||||||||||||||||||
| Introduction | Begin the lesson by asking the students about the current month and which season it is. Listen to their answers and engage in a brief discussion about the season. Introduce the topic of changes in nature during the four seasons and pique the students' curiosity by asking if they would like to learn more about these changes | ||||||||||||||||||||||||||||||||||||||||||||||||||||
| Teaching and learning methods | Learning by Doing: Hands-on activities will allow students to actively explore seasonal changes, deepening their understanding through direct experiences. Painting: Students will express their creativity through painting activities, depicting scenes related to winter, spring, summer, and autumn. Imitating: Role-play and imitation activities will enable students to act out seasonal behaviors, reinforcing their understanding of natural processes. Animating: Simple animations or visual aids will bring seasonal changes to life, helping students visualize the concepts more effectively. | ||||||||||||||||||||||||||||||||||||||||||||||||||||
| Interdisciplinary connections | Art Expression Engage students in a coloring activity related to the seasons. Provide them with coloring materials and ask them to draw scenes depicting the changes they've learned about in nature during each season. Encourage creativity and discussion within the groups. | ||||||||||||||||||||||||||||||||||||||||||||||||||||
| Resource teacher or other specialists activities | The lesson is designed to be accessible for most learners with special needs who have well-preserved cognitive abilities. It avoids lengthy written explanations and complex instructions (TGSt) that could be challenging for the students. During the experiments on seasonal changes, the teacher with special needs can provide support by sitting next to students who may have learning difficulties. | ||||||||||||||||||||||||||||||||||||||||||||||||||||
| New vocabulary |
| ||||||||||||||||||||||||||||||||||||||||||||||||||||
| Work Flow |
Ask students to colour the pictures (Annex 4). Consider the following tips for each season in order to make the activity more engaging; Winter: Use props or instruments to mimic winter sounds like wind blowing, rain tapping, and footsteps on snow. Spring: Create sounds of birds chirping or lambs bleating using simple vocal imitation. Summer: Generate sounds of heat by snapping fingers, and simulate sounds of insects buzzing or water splashing. Autumn: Use props to imitate the sound of falling leaves or rustling winds.
| ||||||||||||||||||||||||||||||||||||||||||||||||||||
| Reflection | Create two or three groups for this activity and ensure you have printed and cut the pictures beforehand (Annex 2). Begin by explaining the game rules in a clear and straightforward manner. Let the students know that they will be matching and pasting the types of clothes depending on the weather. Guide them in classifying and pasting the appropriate clothes for cold and hot weather. Provide support and encouragement as they engage in the activity. | ||||||||||||||||||||||||||||||||||||||||||||||||||||
| Notes | |||||||||||||||||||||||||||||||||||||||||||||||||||||
| Digital Resource | |||||||||||||||||||||||||||||||||||||||||||||||||||||
| 34 | |||||||||||||||||||||||||||||||||||||||||||||||||||||
| | |||||||||||||||||||||||||||||||||||||||||||||||||||||
| 4 |  Grade 1 / The importance of the Sun Grade 1 / The importance of the Sun | ||||||||||||||||||||||||||||||||||||||||||||||||||||
| Developed by | IPSantarem | ||||||||||||||||||||||||||||||||||||||||||||||||||||
| Grade | 1 | ||||||||||||||||||||||||||||||||||||||||||||||||||||
| Duration | 50 | ||||||||||||||||||||||||||||||||||||||||||||||||||||
| Energizers | 27 - Translation movement of the Earth The teacher asks students to group closely within a circle. Then the teacher calls one student and gives them a picture of the sun (annex 1). The student moves to the centre of the circle. Next, the teacher gives another student a picture of the Earth. The Earth student is instructed to perform the movement of the Earth around the sun (a translation movement). The teacher explains the characteristics of the translation movement (fig.1). When the Earth student finishes the translation movement, he/she passes the Earth image to another student, who takes their turn to simulate the Earth’ translation movement, and so on, until all students repeat this movement. The Sun student could also pass the Sun image to other students and so on (fig. 1) | ||||||||||||||||||||||||||||||||||||||||||||||||||||
| Relaxing Exercises | 26 - Guided fantasy on a sunny day Close your eyes and imagine you are on holiday, and the sun is smoothly warming your face. You feel it with all your senses: with your skin you feel the warm air, with your eyes you see the bright colours of the plants and the happy faces of people enjoying the lovely weather, with your nose you smell the blossoming flowers and herbs, with your tongue you taste the delicious summer fruit and vegetables, etc. Express how you feel. (5 min) | ||||||||||||||||||||||||||||||||||||||||||||||||||||
| Objectives | Students will:
| ||||||||||||||||||||||||||||||||||||||||||||||||||||
| Preparation | Materials 1 syringe for each student Green leaves Furadores Water glasses Water Equipment Laptop and projector Preparation for the lesson
| ||||||||||||||||||||||||||||||||||||||||||||||||||||
| Introduction | When we have a sunny day we can do a lot of things, such as playing outside with our friends at school, have a walk or ride a bike. The sun is very important for human health because it helps us to produce vitamins that our body needs for being healthy. However, the sun also influences plants and animals. The sun is important for plant growing and to produce a gas that we use for respiration – oxygen. The daily activities of animals are influenced by the sun: some of them like doing their activities during daylight, whereas others are active when it's dark. In this lesson you are going to understand better the importance of the sun. (5 min) | ||||||||||||||||||||||||||||||||||||||||||||||||||||
| Teaching and learning methods | Inquiry-Based learning Collaborative learning | ||||||||||||||||||||||||||||||||||||||||||||||||||||
| Interdisciplinary connections | Mathematics: reasoning skills Arts: making the sun Sports: learning about the importance of outdoor sports activities; practical activity (energizer) | ||||||||||||||||||||||||||||||||||||||||||||||||||||
| Resource teacher or other specialists activities | Almost all the steps of the lesson are comprehensible to most special needs students who have well-preserved cognitive abilities. The lesson does not comprise long written explanations. The role of the special needs teacher or the assistant teacher is to help target group students in case they are not able to cope with some of the tasks or steps. | ||||||||||||||||||||||||||||||||||||||||||||||||||||
| New vocabulary | Sun, nocturnal animals, diurnal animals | ||||||||||||||||||||||||||||||||||||||||||||||||||||
| Work Flow | Part I | The characteristics of the Sun 20 min.
Fig. 2. Sol (Créditos: NASA Science).
Part II | The influence of the Sun on plants30 min. Now students are going to do an experiment to learn about the influence of the Sun on plants. Divide the students in groups of 3 to 4 students; What you need:
Instructions:
Fig. 3. Parts of a syringe.
Observation: When the leaf disks start to do photosynthesis, they produce oxygen that diminish the density of the leaves. Due to that reason, it is expected that the leaves slowly float in direction to the top of the syringe.
Fig. 4. Initial (1) and final (2) phase of the experiment. Part III | The influence of the sun on animals 15 min
Videos examples: Nocturnal and Diurnal Animals | Grade 4-6 Science | T. Ann - YouTube Nocturnal animals for kids | night animals | creatures of the night | educational video - YouTube The Night Shift – Nocturnal - Animal Instincts - Go Wild - YouTube NOCTURNAL Animal Quiz | For Teachers and Kids | Teaching Resource | Timed Guessing Game - YouTube
Part IV | The influence of the sun on humans 15 min
| ||||||||||||||||||||||||||||||||||||||||||||||||||||
| Reflection | Guided discussion (5 min):
| ||||||||||||||||||||||||||||||||||||||||||||||||||||
| Notes | |||||||||||||||||||||||||||||||||||||||||||||||||||||
| Digital Resource | Annex 3 sen-power.ipsantarem.pt/atividades1/digital/658/Annex3_diurnal_nocturnal_animals.pps Annex 4 sen-power.ipsantarem.pt/atividades1/fotos/658_Annex 4 clock.jpg | ||||||||||||||||||||||||||||||||||||||||||||||||||||
| 35 | ||||||||||||||||||||||||||||||||||||||||||||||||||||||
| | ||||||||||||||||||||||||||||||||||||||||||||||||||||||
| 5 |  Grade 1 / Parts of a plant: root, stem, leaf, blossom, fruit Grade 1 / Parts of a plant: root, stem, leaf, blossom, fruit | |||||||||||||||||||||||||||||||||||||||||||||||||||||
| Developed by | NART | |||||||||||||||||||||||||||||||||||||||||||||||||||||
| Grade | 1 | |||||||||||||||||||||||||||||||||||||||||||||||||||||
| Duration | 60 | |||||||||||||||||||||||||||||||||||||||||||||||||||||
| Energizers | 30 - Living plant The teacher, together with the resource teacher, prepare a box in advance, in which they fold the printed pictograms from Appendix 4 – pictograms for the Living Plant game. The game begins with the teacher choosing one student to play the role of a 'living plant'. The teacher gives an instruction: - I will point a student who will come out in front of the class and will draw a piece of paper from the box. When he/she sees what is on it, they have to name the corresponding part of the plant. The piece will be attached with the help of the teacher to our living plant (the student playing this role). Thus our living plant will be created. The game starts with an instruction: - ............... stand in front, please (names a student from class). Draw out a piece of paper." After drawing out the piece of paper, the student says which part of the plant is shown in the pictogram and with the help of double-sided tape attaches it to the appropriate places on the "living plant" - on the feet/shoes the symbol for roots, on the feet - the symbol for stem, on the hands - for the leaves, on the fingers - for the blossom and fruit. When the "living tree" is completed with all parts after the students have drawn and attached the symbols on the "Living Plant", everyone sings a song with the key words from the lesson (plant, stem, leaf, blossom, fruit) to the Frere Jacques tune/ Are You Sleeping? as to the beat of the melody the students bow to their feet when they sing 'root', point to their feet when they sing 'stem', shake their hands when they sing 'leaf', and their fingers for blossom and fruit. Time - 5 minutes | |||||||||||||||||||||||||||||||||||||||||||||||||||||
| Relaxing Exercises | 31 - I love nature I love nature The teacher gives instruction to the students to close their eyes and while listening to the music try to imagine that they are walking in nature. Teacher asks them to remember what plants there are. Listening to the music lasts about 1 minute. The teacher then gives the floor to a few students to tell what plants they imagined, what they looked like, how big they were, did they have blossoms or were they just leaves. Time – 5 minutes | |||||||||||||||||||||||||||||||||||||||||||||||||||||
| Objectives | Students: - know the parts of plants - root, stem, leaf, blossom, fruit; - know what the functions of the separate parts of plants are; - can indicate the parts of plants by diagram - root, stem, leaf, blossom, fruit; - develop their social skills for working in a team, taking turns with a partner, waiting for a turn, checking their own individual work, independent learning. - develop their communication skills - expression of opinion, communication. | |||||||||||||||||||||||||||||||||||||||||||||||||||||
| Preparation |
| |||||||||||||||||||||||||||||||||||||||||||||||||||||
| Introduction | Teacher tells students: In nature, we meet a variety of plants. They are all around us and they are very wholesome. That’s why they are called the green wealth of the Earth. They also give us joy with their beauty and diversity. They have their similarities and differences. In this lesson, we will learn about the parts of plants, what each one does, and how it helps them grow big and beautiful. | |||||||||||||||||||||||||||||||||||||||||||||||||||||
| Teaching and learning methods | Brainstorming Presentation Working examples Group work Learning through discussion A role-playing game Co-teaching - complementary teaching - a resource teacher works in the group where the SEN student/s are placed. | |||||||||||||||||||||||||||||||||||||||||||||||||||||
| Interdisciplinary connections | Fine art Native language Technology and entrepreneurship Physical education | |||||||||||||||||||||||||||||||||||||||||||||||||||||
| Resource teacher or other specialists activities | The resource teacher, together with the general education teacher, jointly discuss or adapt the presentation, worksheets, tasks and steps in the lesson, as well as the way of including the SEN students in the lesson. The resource teacher supports the student and the group in which the SEN student/students work and, if necessary, develops an adapted version of the worksheets and supports the completion of the tasks of the student/students. | |||||||||||||||||||||||||||||||||||||||||||||||||||||
| New vocabulary | root, stem, leaf, blossom, fruit | |||||||||||||||||||||||||||||||||||||||||||||||||||||
| Work Flow | 1. Update of basic knowledge and introduction of the topic: Appendix 1 - table for sorting plants by type and pictograms to be clipped Appendix 1.1 – images for detection of common parts The teacher says: We will start the lesson with a game. We will divide the class into 3 groups. Each group will receive a worksheet and an envelope with pictograms. The task is to arrange each of the plants in the correct column by sorting them into the corresponding columns of flowers, bushes, trees. After each group has completed their work, choose a student to present the group's work and tell the class what they know about flowers, bushes and trees. Each group is given the first page of the resource as a worksheet, together with an envelope in which the teacher, together with the resource teacher, has previously cut out the pictograms from the second page of the resource. Eliciting the topic by asking the class: – You did great! Now look at the board. You see the pictograms of a flower, a bush and a tree (Appendix 1.1). What can we find in common in the three images? Today we will learn a little more about how plants grow by getting to know their parts and what each of them is responsible for. Time – 5 minutes 3. MP4 Presentation - Appendix 4 - presentation The teacher says: - After we recalled what we know about the plants, what types we know and after we have pointed out some similarities and differences between them, today we will get to know the parts of plants. Let's see what they are and learn what they are for. The teacher gives a presentation and at the same time tells what parts of the plants are and what each of them stands for. The text from the slides is used. Time – 5 minutes 4. Interactive exercise "Parts of plants" The teacher has a choice of two interactive games, according to the specifics of their students. The teacher says: - After learning about the parts of plants, now we will play a game on the board, checking if you have remembered the name of each part of the plant and where it stays. Time – 10 minutes 5. Independent work Appendix 3 - Worksheet for independent work The teacher says: - Now each of you will get a worksheet and you will have to work individually. Colour the plant and its parts and write the name of each part in the notes fields. For SEN students, the task might be colouring and naming the parts of plants. If there are non-verbal students, the task can be transformed and facilitated by the teacher or resource teacher naming the relevant part of the plant and the SEN student pointing it out on the worksheet. Time - 5 minutes 5. Energizing exercise Time - 5 minutes 6. Reflection Time - 4 minutes 7. Homework Appendix 6 - Homework The teacher hands out the first page of the worksheet, specifying that students will receive the second page after returning the completed task - to check their answers. Time – 1 minute | |||||||||||||||||||||||||||||||||||||||||||||||||||||
| Reflection | Appendix 5 - Reflection The teacher says: - To see what we learned today, we will do one exercise. We will see a plant on the board. I will ask you riddles and you will try to guess them. You will write the answers in the notebooks numbered 1 to 5. After students complete the exercise, the teacher opens a second page of the resource to check the answers. Time – 4 minutes | |||||||||||||||||||||||||||||||||||||||||||||||||||||
| Notes | ||||||||||||||||||||||||||||||||||||||||||||||||||||||
| Digital Resource | ||||||||||||||||||||||||||||||||||||||||||||||||||||||
| 36 | |||||||||||||||||||||||||||||||||||||||||||||||||||||
| | |||||||||||||||||||||||||||||||||||||||||||||||||||||
| 6 |  Grade 1 / Body Security: Risk behaviours for individual and collective health and safety Grade 1 / Body Security: Risk behaviours for individual and collective health and safety | ||||||||||||||||||||||||||||||||||||||||||||||||||||
| Developed by | AECE - Escola Básica da Zona Verde | ||||||||||||||||||||||||||||||||||||||||||||||||||||
| Grade | 1 | ||||||||||||||||||||||||||||||||||||||||||||||||||||
| Duration | 60 | ||||||||||||||||||||||||||||||||||||||||||||||||||||
| Energizers | 39 - My body Location: Classroom No. of participants: All students in a class Organisation: Students in a standing circle Materials: None Game description: Start the game with all the students and teacher forming a standing circle. The teacher starts the game by saying the name of a body part. The student next to him/her (it doesn't matter if they're left or right) will place their hand on the body part the teacher says and name another body part and the next student will place their hand on the named body part and so on, until everyone has named a body part and placed a named body part. You mustn't repeat body parts, whoever does it, loses and leaves the game. | ||||||||||||||||||||||||||||||||||||||||||||||||||||
| Relaxing Exercises | 42 - The Bottom of the Sea Show a YouTube video of the bottom of the sea with relaxing music. Ask each student to sit in their seat in the classroom, watch the fish move and relax, then close their eyes and imagine themselves as a little fish swimming calmly and peacefully at the bottom of the sea. Talk to the class about what they have watched and heard. | ||||||||||||||||||||||||||||||||||||||||||||||||||||
| Objectives |
In the end of the lesson students will be able to:
| ||||||||||||||||||||||||||||||||||||||||||||||||||||
| Preparation |
Resources:
Preparation :
| ||||||||||||||||||||||||||||||||||||||||||||||||||||
| Introduction | Approach the different places that students usually stay, such as their homes, the car, the street and the water. Introduce the concept of body safety, explaining that there are dangers in each place/environment and that we need to follow instructions to keep our bodies safe in each environment. We need to be able to identify certain signs that indicate dangerous situations and rules. | ||||||||||||||||||||||||||||||||||||||||||||||||||||
| Teaching and learning methods |
| ||||||||||||||||||||||||||||||||||||||||||||||||||||
| Interdisciplinary connections |
Mother tongue- Select relevant information according to the listening objectives and record them using different techniques. Speak clearly and articulate words appropriately; Art Education - Engaging in dialogue about what they see and feel, in order to construct multiple discourses and readings of reality(ies); Transforming acquired knowledge into new ways of appreciating the world, by comparing images and/or objects. Physical Education - Provide formative activities which, in all situations, create opportunities to: - Cooperate with teammates in the pursuit of personal and group success; - Apply the rules of participation agreed in the class; - Be autonomous when carrying out tasks; Citizenship and Development - Sustainable Development; Environmental Education. | ||||||||||||||||||||||||||||||||||||||||||||||||||||
| Resource teacher or other specialists activities | All the steps in exploring the topic are understandable for students with specific needs with cognitive abilities. The lesson does not include lengthy written explanations. The role of the support or special education teacher is to help the students in the target group if they are unable to carry out any of the tasks or steps, or if they feel disorientated in understanding something that may be asked of them. Identifying and manipulating and handling materials, taking part in games, exploring content by visualising images, etc. are usually well accepted and meet the interests and needs of most students. | ||||||||||||||||||||||||||||||||||||||||||||||||||||
| New vocabulary | Risky behaviour Body safety | ||||||||||||||||||||||||||||||||||||||||||||||||||||
| Work Flow |
1st step - Large group Start the lesson by talking to the students about risky behaviours.
2nd step - Large group Show an interactive powerpoint (Appendix 1) in which the students participate according to the questions and challenges on the topic, representing different environments: the house, the street, the the car and the beach, which the teacher will place on the images with the symbols.
Then he /she confirms if the answers given by the students are correct or not. 3rd step - Individual / Large Group Explore some dangers using printed cards with signs and images of when we are at home, in the street or on the beach (Appendix 2). At the front, in the classroom, there is a table with a set of face down pictures spread randomly. The teacher should allow each student to pick up an image and show it to their classmates, so that everyone can see it. The student with the picture should try to explain what it means. The rest of the classmates listen and then say whether their colleague is correct or not. Whenever necessary the class should help to clarify the meaning of the pictures and they should also say what precautions should be taken to protect themselves. In order to make this activity more attractive, use the digital tool https://spinthewheel.io (by inserting the name of each student) to sort out the students who are coming at front to identify/describe the content and explain the meaning of the pictures by inserting the name of each student. | ||||||||||||||||||||||||||||||||||||||||||||||||||||
| Reflection | In order to lead students to reflect about what they have been learning and to check their comprehension on the subject, ask every student collaboration so that everyone can participate and carry out an interactive Wordwall activity with 2 games:; Safety on the street and in the car; Safety at the beach and at home Game 1: Safety on the street and in the car https://wordwall.net/resource/75978408 Game 2: Safety at at home and the beach https://wordwall.net/resource/75978497 Then at the end of the lesson ask the students the following questions: What was your favourite activity? - Energising activity - Relaxing activity; - Large group activities; - Individual activities; - Interactive activities - WordWall | ||||||||||||||||||||||||||||||||||||||||||||||||||||
| Notes | |||||||||||||||||||||||||||||||||||||||||||||||||||||
| Digital Resource | Appendix 1: https://sen-power.eu/atividades1/digital/864/Appendix 1.pptx Appendix 2: https://sen-power.eu/atividades1/pdf/864_Appendix 2.pdf Digital tool: https://spinthewheel.io | ||||||||||||||||||||||||||||||||||||||||||||||||||||
| 37 | |||||||||||||||||||||||||||||||||||||||||||||||||||||
| | |||||||||||||||||||||||||||||||||||||||||||||||||||||
| 7 |  Grade 1 / Basic needs of the living beings – animals and plants Grade 1 / Basic needs of the living beings – animals and plants | ||||||||||||||||||||||||||||||||||||||||||||||||||||
| Developed by | AECE - Escola Básica da Zona Verde | ||||||||||||||||||||||||||||||||||||||||||||||||||||
| Grade | 1 | ||||||||||||||||||||||||||||||||||||||||||||||||||||
| Duration | 60 | ||||||||||||||||||||||||||||||||||||||||||||||||||||
| Energizers | 38 - Good morning - good afternoon Location: Classroom/Interior No. of participants: All students in a class Organization: Students standing in a circle Material: A blindfold Game description: The teacher draws a student to go into the middle blindfolded. The other students hold hands and walk around the circle. The blindfolded student touches a classmate who has to say "good morning" or "good afternoon". At this point, the blindfolded student tries to find out who their classmate is. If they do, they switch and so on until the teacher decides to keep the game going. | ||||||||||||||||||||||||||||||||||||||||||||||||||||
| Relaxing Exercises | 37 - Animal sounds Use the computer - Youtube - to access the sounds of the animals worked on in class. | ||||||||||||||||||||||||||||||||||||||||||||||||||||
| Objectives |
In the end of the lesson students will be able to:
| ||||||||||||||||||||||||||||||||||||||||||||||||||||
| Preparation |
Resources:
Preparation
Free up the centre of the room for the group dynamics/Energizer | ||||||||||||||||||||||||||||||||||||||||||||||||||||
| Introduction | Students will become aware that there are different living beings, animals and plants. Using photographs, they will realize that living beings have various stages of development and that each stage has different needs. During the lesson they will plant and/or sow plants so that they can follow their growth. | ||||||||||||||||||||||||||||||||||||||||||||||||||||
| Teaching and learning methods |
| ||||||||||||||||||||||||||||||||||||||||||||||||||||
| Interdisciplinary connections |
Mother tongue - Select relevant information according to the listening objectives and record them using different techniques. Speak clearly and articulate words appropriately. Mathematics - Developing an interest in mathematics and appreciating its role in the development of other sciences and areas of human and social activity. Citizenship and Development - Sustainable Development; Environmental Education. | ||||||||||||||||||||||||||||||||||||||||||||||||||||
| Resource teacher or other specialists activities | All the steps in the exploration of the topic are understandable to students with specific needs but cognitive abilities. The lesson does not include lengthy written explanations. The role of the Educational Support or Special Education teacher is to help the students in the target group if they are unable to carry out any of the tasks or steps, or if they feel disoriented in understanding something that may be asked of them; Identifying and manipulating and handling materials, taking part in games, exploring content through the visualisation of images, etc., are usually well accepted and meet the interests and needs of most students. | ||||||||||||||||||||||||||||||||||||||||||||||||||||
| New vocabulary | Living beings Stages of life Basic needs | ||||||||||||||||||||||||||||||||||||||||||||||||||||
| Work Flow | 1st step - Large group Start the lesson by talking to the students about what living beings are. BEINGS THAT ARE BORN, EVOLVE... Show powerpoint images of the different stages of development of living beings (Appendix 1). 2nd step - Large group Explore the basic needs that living beings have at different stages of their lives using word images (Appendix 2). Involve the students in each image, asking what type of need the image corresponds to and who it is aimed at. EX: Seeds are food for birds and some animals, emphasising that food is a basic need that can differ from living being to living being. Water and rest/sleep is a basic need for all living beings and light for the vast majority of living beings. The reference to plants is associated with earth, water and light. With regard to milk, emphasise the importance of this food throughout life, especially for humans, but also for many baby mammals. Move on to the presentation (Appendix 3), to point out how needs vary according to life stage, especially in babies. 3rd Step -Groupwork Form 4 groups and give each group a sheet (appendix 4) with the evolution of a plant that is different for each group. Ask the students to cut out the images and organise their evolution correctly, pasting them onto the white sheet of paper provided. 4th step - Large group Give students the opportunity to take part in sowing or planting a plant. Once the work has been completed, place the pot in a sunny, well-ventilated area of the room. Don't forget to water after the task has been completed and whenever necessary, as this is one of the precautions to be taken throughout the development and growth of the plants, reinforcing that it is a necessary precaution for the seeds to grow (water, sunlight). Emphasise the similarity between plant growth and the development of living beings. Each student can record the experiment by drawing and illustrating as they can , in this lesson or at another time that the teacher sees fit. | ||||||||||||||||||||||||||||||||||||||||||||||||||||
| Reflection | Briefly reflect with the students on the evolution of living beings and the importance of basic needs for their growth and development. Reinforce the idea that all living beings need to be cared for at all stages of development and that they must be respected. What was your favourite activity? - Relaxation activity; - Group dynamics - Game; - The large group activities; - The small group activity; - Planting the seed or plant. | ||||||||||||||||||||||||||||||||||||||||||||||||||||
| Notes | |||||||||||||||||||||||||||||||||||||||||||||||||||||
| Digital Resource | Appendix 1: https://sen-power.eu/atividades1/digital/865/Appendix 1.pptx Appendix 2: https://sen-power.eu/atividades1/pdf/865_Appendix 2.pdf Appendix 3: https://sen-power.eu/atividades1/pdf/865_Appendix 3.pdf Appendix 4: https://sen-power.eu/atividades1/pdf/865_Appendix 4.pdf | ||||||||||||||||||||||||||||||||||||||||||||||||||||
| 38 | |||||||||||||||||||||||||||||||||||||||||||||||||||||
| | |||||||||||||||||||||||||||||||||||||||||||||||||||||
| 8 |  Grade 1 / Recycling Grade 1 / Recycling | ||||||||||||||||||||||||||||||||||||||||||||||||||||
| Developed by | Antalya Directorate Of Education | ||||||||||||||||||||||||||||||||||||||||||||||||||||
| Grade | 1 | ||||||||||||||||||||||||||||||||||||||||||||||||||||
| Duration | 60 | ||||||||||||||||||||||||||||||||||||||||||||||||||||
| Energizers | 13 - Simon says Teacher tells the group that they should follow instructions when he/she starts the instruction by saying “Simon says...”. If the teacher does not begin the instructions with the words “Simon says”, then the group should not follow the instructions! The teacher begins by saying something like “Simon says clap your hands” while clapping their hands. The participants follow. The teacher speeds up the actions, always saying “Simon says” first. After a short while, the “Simon says” is omitted. Those participants who do follow the instructions anyway are ‘out’ of the game. The game can be continued for as long as it remains fun. | ||||||||||||||||||||||||||||||||||||||||||||||||||||
| Relaxing Exercises | 9 - Lion's breath Lion’s breath is a playful way to release and relax into more peaceful feelings. The trainer tells students that they are going to do a breath called the lion’s breath in order to let go of feelings or thoughts we no longer want. This breath is very helpful in getting those ideas out of us and pushing them far away. Instructions
| ||||||||||||||||||||||||||||||||||||||||||||||||||||
| Objectives |
| ||||||||||||||||||||||||||||||||||||||||||||||||||||
| Preparation | Materials:
| ||||||||||||||||||||||||||||||||||||||||||||||||||||
| Introduction | The teacher could start the lesson by saying: Before we dive into today's lesson, I'd like to draw your attention to something. As you can see, our classroom rubbish bin is overflowing. This raises a couple of questions: Why is there so much rubbish, and what can we do to prevent it? Let's take a moment to discuss. Why do you think our rubbish bin is filling up so quickly? What are some ways we can reduce the amount of waste we generate? Now, I want you to imagine something with me. Close your eyes for a moment and picture our world transformed into a massive pile of rubbish. It's not a pleasant image, is it? But don't worry, today we're going to explore ways to prevent this scenario from becoming a reality. Are you curious to learn more about how we can combat this issue? Let's embark on this journey together and discover what steps we can take to protect our planet from becoming buried in waste. | ||||||||||||||||||||||||||||||||||||||||||||||||||||
| Teaching and learning methods | Learning by Doing: Hands-on activities will enable students to actively explore recyclable materials and deepen their understanding through direct experiences. Colouring: Students will express their creativity by painting scenes of children throwing rubbish into the required bins. Imitation: Through role-playing and imitation activities, students will understand the value of finite resources and empathise with endangered species. Animation: Simple animations or visual aids will help students visualise concepts more effectively by bringing the recycling adventure to life. | ||||||||||||||||||||||||||||||||||||||||||||||||||||
| Interdisciplinary connections | Literature | ||||||||||||||||||||||||||||||||||||||||||||||||||||
| Resource teacher or other specialists activities | The lesson is designed to be accessible for most learners with special needs who have well-preserved cognitive abilities. It avoids lengthy written explanations and complex instructions (TGSt) that could be challenging for the students. During the activities, the teacher with special needs can provide support by sitting next to students who may have learning difficulties. | ||||||||||||||||||||||||||||||||||||||||||||||||||||
| New vocabulary |
| ||||||||||||||||||||||||||||||||||||||||||||||||||||
| Work Flow |
| ||||||||||||||||||||||||||||||||||||||||||||||||||||
| Reflection | "If we don't finish this activity in class, we'll continue it together as a fun storytelling game! We'll create a story about a tree's life cycle. I'll start the story, and then each of you will get a turn to add a sentence. Let's begin: Once upon a time, there was a tiny seed buried in the soil. It felt warm and cozy underground. One day, it started to grow into a small sprout reaching for the sunlight... Now, it's your turn! Add a sentence about what happens next. We'll go around the room and see how our tree grows into a majestic tree in the forest and eventually transforms into paper. Remember to think about the environment and how everything in nature is connected. Let's use our imaginations and have fun telling the story together!" | ||||||||||||||||||||||||||||||||||||||||||||||||||||
| Notes | |||||||||||||||||||||||||||||||||||||||||||||||||||||
| Digital Resource | |||||||||||||||||||||||||||||||||||||||||||||||||||||
| 39 | |||||||||||||||||||||||||||||||||||||||||||||||||||||
| | |||||||||||||||||||||||||||||||||||||||||||||||||||||
| 9 |  Grade 1 / Healthy foods and beverages Grade 1 / Healthy foods and beverages | ||||||||||||||||||||||||||||||||||||||||||||||||||||
| Developed by | Antalya Directorate Of Education | ||||||||||||||||||||||||||||||||||||||||||||||||||||
| Grade | 1 | ||||||||||||||||||||||||||||||||||||||||||||||||||||
| Duration | 60 | ||||||||||||||||||||||||||||||||||||||||||||||||||||
| Energizers | 40 - Who am I? Location: Classroom No. of participants: All the students in a class Organisation: Students get into groups in pairs. Materials: woollen yarn; pieces of cardboard or paper with animal and plant figures printed on them to put around each student's neck. Discovering animals and plants; Materials: woollen thread and drawings of animals and plants. Procedures: Each pupil puts a piece of yarn round their neck with a name tag and a drawing/figure of an animal/plant facing their back. In pairs they will ask each other questions to find out which animal or plant it represents. The number of questions should be agreed beforehand. Ex: Badge with a drawing of an apple tree with apples. Questions: Is it a plant or an animal? Animal Is it a small or large plant? Large Does it bear fruit? Yes Are the fruits red? Yes Are they apples? Yes The tree is called an apple tree. | ||||||||||||||||||||||||||||||||||||||||||||||||||||
| Relaxing Exercises | 38 - Hands and Arms To the sound of calming/relaxing music, the students sit in their seats in the classroom and pretend they have a whole lemon in their left or right hand and the other hand over the one holding the lemon. The teacher will give the instructions: Now squeeze hard. Try to squeeze all the juice out of the lemon. Feel the force in your hands and arms as you squeeze. Now drop the lemon. Notice how your muscles feel when they're relaxed. Now take another lemon and squeeze it, again using one hand over the other. Try to squeeze this one harder than you did the first one. That's it! With force! Don't let a single drop remain. Squeeze hard. Now drop the lemon and relax. Notice how much better your hands and arms feel when they're relaxed. All right! | ||||||||||||||||||||||||||||||||||||||||||||||||||||
| Objectives | - Students will learn to identify various healthy foods and beverages. - Students will understand the benefits of choosing healthy foods. - Students will apply their knowledge through matching and artistic activities. | ||||||||||||||||||||||||||||||||||||||||||||||||||||
| Preparation | Materials: Annex 1: Poster with various foods
Annex 2: Matching Activity
Annex 3: Competition Materials
Annex 4: Artistic Activity Materials
Annex 5: Review Activity
Annex 6: Final Activity Materials
Annex 7: Prepared Slides for Presentation
| ||||||||||||||||||||||||||||||||||||||||||||||||||||
| Introduction | To start the lesson, engage students in a discussion about their favorite foods and drinks. Listen carefully to their responses and facilitate a brief conversation about healthy and unhealthy choices. Next, introduce the topic of how nutrition affects our bodies. You can say, "Today, we're going to talk about something very important: nutrition. What we eat plays a big role in how our bodies work, and not getting the right nutrients can cause serious problems. Malnutrition happens when our bodies don't get enough of the essential nutrients or get too much of the unhealthy ones. This can affect our energy levels, immune system, growth, and overall well-being. Throughout today's lesson, we'll explore how malnutrition can affect us and why it's important to make healthy food choices." Encourage students to share their thoughts on the potential effects of consistently poor eating habits. Then, ask students to brainstorm ideas about healthy eating practices. You could say, "Before we start our discussion, let's think about something very important: our health. Eating well is a big part of staying healthy. So, let's brainstorm together about what it means to eat healthily. What foods do you think are good for you, and why? How do you think our food choices affect our bodies and minds? Let's share our ideas as we talk about the importance of nourishing ourselves in a way that helps us stay healthy." Highlight the connection between nutrition and overall well-being, explaining how food choices can affect energy levels, mood, and overall vitality. Offer support and guidance, and let students know you're there to help them make healthy choices if they need it.
| ||||||||||||||||||||||||||||||||||||||||||||||||||||
| Teaching and learning methods | Learning by Doing: Hands-on activities will enable students to explore healthy and unhealthy foods and deepen their understanding through direct experiences. Matching: Students will be able to match healthy and unhealthy foods for the food and drink options they encounter. Reasoning: making predictions about how the foods they eat and drink will affect their bodies in the long term will improve their prediction skills. | ||||||||||||||||||||||||||||||||||||||||||||||||||||
| Interdisciplinary connections | Art | ||||||||||||||||||||||||||||||||||||||||||||||||||||
| Resource teacher or other specialists activities | - For SEN students, provide additional visual aids and simplified instructions. - Offer one-on-one support during activities and ensure that instructions are clear and accessible. - Use positive reinforcement to encourage participation and engagement.. | ||||||||||||||||||||||||||||||||||||||||||||||||||||
| New vocabulary |
| ||||||||||||||||||||||||||||||||||||||||||||||||||||
| Work Flow | Step 1: Poster Discussion (10 minutes)
Step 2: Matching Activity (10 minutes)
Step 3: Competition (15 minutes)
Instructions for the Activity:
Step 4: Artistic Activity (15 minutes)
Step 5: Review Activity (10 minutes)
Step 6: Final Activity (10 minutes)
| ||||||||||||||||||||||||||||||||||||||||||||||||||||
| Reflection | Guided reflection - suggested questions: Can we use this knowledge to make healthier choices every day? How? Share some practical steps. | ||||||||||||||||||||||||||||||||||||||||||||||||||||
| Notes | |||||||||||||||||||||||||||||||||||||||||||||||||||||
| Digital Resource | |||||||||||||||||||||||||||||||||||||||||||||||||||||
| 40 | |||||||||||||||||||||||||||||||||||||||||||||||||||||
| | |||||||||||||||||||||||||||||||||||||||||||||||||||||
| 10 |  Grade 1 / Reading tree rings; parts of plants Grade 1 / Reading tree rings; parts of plants | ||||||||||||||||||||||||||||||||||||||||||||||||||||
| Developed by | Prosveta-Sofia Foundation | ||||||||||||||||||||||||||||||||||||||||||||||||||||
| Grade | 1 | ||||||||||||||||||||||||||||||||||||||||||||||||||||
| Duration | 60 | ||||||||||||||||||||||||||||||||||||||||||||||||||||
| Energizers | 3 - Amoeba An evolution game! Everyone starts off as an amoeba, with the purpose of evolving to a human. All students walk around acting like an amoeba and when they meet with another amoeba, they play one round of rock/paper/scissors. Whoever wins evolves into a worm. When two worms meet they play again rock/paper/scissors and whoever wins turns into a wasp, but whoever loses goes back to becoming an amoeba. This continues until one becomes human. The evolution stages are: amoeba à worm à wasp à chicken à monkey à human. | ||||||||||||||||||||||||||||||||||||||||||||||||||||
| Relaxing Exercises | 7 - Strong as a plant All students spread out in the room and imagine they are plants (eg tulip, grass, oak, pine tree, etc.) but don’t tell the others what plant they are. They listen to the audio recording and with their actions imitate the movements of the plant in different weather conditions (rain, wind, storm, snow, calm weather, etc.) *The teacher plays the sounds from Annex 1 while students complete the activity. | ||||||||||||||||||||||||||||||||||||||||||||||||||||
| Objectives |
| ||||||||||||||||||||||||||||||||||||||||||||||||||||
| Preparation | Preparation
Equipment
| ||||||||||||||||||||||||||||||||||||||||||||||||||||
| Introduction | Two children stand up and go to the front. Pre-cut tree leaves are attached to their hands with clothes pegs or paper clips. The two children are instructed to perform movements characteristic of trees. The rest of the class name the different parts of the tree. | ||||||||||||||||||||||||||||||||||||||||||||||||||||
| Teaching and learning methods | Discussion Group work Individual work | ||||||||||||||||||||||||||||||||||||||||||||||||||||
| Interdisciplinary connections | Mathematics (Step 2) Getting to know the world (Step 3) Mother tongue – communication skills Physical education (relaxing activity) | ||||||||||||||||||||||||||||||||||||||||||||||||||||
| Resource teacher or other specialists activities | The lesson is designed to be accessible to students with special needs who have well-preserved cognitive abilities. It lacks long written explanations and complex instructions that can be challenging for them. In the course of the lesson, activities related to physical activity and activities that are carried out on the spot alternate. Various manipulatives are used, with the help of which students will learn more effectively. | ||||||||||||||||||||||||||||||||||||||||||||||||||||
| New vocabulary | Dendrochronology - the science that studies tree trunk rings. | ||||||||||||||||||||||||||||||||||||||||||||||||||||
| Work Flow | Step 1 The lesson begins with a discussion about plants. The teacher asks questions guiding students to demonstrate knowledge about plants and their parts: 1. What are the living organisms in our world? (animals and plants); 2. What is the difference between animals and plants? (e.g. animals move independently, but plants do not); 3. Discussion of plant and animal nutrition. 3.1. Do animals need food? How do they get it? 3.2. Do plants need food? How do they get it? 4. Plant parts. 4.1. Can plants move from one place to another on their own? Why? (Use slide 2, Annex 2) What part holds them together? (part E) What is this part called? 4.2. Discussion – suggested questions: ● Can some parts of plants move without external forces? (no); ● Some plant parts can move is subjected to external forces. In what cases does this happen? (wind, rain, storm ...); ● Which parts can move in these cases? (A, B, C, D – stem, leaves, flowers, fruits). If students face difficulties answering the questions, they can look at the plants in the classroom or in the school yard. 5. Game - parts of plants https://wordwall.net/resource/72361010 Step 2 – Rings in tree trunks Introduction: You’re walking through the woods or on a street in your neighbourhood, and you come upon a giant oak towering above your head. This majestic tree, you think, could have been standing here when your grandparents were born, or even earlier. But how can you know for sure? Getting the answer, it turns out, is not trivial, but we will learn how you find out a tree’s age. Answering this question has spawned an entire field of science: dendrochronology.
The sample is very thin and the tree easily recovers after extracting it.
The class is divided into 7 groups. Each group receives a printout of the cross section of а tree and а table where they have to fill in the information about “My tree”. (Handout 3)
Each group reports the results of their research while the teacher shows the corresponding cross-section on the screen. Step 3 As an additional task (which can be done at home or as part of another lesson), students could think how the different parts trees are used by people. They can brainstorm the topic or play the game https://wordwall.net/resource/72363812 | ||||||||||||||||||||||||||||||||||||||||||||||||||||
| Reflection | Activity 1: The teacher arranges the pictures with images of the different parts of the plants with the images facing down (Handout 4). Each student chooses a picture card and starts walking around the room with it. When prompted, students should form groups to graphically arrange a plant (eg root, stem and branches or root, stem and leaf(s), or root, stem, leaves and blossom, etc.). Each group that has made a plant describes its constituent parts to the others. If there are plants without leaves, blossom and fruits, the participants explain whether their appearance is imminent or the plant has no fruits. Activity 2: A long straight line is drawn on the floor (or a rope is placed that has a knot right in the middle). Emoticon signs (a smiling face and a frowning face) are placed at both ends. The teacher begins to list the activities during the lesson (the energizing activity "Amoeba", the discussion and computer game "Parts of plants", the activity of reading the information encoded in the rings of tree trunks, the computer game from the additional task of step 3 (if done during the lesson) and the relaxing activity "I am a plant") and students provide feedback about the corresponding activity by taking a position along the line (rope) - closer to the smiling emoticon or closer to the frowning one | ||||||||||||||||||||||||||||||||||||||||||||||||||||
| Notes | |||||||||||||||||||||||||||||||||||||||||||||||||||||
| Digital Resource | Annex 1 | ||||||||||||||||||||||||||||||||||||||||||||||||||||
| 41 | |||||||||||||||||||||||||||||||||||||||||||||||||||||
| | |||||||||||||||||||||||||||||||||||||||||||||||||||||
| 11 |  Grade 1 / Classification of plants based on the structure of the stem: trees, shrubs and grasses. Deciduous and coniferous trees. Grade 1 / Classification of plants based on the structure of the stem: trees, shrubs and grasses. Deciduous and coniferous trees. | ||||||||||||||||||||||||||||||||||||||||||||||||||||
| Developed by | Prosveta-Sofia Foundation | ||||||||||||||||||||||||||||||||||||||||||||||||||||
| Grade | 1 | ||||||||||||||||||||||||||||||||||||||||||||||||||||
| Duration | 60 | ||||||||||||||||||||||||||||||||||||||||||||||||||||
| Energizers | 19 - Grab the finger In a circle, place right finger on next person s left palm. Try to grab a finger before yours gets grabbed. After doing several times switch; place left finger on next person s right palm and repeat the process for a few times. | ||||||||||||||||||||||||||||||||||||||||||||||||||||
| Relaxing Exercises | 7 - Strong as a plant All students spread out in the room and imagine they are plants (eg tulip, grass, oak, pine tree, etc.) but don’t tell the others what plant they are. They listen to the audio recording and with their actions imitate the movements of the plant in different weather conditions (rain, wind, storm, snow, calm weather, etc.) *The teacher plays the sounds from Annex 1 while students complete the activity. | ||||||||||||||||||||||||||||||||||||||||||||||||||||
| Objectives | Students will:
| ||||||||||||||||||||||||||||||||||||||||||||||||||||
| Preparation | Preparation
Equipment Laptop and projector | ||||||||||||||||||||||||||||||||||||||||||||||||||||
| Introduction | We are surrounded by living organisms and non-living things. Living organisms are those that feed, grow, develop and reproduce. These are plants, animals and people. Non-living things do not need food, they do not grow and reproduce. Examples of non-living things are rocks, the earth, the objects around us - tables, notebooks, bags, etc. Everything that surrounds us has its place in our lives. Do you think animals or plants are more important in life? Why? Are living organisms or non-living things more important in life? The discussion suggests different opinions, which can be summarized by the conclusion that both living organisms and non-living bodies are important for life on Earth. Did you know that there are planets where there are rocks and mountains (non-living things) but no living organisms? We are lucky to live on the planet Earth, where there are conditions for the existence of living organisms and people. | ||||||||||||||||||||||||||||||||||||||||||||||||||||
| Teaching and learning methods | Team work Field work | ||||||||||||||||||||||||||||||||||||||||||||||||||||
| Interdisciplinary connections | Mathematics: logical thinking Mother tongue: oral communication Fine arts: creating a work of art | ||||||||||||||||||||||||||||||||||||||||||||||||||||
| Resource teacher or other specialists activities | The activities in the lesson are practical and do not imply difficulties in the implementation. In case of problems with communication and teamwork, the resource teacher can complete the tasks individually with the student, then join the corresponding team and present the result of the completed task together with the student. | ||||||||||||||||||||||||||||||||||||||||||||||||||||
| New vocabulary | Coniferous trees Deciduous trees | ||||||||||||||||||||||||||||||||||||||||||||||||||||
| Work Flow | Step 1 – team work (10 min) 1. Students are divided into teams of 4-5 children. Each group receives the cards from Handout 1. Task: Divide the cards into 3 groups - the plants in one group are similar and different from the other groups considering their stem. Students start working and the teacher goes round the teams and asks guiding questions if he/she notices that some images are not placed in the group they belong to, e.g. if the blossoming cherry tree is placed in the same group with the shrubs (because it has flowers, as some of the shrubs have), the teacher remembers the hint that the division into groups is to based on the similarities and differences of the stems. Time for work: 5 min. After the time has elapsed, each group presents the results of their work and tries to formulate the reasons for dividing the images accordingly. The teacher does not comment on whether this was done correctly. 2. Students watch the video from Annex 2 and regroup the images, if needed. Step 2 – types of trees (broad-leaved and coniferous): 15 min 1. Students are divided into 4-5 teams, and each team receives a set of leaves - several of each type. The task is to divide them into 2 groups, taking into account a feature by which the leaves of the group are similar and this feature distinguishes them from the leaves of the other group. Whichever way the division is made, the students tell the rest of the class why they made the division this way. 2. The teacher, with the help of the students, attaches to Poster 1 different leaves (green or herbaceous) in the two columns: deciduous and coniferous. 3. The teacher, with the help of the students, attaches to the Poster 2 different leaves (green or herbaceous) in the two columns: from broad-leaved deciduous trees and from broad-leaved evergreen trees. Step 3 - "I'm a detective!" (fieldwork): 30 min 1. The activity takes place in the school yard (if there are different trees there), in a nearby park or during an outing to the fields/mountains. Each student receives a printout of Handout 3. The first task is to mark the leaves they have found. Task 2 is to circle the leaves of deciduous trees with brown color and the leaves of coniferous trees with green color, but only the marked leaves count. 2. Students collect fallen leaves (if the season is appropriate) which will be used in Step 4. Step 4 - "I am an artist!" (30 min) If students have collected leaves in Step 3, they are asked to make some kind of installation with them – e.g.
| ||||||||||||||||||||||||||||||||||||||||||||||||||||
| Reflection | Every student is provided with one of the cards from Handout 1. The task is to find the group he/she belongs to considering the characteristics of the plant on the card. As a result, students are expected to divide into 3 groups according to the type of stem. After completing the task, each group discusses the common characteristics of the plants in the group and chooses one representative to communicate them to the class. The team members optionally add specific information about the plants from their cards (from personal impressions or from other information channels). | ||||||||||||||||||||||||||||||||||||||||||||||||||||
| Notes | Step 3 could be organized in another lesson or during the lunch break. For Step 4 students need the leaves they have collected in Step 3. If the lesson is delivered in winter or early spring, there will be no leaves available. So, the teacher could organize students at the beginning of the school to collect some leaves and store them in a box, explaining that they will use them later during the school year. | ||||||||||||||||||||||||||||||||||||||||||||||||||||
| Digital Resource | |||||||||||||||||||||||||||||||||||||||||||||||||||||
| 42 | ||
| | ||
| Grade 2
| ||
| 43 | |||||||||||||||||||||||||||||||||||||||||||||||||||||
| | |||||||||||||||||||||||||||||||||||||||||||||||||||||
| 1 |  Grade 2 / Domestic and wild animals. People and animals. Grade 2 / Domestic and wild animals. People and animals. | ||||||||||||||||||||||||||||||||||||||||||||||||||||
| Developed by | Prosveta-Sofia Foundation | ||||||||||||||||||||||||||||||||||||||||||||||||||||
| Grade | 2 | ||||||||||||||||||||||||||||||||||||||||||||||||||||
| Duration | 90 | ||||||||||||||||||||||||||||||||||||||||||||||||||||
| Energizers | 15 - Animal roundup The teacher tells to the class to silently think of an animal. Then he/she tells to the group that without talking, they need to arrange themselves on a line from largest to smallest animals. Group members can only make gestures and the noise of their animal. After they have finished, teacher ask to the students to say the animal they were supposed to be to see if the order is correct. | ||||||||||||||||||||||||||||||||||||||||||||||||||||
| Relaxing Exercises | 6 - Bee breathing The teacher instructs the students to get in a comfortable position to practice bee breathing. They have to imagine that they are sitting on a leaf or a flower petal, to sit straight and allow the leaf or petal to gently support them. The teacher gives students the following instructions: Breathe in, allowing the air to just gently come in through your nose, filling up your lungs. As you breathe out, buzz like a bee. See how long your buzz can last. See how far your bee is going to fly before sitting down and resting again. Buzz. Buzz. Buzz. On the next breath, see if your bee can fly with a loud, strong buzz. On the next breath, see if your bee can fly with a soft buzz. When the exercise is finished, the teacher gives time for a short discussion: Does it feel different with a strong or a soft buzz? How does your body feel? Optional (use if time allows): After breathing practice, draw a picture of a bumblebee and the leaf or flower that you were “sitting on” in your imagination. This picture can be used as a relaxation practice reminder. When you see the picture, practice being like a Bee on a leaf and practice a Bee breath. | ||||||||||||||||||||||||||||||||||||||||||||||||||||
| Objectives | Students will:
| ||||||||||||||||||||||||||||||||||||||||||||||||||||
| Preparation | Materials Flipchart paper Colour pencils and markers Glue Hair clips, or other suitable gadgets, to stick the animal pictures on students’ clothes (act. 4.2.1) Equipment Laptop, projector and loud speakers Preparation for the lesson For the matching game:
| ||||||||||||||||||||||||||||||||||||||||||||||||||||
| Introduction | Teaching children to care for and respect animal life lets them know the importance of being kind to all creatures, whether great or small. Learning kindness to animals at an early age can benefit children as it helps them become better and more compassionate individuals as they grow. | ||||||||||||||||||||||||||||||||||||||||||||||||||||
| Teaching and learning methods | Discussion based learning Collaborative learning Case-based learning Problem-based learning Artistic creation | ||||||||||||||||||||||||||||||||||||||||||||||||||||
| Interdisciplinary connections | Mathematics: reasoning skills, descending order of heights (energizer) Arts: making a poster Active citizenship: planning a Clean up day | ||||||||||||||||||||||||||||||||||||||||||||||||||||
| Resource teacher or other specialists activities | The steps of the lesson are comprehensible to most special needs students who have well-preserved cognitive abilities. There are no long written explanations in the lesson. The role of the special needs teacher is to help target group students in case they are not able to cope with some of the tasks or steps. The acting games are activities that most students with learning difficulties enjoy a lot. | ||||||||||||||||||||||||||||||||||||||||||||||||||||
| New vocabulary | Habitat Domestic and wild animals | ||||||||||||||||||||||||||||||||||||||||||||||||||||
| Work Flow | 1. Guessing game: The teacher randomly chooses a student (by either picking up the name of a student out of a hat where all the names are placed – prior to that all students are asked to write their names on a piece of paper and fold it in 4, or by using the application www.pickerwheel.com ) The student whose name has been chosen comes to the front and picks up a picture card (Handout1 – animal flash cards) and tries to present it by miming (moving around and making the sound of the animal, if any); the other students can ask YES/NO questions only (tip: the first question would be “Are you a wild/domestic animal?”). Rules of the game: Students can ask 5 questions and make 3 guesses in total. If they guess the animal, the teacher sticks the picture on the board. If not, the student returns the picture card on the table. The game can be repeated with other students coming to the front and miming the chosen animal. (5 min.) 2. Matching game: 3 teams. Each team receives a pack of cards (Handout2 - jigsaw pictures of animals) and the two posters created during the preparation stage. The task of each team is to, firstly, match the jigsaw pictures of the animals and glue the pieces on sheets of paper; secondly, the team has to stick each animal on the correct poster depending on whether it is a domestic animal or a wild one. When all teams are ready, they present the results of the collages to the rest of the class.(10 min.) 3. Logical thinking and reasoning. Objective: Students are expected to come to the characteristics of domestic (farm animals and pets) and wild animals on their own. How? By showing them different pictures and videos, or just referring to the posters resulting from the matching game and asking them what the presented animals have in common, whereas the second group of animals don’t, e.g.
A. Pets A.1. Looking after a pet (NFE tool: brainstorming and snowballing): Considering the students’ personal experience or experience with other people’s pets, they answer the question: What does a pet need? Think of the 5 most important things when looking after a pet. Students work in pairs and each pair comes up with a list. Next step is to work in groups of 4 (2 pairs) and agree on the 5 most important things. Final step – a reporter from each group lists the results and the teacher puts them down on the board. Final results will (possibly) comprise food, drink, shelter, medical care and probably love, walks, games, toys, etc.(7 min.) A.2. Benefits for people (discussion): Students share their personal experience with pets – What is good about having a pet? (3 min.) B. Farm animals. B.1. Looking after farm animals: Imagine what it would be like if you weren’t being looked after. What if you couldn’t get a drink when you were really thirsty? Or there wasn’t any food to eat, when you got hungry? It wouldn’t be very nice if you had to stay outside all the time and had nowhere to rest in a place which was dry and comfortable, or had to spend every day on your own. Imagine not being looked after properly when you are feeling ill, being frightened every time you left your classroom or not being able to do the things you want to do? Farm animals need to be looked after just like all living creatures who cannot take care of themselves. How do farmers look after their livestock? Students are divided in 5 groups. In each group 2 or 3 students step in the shoes of farm animals of the same kind (sheep, or cows, or hens, etc.), and the rest of the children belong to the farmer’s team who look after the animals. The children who play the roles of the farm animals receive a picture of the respective animal (Handout 4) and stick it to their clothes. Task: Each team needs to think of a sketch and act it for the class. The story is supposed to illustrate the needs of the animals and how they are (or are not) being taken care on the farm. Instruct the children that each sketch should last some 3 to 4 minutes maximum. Possible sketches for sheep: the sheep live in a farm’s yard and walk freely around; the weather is very hot and they go the bucket to drink water, but there is nothing inside. They start bleating and the farmer comes and pours in some water (or doesn’t come); then, one of the sheep feels ill and the farmer calls/doesn’t a vet to check what’s wrong with it. After each sketch the students discuss if the farm animals have been taken good care of, or what could have been done better. (10 min.) B.2. Benefits for people (brainstorming): When you go to the shops, do you know how many of the things you buy come from animals? Name a few. (The teachers puts down the names of the product children list, and explains that some people choose not to eat animal products at all - these people are called vegans).(5 min.)
A. Teach pupils to clean up litter because they care for animals. Encourage them to clean up any litter that they find on the playground, in the park or in the yard. Explain that stray cats and dogs, foxes and deer, can get poisoned from seemingly innocuous items such as chocolate, cleaning products, batteries. Small birds can choke on small pieces of plastic, while ducks, fish, and other creatures that live in the water can be harmed by plastic soda rings and other trash. Ask students to share any stories they know about cleaning up litter to help animals or cases they know about animals being harmed due to litter. (3 min.) B. Take the initiative to clean up (NFE approaches – learning by doing, discussion, artistic creation): (15 min.) B.1. Watch the video Lilly’s Plastic Pickup. B.2. Plan a similar campaign in your school yard/local park/ neighbourhood. Students can choose between working in a group or planning personal activities like the girl from the video. Students who prefer to work on their own, start planning their activities. The remaining part of the class is divided in big groups of ca. 10 people. The task is to plan a “Clean Up Day”. They have to come up with all the details of the campaign, e.g. what is to be cleaned, what materials/equipment is needed (if any), meeting point, timing, etc.. After agreeing on the details, they have to create a poster to advertise it (or present it) to the rest of the school. | ||||||||||||||||||||||||||||||||||||||||||||||||||||
| Reflection | Guided discussion: (5 min.)
| ||||||||||||||||||||||||||||||||||||||||||||||||||||
| Notes | |||||||||||||||||||||||||||||||||||||||||||||||||||||
| Digital Resource | |||||||||||||||||||||||||||||||||||||||||||||||||||||
| 44 | |||||||||||||||||||||||||||||||||||||||||||||||||||||
| | |||||||||||||||||||||||||||||||||||||||||||||||||||||
| 2 |  Grade 2 / Biodiversity and responsible attitude towards Nature Grade 2 / Biodiversity and responsible attitude towards Nature | ||||||||||||||||||||||||||||||||||||||||||||||||||||
| Developed by | AECE - Escola Básica da Zona Verde | ||||||||||||||||||||||||||||||||||||||||||||||||||||
| Grade | 2 | ||||||||||||||||||||||||||||||||||||||||||||||||||||
| Duration | 60 | ||||||||||||||||||||||||||||||||||||||||||||||||||||
| Energizers | 23 - Building words Students work in pairs and each pair is given a letter from the word "Biodiversity". (Appendix 1) Each letter is numbered, starting at 1 and ending at 14, there are as many numbers as letters. At this stage do not tell the pupils what the word is. Pupils should create a collage of what they understand biodiversity to be by covering each letter with pictures they tear out of plants and animals and the places where they live. Images can be taken from newspapers, magazines, old calendars and tourist brochures. Once the collage is finished, the students will hold the letters with adhesive gum on the previously prepared placard of the room and together READ the constructed WORD. | ||||||||||||||||||||||||||||||||||||||||||||||||||||
| Relaxing Exercises | 22 - Soap Bubbles By moving tables and chairs out of the classroom or using the gymnasium, put on some relaxing music/nature sounds through the computer and ask the children to distribute them around the room. Randomly give the students pieces to make soap bubbles, asking them to control their breathing in order to blow/make big soap bubbles that do not burst as soon as they start blowing. The students should remain in silence, concentrated on the music and breathing calmly moving around the space, observing the soap bubbles. | ||||||||||||||||||||||||||||||||||||||||||||||||||||
| Objectives | In the end of the lesson students should be able to:
| ||||||||||||||||||||||||||||||||||||||||||||||||||||
| Preparation | Materials:
Preparation: 1st Field Research Outgoing: Go out to the green space outside the school with the group/class and observe. Return to the classroom elicit students to talk about what they saw and collectively list on the classroom board what the students say they had observed. 2nd Field Research Outgoing: Afterwards two days later, return to the same green space outside the school with the group / class, with the aim of observing living beings more carefully and in detail: plants and animals, asking students to take a small notebook (made with some sheets of reused paper cut to A5 size and stapled) taking notes of what they observe with words, possible elements to collect and simple drawings. | ||||||||||||||||||||||||||||||||||||||||||||||||||||
| Introduction | It’s important to explore and give emphasis to the theme Biodiversity by promoting the understanding of what it is, since life and the nature survival depend on biodiversity, which guarantees the balance of the planet. From direct observation, experience, or videos, photos/images..., students are able to do a variety of activities and dynamics on the diversity of living beings. Involve students in the knowledge of Biodiversity at the level of animals and plants, learning to identify and protective behaviours towards Nature. | ||||||||||||||||||||||||||||||||||||||||||||||||||||
| Teaching and learning methods |
| ||||||||||||||||||||||||||||||||||||||||||||||||||||
| Interdisciplinary connections | Mother tongue- Select relevant information according to the objectives of listening and record it using different techniques. Speak clearly and articulate words appropriately. Maths - Develop interest in maths and value its role in the development of other sciences and fields of human and social activity. Artistic Education - Dialogue about what students see and feel, in order to build multiple discourses on reading reality(ies); Transform the knowledge acquired into new ways of appreciating the world, through the comparison of images and/or objects. Physical Education - Provide formative activities that, in all situations, create opportunities to: - co-operate with teammates in the pursuit of personal and group success; - apply the rules of participation, agreed in the class; - to be autonomous in the realisation of tasks. Citizenship and Development - Sustainable Development; Environmental education. | ||||||||||||||||||||||||||||||||||||||||||||||||||||
| Resource teacher or other specialists activities | All steps of the topic exploration are understandable for pupils with specific needs but with cognitive abilities. The lesson does not include long written explanations. The role of the support or special education teacher is to help pupils in the target group if they are unable to complete any of the tasks or steps, or feel disorientated in understanding something that may be asked. Identifying and manipulating and handling materials, participating in games, exploring content through visualisation of images, etc. are usually well accepted activities and meet the interests and needs of most students. | ||||||||||||||||||||||||||||||||||||||||||||||||||||
| New vocabulary | Biodiversity; preservation; protection; threats; conservation; responsible attitudes. | ||||||||||||||||||||||||||||||||||||||||||||||||||||
| Work Flow | 1st STEP Pair Work: In pairs in the classroom students give a short presentation on what they have observed, recorded and collected from the 1st field research outgoing. 2nd STEP Pair Work: Use glue, tape or sticky gum to fix the materials on the board. The aim of this activity is to create an image that represents the concept of Biodiversity. 3rd STEP The whole class: Encourage a debate with students about what they understand Biodiversity to be, and its importance for the whole planet. 4th STEP Pair Work: Ask students to make a research in pairs on their computers about the topic: What threatens BIODIVERSITY - Living beings - Plants and animals. Each pair should gather information about the topic and build a concept map on the topic (Appendix 2). 5th STEP Class as a whole: Collective elaboration of an awareness-raising leaflet on BIODIVERSITY (Appendix 3)
| ||||||||||||||||||||||||||||||||||||||||||||||||||||
| Reflection | Guided discussion: Making an interactive activity for assessment, through the free plickers - https://get.plickers.com - Follow directions to use application and print cards (appendix 4) on 120grs weight paper sheet. Print as many cards as the number of students. Questions - The topic we have been studying over the last few weeks is.... - Biodiversity is... - Preserving biodiversity means... - Without biodiversity, we have no... - Humans protect animals and plants when they... Which activity did you enjoy the most? - Going on field research outdoors ; - Relaxation activity ; - Group dynamics ; - The individual and small group activities; - The large group activities; - Research on the computer; - Elaboration of the leaflet; - Other... | ||||||||||||||||||||||||||||||||||||||||||||||||||||
| Notes | |||||||||||||||||||||||||||||||||||||||||||||||||||||
| Digital Resource | Free plickers - https://get.plickers.com https://www.plickers.com/set/64b9b1935b70d410ba2184c6 | ||||||||||||||||||||||||||||||||||||||||||||||||||||
| 45 | |||||||||||||||||||||||||||||||||||||||||||||||||||||
| | |||||||||||||||||||||||||||||||||||||||||||||||||||||
| 3 |  Grade 2 / The human body: Sensory organs Grade 2 / The human body: Sensory organs | ||||||||||||||||||||||||||||||||||||||||||||||||||||
| Developed by | Prosveta-Sofia Foundation | ||||||||||||||||||||||||||||||||||||||||||||||||||||
| Grade | 2 | ||||||||||||||||||||||||||||||||||||||||||||||||||||
| Duration | 60 | ||||||||||||||||||||||||||||||||||||||||||||||||||||
| Energizers | 33 - Ball game This is a game that includes all parts of the body that will be studied in the lesson. Preparation: Move the tables by the walls of the room and divide students into 3 teams; ask the members of each team to linie up behind each other. Put 3 chairs in front of each team, locating them at a distance from each other, so that they play the role of obstacles on the way. You also needed is 3 disposable plates, 3 light plastic balls and a whistle* (to be used as a signal to turn around). Instructions:
* The whistle could be replaced by clapping the hands. | ||||||||||||||||||||||||||||||||||||||||||||||||||||
| Relaxing Exercises | 34 - The world around me You will need handouts for all students. Students take their places and get relaxed listening to the sounds of the music. They are instructed to calm down and think about 5 things they can see, 4 sounds they can hear, 3 tastes they can taste, 2 scents they can smell, 1 thing they can to touch at the moment, and record them in the worksheet (Handout 6_1 or Handout 6_2). | ||||||||||||||||||||||||||||||||||||||||||||||||||||
| Objectives | At the end of the lesson, students will: ● know the parts of the human body and will be able to name them; ● have a responsible attitude towards their body and take care of it; ● know the sensory organs, their functions and their importance for perceiving the surrounding world; ● learn more about the hygiene habits they should follow to protect their senses. | ||||||||||||||||||||||||||||||||||||||||||||||||||||
| Preparation | Equipment: laptop, multimedia, speakers For the energizer: For each of the three teams – 3 chairs, a disposable plate, a light plastic ball and a whistle with which the teacher signals the students to rotate. For the relaxing activty: printed worksheet for each student (Handout 6_1 or Handout 6_2). For Step 1
For Step 4: Handout 3 printed for each team; For Step 5: a flipchart sheet that is graphed similarly to the Sensory Signals worksheet (Poster_workesheet4) (it can also be filled in on the screen as an e-document); For Step 6: presentation (Annex 1, slide 9), book/text written in Braille (if possible to find); For the Reflection – a printed survey card for each student (Handout 5): one page contains 4 survey cards. | ||||||||||||||||||||||||||||||||||||||||||||||||||||
| Introduction | The students analyze and discuss with the teacher the Ball Game (the energizing activity) by:
| ||||||||||||||||||||||||||||||||||||||||||||||||||||
| Teaching and learning methods | Discussion, case study, role play, explanation | ||||||||||||||||||||||||||||||||||||||||||||||||||||
| Interdisciplinary connections | Mother tongue - used all the time when performing the tasks. Physical education - developing students' skills to coordinate their movements during the energizing activity. Music - recognizing a piece of music. | ||||||||||||||||||||||||||||||||||||||||||||||||||||
| Resource teacher or other specialists activities | The worksheet (Handout 6_2) can assist the resource teacher when students work individually on the task in the relaxing activity. In the other steps of the lesson, the resource teacher can support the target group students in the group work tasks and the whole-class activities. | ||||||||||||||||||||||||||||||||||||||||||||||||||||
| New vocabulary | Head, torso, legs, arms, sense organs | ||||||||||||||||||||||||||||||||||||||||||||||||||||
| Work Flow | Step 1 Materials needed: the cardboard circle is pinned to the board; markers for drawing arms, legs, eyes, nose and ears. 1. Narration by the teacher The ball you carried around in the energizing activity told me the story of the Sad Ball you see on the board. A ball was very unhappy that it could not be a human. It wanted to be able to do the same things as the children - to see how beautiful and perfect it is with its round shape, to kick with its feet, to grab things with its hands, to hear the sound of clapping, to feel the taste of chocolate from children's hands and their softness and warmth. Its desire was so strong and its sadness so sincere that the Sun and the Moon, who looked like the ball, but were more powerful, decided to help it. They were strong, but they could not come down to the Earth to help the ball. So, they asked the children for help, because the children were the ones who needed the ball in their games and loved playing with it. 2. The teacher tells the students: Do you want to help the ball together?
3. The teacher sums up the activities: We helped the ball's dream come true. Now let's compare it to the human body.
4. Students think of a name for the ball as its creators. The teacher suggests that they organize and celebrate its first birthday.
You will be split in 5 teams and each team will take on a part of the organization for the birthday party. Five is also the number of the human senses. I will give you five riddles and this is how we will split the responsibilities regarding the organization of the party. The first person to answer the corresponding riddle will have the right to choose their team of four (or more, depending on the number of students in the class). Riddles about the five senses:
In the summer, When sun shines on it Its colours change. What is it? (the skin). The leaders of the 5 teams choose their team members who stand at different locations in the classroom. Teacher: Before the starting the preparations for the birthday party, let's do some gymnastics for the senses! (All students complete the activities) Eyes: Without moving your head, try to see: - the top of your head, - your shoes, - who is to the left and who is to the right, - and if you have completed everything, make a circle with your eyes: look upward, to the right, downward, to the left and upward again. Ears: Put your hands on the earlobes, massage them and gently pull them in different directions - up, down, backward and forward. Nose: Like a police dog, move your nose, sniff-sniff and find all the clues. Tongue: Open your mouth and show your tongue - up, down, right and left; then put it back in the hut. Skin: Show how we should wash our hands.
Team 1’s task is to select only the photos of children playing with a ball (Handout 2). Team 2 has to choose a perfume for the ball. How? You can choose from several aromas - tampons infused with coffee, vinegar and perfume are used. Team 3 will select appropriate music, and you can choose from the 5 songs (and one of the tunes is "Happy Birthday!"). Team 4’s task is to take care of the food and drinks. To do this, you must detect the tastes of chocolate and orange juice, and identify the other tastes. The children of team 4 are blindfolded (with paper strips or disposable masks); the teacher gives the prepared drinks and foods to the children and everyone tries to identify what it is (water, milk, orange juice, biscuit, apple, chocolate, salt). Team 5 has the task of choosing 5 small gifts from the magic box by touching the hidden objects; the paper strips and pieces of paper are for distraction making the task more challenging. * On the box there are pictures of the gift items that Team 5 must find. At the end of the game, the teams present what they have prepared for the Sad Ball’s birthday party at the 5 stations located on different tables in the classroom. Step 2 Whole-class activity
Step 3 Team work At the beginning of the lesson, in the game with the ball in the plate, you were real sports persons. In life, and in sports, all parts of the body have their importance, but in different sports certain parts of the body have a more important role. Let's see if you can identify them. Task:
Step 4 Group work: „Object hunt“ Spot the objects using your five senses! The five teams already know more about the senses, and they can make use them more efficiently to find different objects in the classroom that match certain characteristics as described in Handout 3. The teams fill in their findings in Handout 3. Step 5 Whole-class activity We constantly see different things around us, hear different sounds, smell different scents, feel the objects with our skin, or taste different flavors. When doing so, the sense organs send signals the brain and it takes a decision what to do after our sensation. Let's fill in the table together - signals of the senses. (Poster_workesheet4) (The table can also be filled in as an e-document with the teacher putting down students’ answers.) Step 6 The ball was our hero and we tried to turn it into a person. Now, let’s go back to the beginning of the lesson and imagine it is just an ordinary ball and has no eyes, ears, tongue or nose. Discussion on the life of people with impaired sensory organs: comments on how people with disabilities cope in everyday situations (Annex 1, slide 9). | ||||||||||||||||||||||||||||||||||||||||||||||||||||
| Reflection | Students fill out short questionnaires with questions related to their satisfaction with the lesson. When they are ready, students drop the feedback forms in the opening of the magic box used by Team 5. Printable worksheet (Handout 5). | ||||||||||||||||||||||||||||||||||||||||||||||||||||
| Notes | |||||||||||||||||||||||||||||||||||||||||||||||||||||
| Digital Resource | |||||||||||||||||||||||||||||||||||||||||||||||||||||
| 46 | |||||||||||||||||||||||||||||||||||||||||||||||||||||
| | |||||||||||||||||||||||||||||||||||||||||||||||||||||
| 4 |  Grade 2 / Effect of the movement and shape of the Earth on human life Grade 2 / Effect of the movement and shape of the Earth on human life | ||||||||||||||||||||||||||||||||||||||||||||||||||||
| Developed by | Antalya Directorate Of Education | ||||||||||||||||||||||||||||||||||||||||||||||||||||
| Grade | 2 | ||||||||||||||||||||||||||||||||||||||||||||||||||||
| Duration | 60 | ||||||||||||||||||||||||||||||||||||||||||||||||||||
| Energizers | 20 - Chief of clan Everyone stands in a circle. One participant closes his/her eyes or steps out of the room. He/She will have to guess who is the chief of the clan. One participant volunteers to be the secret Chief (quietly, so the "guesser" can't hear anything). The chief begins an action such as snapping fingers, patting the tummy, or slapping knees, and everyone in the circle imitates him/her. The guesser returns to the room and tries to figure out who the chief is. As the guesser looks around, the chief changes the action avoiding being detected. | ||||||||||||||||||||||||||||||||||||||||||||||||||||
| Relaxing Exercises | 14 - Give me your energy The students stand in a circle. The teacher starts, pretending he/she is holding a ball on the hands and passing it to the student on his/her right; this one do the same, until the ball comes back to the teacher. The ball needs to be passed in a gentle way, as it is very precious. At the second round, the teacher passes the ball to students in another side of the circle, making a gesture and a noise. The students will do the same until everyone will have touched the ball at least once. The ball can be passed in any way (in form of kick, kiss…), pretending it becomes bigger or smaller depending on the will of the students. | ||||||||||||||||||||||||||||||||||||||||||||||||||||
| Objectives | Students will comprehend the formation process of day and night in a simple way. | ||||||||||||||||||||||||||||||||||||||||||||||||||||
| Preparation | Materials needed: Music player and upbeat music/song A globe Paper and pencils for each student Playdough or modeling clay for each student Flashlight A mark or a sticker Preparation Print Annex 2 Equipment Laptop and computer to explain the Earth's rotation and the day-night cycle (Annex 1) Classroom settings Identify some space in the classroom or outside where students can move freely. | ||||||||||||||||||||||||||||||||||||||||||||||||||||
| Introduction | "Earth's Dance Party": Begin by gathering all students in a clear space in the classroom or the school yard. Explain that they are going to participate in an "Earth's Dance Party" to feel the excitement of Earth's movements. Start by demonstrating some simple dance moves that represent Earth's rotation, such as spinning yourself but staying on the same spot to simulate the rotation of the Earth round its axis. Encourage the students to join in and copy your moves. Instruct them to start dancing and spinning around like the Earth when the music starts playinf. They can imagine themselves being planets, gracefully spinning around their own axis, and interacting with their classmates as they dance. Play some upbeat music or a song with a catchy beat to set the mood and get the party started. As the music plays, encourage the students to dance freely, spin around, and interact with each other, just like Earth's magical dance. | ||||||||||||||||||||||||||||||||||||||||||||||||||||
| Teaching and learning methods |
| ||||||||||||||||||||||||||||||||||||||||||||||||||||
| Interdisciplinary connections |
| ||||||||||||||||||||||||||||||||||||||||||||||||||||
| Resource teacher or other specialists activities |
| ||||||||||||||||||||||||||||||||||||||||||||||||||||
| New vocabulary | Rotation: The spinning movement of the Earth around its axis, causing day and night. Axis: An imaginary line running through the center of the Earth, around which it rotates. Day-Night Cycle: The cycle of alternating day and night caused by the Earth's rotation. Sunrise: The moment when the sun appears above the horizon in the morning. Sunset: The moment when the sun disappears below the horizon in the evening. Daytime: The period of the day when the sun is visible and it is bright outside. Nighttime: The period of the day when the sun is not visible, and it is dark outside. Globe: A three-dimensional representation of the Earth. | ||||||||||||||||||||||||||||||||||||||||||||||||||||
| Work Flow | The Earth's marvelous dance: How the Earth's Rotation round its axis affects us
Provide each group with a small ball or modeling clay. Instruct them to mold the clay/dough into a round ball to represent the Earth, or use the balls.
Take the ball (or make a ball with the play dough/clay) and put a small mark or sticker on one of the sides. This is where we are on the Earth. Use a box to create dark environment. This will simulate the darkness of space. Cut a hole on one of the sides of the box. Place the ball on a flat surface within the dark environment. Demonstrate Day and Night: Position the flashlight (representing the Sun) in front of hole cut in the side of the box. Turn on the flashlight and shine it directly on the side of the globe where the mark (the sticker) is. It is daytime on the illuminated side. Observe how the light from the flashlight reaches only one side of the Earth, creating daytime on that side. The opposite side is dark – it is nighttime on that side. But the Earth is constantly moving round its axis. To simulate that movement, students should slowly rotate the ball round its axis, while keeping the flashlight in the same position. They can use their hands to gently rotate the ball, or, in case of using playdough, they can put a stick in the globe and rotate the stick. As they rotate the globe, they will notice how the marked side moves away from the light, creating darkness on that side. The side which is not marked is now illuminated, so it is daytime on the non-marked side. Students are instructed to continue rotating the globe to complete one full rotation and observe that this rotation of the Earth is what causes day and night on our planet. Optional: To demonstrate how day and night cycle for different parts of the Earth, you can use a lamp to represent the Sun and place it at different angles relative to the globe. This will simulate the changing positions of the Sun during the day, creating different time zones. | ||||||||||||||||||||||||||||||||||||||||||||||||||||
| Reflection | Suggested Questions:
Is there anything else you would like to explore further or any questions you have about day and night? | ||||||||||||||||||||||||||||||||||||||||||||||||||||
| Notes | |||||||||||||||||||||||||||||||||||||||||||||||||||||
| Digital Resource | |||||||||||||||||||||||||||||||||||||||||||||||||||||
| 47 | |||||||||||||||||||||||||||||||||||||||||||||||||||||
| | |||||||||||||||||||||||||||||||||||||||||||||||||||||
| 5 |  Grade 2 / Means of transport. Pollution. Grade 2 / Means of transport. Pollution. | ||||||||||||||||||||||||||||||||||||||||||||||||||||
| Developed by | AECE - Escola Básica da Zona Verde | ||||||||||||||||||||||||||||||||||||||||||||||||||||
| Grade | 2 | ||||||||||||||||||||||||||||||||||||||||||||||||||||
| Duration | 60 | ||||||||||||||||||||||||||||||||||||||||||||||||||||
| Energizers | 41 - Means of transport Location: Classroom/Interior No. of participants: All the students in a class Organisation: Students in seated circles With the group sitting in a circle, the teacher says the name of some means of transport and points to one of the students. The chosen student has to say the name of the means of transport they heard and add another one to his/her choice. The classmate next to him/her must say the means of transport already named and add another, and so on, until someone gets the sequence wrong. No means of transport may be repeated. Example: Teacher - car; Student 1 - car and motorbike; Student 2 - car, motorbike and bicycle; Student 3 - car, motorbike, bicycle and scooter and so on. | ||||||||||||||||||||||||||||||||||||||||||||||||||||
| Relaxing Exercises | 39 - Sounds game To the sound of calming/relaxing music, the students sit in their seats in the classroom and pretend they have a whole lemon in their left or right hand and the other hand over the one holding the lemon. The teacher will give the instructions: Now squeeze hard. Try to squeeze all the juice out of the lemon. Feel the force in your hands and arms as you squeeze. Now drop the lemon. Notice how your muscles feel when they're relaxed. Now take another lemon and squeeze it, again using one hand over the other. Try to squeeze this one harder than you did the first one. That's it! With force! Don't let a single drop remain. Squeeze hard. Now drop the lemon and relax. Notice how much better your hands and arms feel when they're relaxed. All right! | ||||||||||||||||||||||||||||||||||||||||||||||||||||
| Objectives |
In the end of the lesson students will be able to:
| ||||||||||||||||||||||||||||||||||||||||||||||||||||
| Preparation | Resources: - Computer with video projector; - Pens for writing on the board; - Students' individual scissors; pencil case, charcoal and coloured pencils and glue. Preparation: - Computer switched on as well as the video projector; - Clean wall chart for the first part of the plan; - A2 cardboard divided into three equal columns - each column should read: LAND TRANSPORT; WATER TRANSPORT; AIR TRANSPORT. The card should be fixed to a wall or board at the height of the students. | ||||||||||||||||||||||||||||||||||||||||||||||||||||
| Introduction | Means of transport are identified according to the environment in which they travel: on land, on water, in the air. Means of transport are the different ways in which people move from one place to another (shorter or longer distances), they are used to move goods, to do services and everything else we need. The importance of means of transport in human life. The advantages of using public transport and non-polluting transport for the environment. | ||||||||||||||||||||||||||||||||||||||||||||||||||||
| Teaching and learning methods |
| ||||||||||||||||||||||||||||||||||||||||||||||||||||
| Interdisciplinary connections |
Mother Tongue- Select relevant information according to the listening objectives and record them using different techniques. Speak clearly and articulate words appropriately. Artistic Education - Engaging in dialogue about what they see and feel, in order to construct multiple discourses and readings of reality(ies); Transforming acquired knowledge into new ways of appreciating the world, by comparing images and/or objects. Citizenship- Sustainable Development; Environmental Education. | ||||||||||||||||||||||||||||||||||||||||||||||||||||
| Resource teacher or other specialists activities | All the steps in exploring the topic are understandable for students with specific needs, with cognitive abilities. The lesson does not include lengthy written explanations. The role of the support or special education teacher is to help the students in the target group if they are unable to carry out any of the tasks or steps, or if they feel disorientated in understanding something that may be asked of them. Identifying and manipulating and handling materials, taking part in games, exploring content by visualising images, etc. are usually well accepted and meet the interests and needs of most students. | ||||||||||||||||||||||||||||||||||||||||||||||||||||
| New vocabulary | Means of Transport; Transport; Public/Collective; Environment; Land Transport; Road, Rail, Water, River; Maritime, Air, Electric Transport. | ||||||||||||||||||||||||||||||||||||||||||||||||||||
| Work Flow | 1st step - Large group Start the lesson by asking the students the following questions:
Divide the board into three columns to record the students' answers - Observe and reflect on the data given by the students. 2nd step - Large group What means of transport are there? Powerpoint presentation (appendix 1) on means of transport. What means of transport there are and how they are classified. With some slides allowing interactivity, as the images appear when you click, involve the students in exploring them. 3rd step - Small groups Divide the class into groups of 5 or 6, depending on the number of students in the class. Give each group a sheet of paper from Appendix 2, which contains images of transport. Ask each group to cut out one of these transports and stick it on a piece of cardboard fixed to a wall or board in the room at the level of the students. The cardboard is divided into three columns, with Land Transport, Water Transport and Air Transport written in each column. The students have to stick the pictures they have cut out into the corresponding column. Once all the pictures have been pasted in, we confirm as a group the diversity of transport and whether everyone has pasted in the correct category. 4th step - Individual. Give each student (who can remain seated in the groups they were in during the previous task) a worksheet (appendix 2 A), and ask them to cut them out and stick them on correctly. At the end of the activity, they can even colour the transports. 5th step Large group Project a new interactive powerpoint (appendix 3) with various challenges: - Why are means of transport necessary? - Which means of transport is best to use? - Why is it important to use public transport, car sharing, cycling and/or scootering and walking? This activity should be put fully in practice with the participation of the students, since the projection presents questions which answers must first be given by the students and then confirmed with the signs 6th step - Individual Ask each student to return to their seat and complete a formative exercise (appendix 4) on the topic they have been working on. 7th step - Individual task - Optional This activity can be carried out at another time or moment. Ask each student to draw a picture on the topic ‘How I get to school’. Although it's a free drawing, students should draw the means of transport they use to get to school. If they walk, that's exactly what they draw, the boy or girl walking with someone... | ||||||||||||||||||||||||||||||||||||||||||||||||||||
| Reflection | What was your favourite activity? - Relaxation activity ; - Group dynamics - Game; - The large group activities; - Interactive presentations. - Cut and paste activities - Individual activities. | ||||||||||||||||||||||||||||||||||||||||||||||||||||
| Notes | |||||||||||||||||||||||||||||||||||||||||||||||||||||
| Digital Resource | Appendix 1: https://sen-power.eu/atividades1/digital/871/Appendix 1.pptx Appendix 2: https://sen-power.eu/atividades1/pdf/871_Appendix 2.pdf Appendix 2A: https://sen-power.eu/atividades1/pdf/871_Appendix 2A.pdf Appendix 3: https://sen-power.eu/atividades1/digital/871/Appendix 3.pptx Appendix 4: https://sen-power.eu/atividades1/pdf/871_Appendix 4.pdf | ||||||||||||||||||||||||||||||||||||||||||||||||||||
| 48 | |||||||||||||||||||||||||||||||||||||||||||||||||||||
| | |||||||||||||||||||||||||||||||||||||||||||||||||||||
| 6 |  Grade 2 / Plants Grade 2 / Plants | ||||||||||||||||||||||||||||||||||||||||||||||||||||
| Developed by | AECE - Escola Básica da Zona Verde | ||||||||||||||||||||||||||||||||||||||||||||||||||||
| Grade | 2 | ||||||||||||||||||||||||||||||||||||||||||||||||||||
| Duration | 60 | ||||||||||||||||||||||||||||||||||||||||||||||||||||
| Energizers | 40 - Who am I? Location: Classroom No. of participants: All the students in a class Organisation: Students get into groups in pairs. Materials: woollen yarn; pieces of cardboard or paper with animal and plant figures printed on them to put around each student's neck. Discovering animals and plants; Materials: woollen thread and drawings of animals and plants. Procedures: Each pupil puts a piece of yarn round their neck with a name tag and a drawing/figure of an animal/plant facing their back. In pairs they will ask each other questions to find out which animal or plant it represents. The number of questions should be agreed beforehand. Ex: Badge with a drawing of an apple tree with apples. Questions: Is it a plant or an animal? Animal Is it a small or large plant? Large Does it bear fruit? Yes Are the fruits red? Yes Are they apples? Yes The tree is called an apple tree. | ||||||||||||||||||||||||||||||||||||||||||||||||||||
| Relaxing Exercises | 38 - Hands and Arms To the sound of calming/relaxing music, the students sit in their seats in the classroom and pretend they have a whole lemon in their left or right hand and the other hand over the one holding the lemon. The teacher will give the instructions: Now squeeze hard. Try to squeeze all the juice out of the lemon. Feel the force in your hands and arms as you squeeze. Now drop the lemon. Notice how your muscles feel when they're relaxed. Now take another lemon and squeeze it, again using one hand over the other. Try to squeeze this one harder than you did the first one. That's it! With force! Don't let a single drop remain. Squeeze hard. Now drop the lemon and relax. Notice how much better your hands and arms feel when they're relaxed. All right! | ||||||||||||||||||||||||||||||||||||||||||||||||||||
| Objectives |
In the end of the lesson students will be able to:
| ||||||||||||||||||||||||||||||||||||||||||||||||||||
| Preparation | Resources: Computer and video projector; Printed images representing different types of plants; Scissors; Glue stick; Potted indoor plant - (to identify the various parts that make up the plant); White sheets and coloured pencils. Preparation Go outside with the pupils to observe spontaneous plants and cultivated plants. (If there isn't a green space, such as a vacant garden. near the school, Plants in the school playground, on balconies or in the gardens of neighbouring houses, trees in the street and spontaneous weeds growing by the side of the road can also be observed). Ask each student to take a sheet of paper and coloured pencils and let them choose a plant to draw. | ||||||||||||||||||||||||||||||||||||||||||||||||||||
| Introduction | There are some plants that grow on their own and don't need any care from humans, these are called spontaneous plants. Others may need human care, such as sowing and watering; these are cultivated plants like lettuce. Most plants are made up of several parts: the root through which they feed and hold onto the soil, the stem or trunk which keeps the plant upright and transports water and nutrients to all parts of the plant, and leaves through which they breathe. What do plants give us and what do plants need? | ||||||||||||||||||||||||||||||||||||||||||||||||||||
| Teaching and learning methods |
| ||||||||||||||||||||||||||||||||||||||||||||||||||||
| Interdisciplinary connections |
Mother tongue - Select relevant information according to the listening objectives and record them using different techniques. Speak clearly and articulate words appropriately. Maths - Developing an interest in maths and appreciating its role in the development of other sciences and areas of human and social activity. Citizenship and Development - Sustainable Development; Environmental Education. | ||||||||||||||||||||||||||||||||||||||||||||||||||||
| Resource teacher or other specialists activities | All the steps in exploring the topic are understandable for students with specific needs with cognitive abilities. The lesson does not include lengthy written explanations. The role of the support or special education teacher is to help the students in the target group if they are unable to carry out any of the tasks or steps, or if they feel disorientated in understanding something that may be asked of them. Identifying and manipulating and handling materials, taking part in games, exploring content by visualising images, etc. are usually well accepted and meet the interests and needs of most students. | ||||||||||||||||||||||||||||||||||||||||||||||||||||
| New vocabulary | Plant life Spontaneous plants and cultivated plants. Root, stem... | ||||||||||||||||||||||||||||||||||||||||||||||||||||
| Work Flow | 1st step - Large group Start the lesson by talking to the class about the plants observed outside the school. Explore with the students the differences between cultivated plants and spontaneous plants and the possible habitats of both. Use the Powerpoint presentation (Appendix 1) 2nd step - Small group Divide the class into groups. Give the students printed images of spontaneous and cultivated plants (Appendix 2). Start by asking the students to identify, separate, cut out and organise them into spontaneous plants and cultivated plants. 3rd step - small group Distribute appendix 3 to each group - A3 size sheet with four columns identified/categorised in the header into 4 categories, where the students will stick the plant cuttings according to the teacher's previous explanation. 4th step - Individual task Whether plants are cultivated or spontaneous, they are all made up of various parts. Enrich and reinforce this learning by bringing into the classroom a potted plant, if possible with a flower, which will allow students to get closer to the various parts of the plant, identifying where the root, stem, leaves and flowers are located (if possible), and finally explaining that it is from the flower that the fruit is born. The teacher projects an image of a plant (appendix 4), with the information needed to identify the various parts of the plant. To conclude this activity, ask each student to draw a plant and, with the teacher's guidance, write down each part that makes it up. | ||||||||||||||||||||||||||||||||||||||||||||||||||||
| Reflection | Guided discussion about what students have learnt: Spontaneous plants/cultivated plants and the parts that make up plants. Connect the importance of the natural environment and basic needs for the growth and development of living beings - plants. Reinforce the idea that all plants deserve to be cared for and respected at all stages of development. What was your favourite activity? - Going outside; - The relaxation activity; - Group dynamics - game ; - The large group activities; - The small group activities. | ||||||||||||||||||||||||||||||||||||||||||||||||||||
| Notes | |||||||||||||||||||||||||||||||||||||||||||||||||||||
| Digital Resource | Appendix 1: https://sen-power.eu/atividades1/digital/872/Appendix 1 - Plants.pptx Appendix 2: https://sen-power.eu/atividades1/pdf/872_Appendix 2 Plants.pdf Appendix 3: https://sen-power.eu/atividades1/pdf/872_Appendix 3 Plants.pdf Appendix 4: https://sen-power.eu/atividades1/pdf/872_Appendix 4 Plants.pdf | ||||||||||||||||||||||||||||||||||||||||||||||||||||
| 49 | |||||||||||||||||||||||||||||||||||||||||||||||||||||
| | |||||||||||||||||||||||||||||||||||||||||||||||||||||
| 7 |  Grade 2 / Growing healthy! Growing strong! Grade 2 / Growing healthy! Growing strong! | ||||||||||||||||||||||||||||||||||||||||||||||||||||
| Developed by | Prosveta-Sofia Foundation | ||||||||||||||||||||||||||||||||||||||||||||||||||||
| Grade | 2 | ||||||||||||||||||||||||||||||||||||||||||||||||||||
| Duration | 60 | ||||||||||||||||||||||||||||||||||||||||||||||||||||
| Energizers | 17 - Toaster or Rock Star The group starts in a circle with one person in the center. The person in the center points at someone in the circle and says “Toaster” or “Rock star”.
| ||||||||||||||||||||||||||||||||||||||||||||||||||||
| Relaxing Exercises | 33 - Ditch the shoes! Do you know the phrase “stay grounded”? Adults use it quite often, but sometimes the easiest way to do that is to connect yourself to the ground again. If you are outside, consider taking your shoes off and walking through the grass. Take note of what the soft grass feels like and the dirt under your feet. Do also ensure there’s no glass, nails or anything else sharp in the vicinity before taking off your shoes. If you are in the classroom, just take of your shoes and enjoy walking around slowly. | ||||||||||||||||||||||||||||||||||||||||||||||||||||
| Objectives | Students will: ● build a responsible attitude towards their bodies and their health through activities related to:
● learn how to take care of their health; ● develop their thinking skills. | ||||||||||||||||||||||||||||||||||||||||||||||||||||
| Preparation | Preparation of supporting materials ● For Step 5 Flower of Health there should be prepared: o a pot of geraniums; o cut shamrocks from coloured paper, attached to wooden skewers – for each student; o cut shamrocks from coloured paper attached to wooden skewers with the messages from step 5 written on them ● For activity Reflection: o cut a circle from yellow cardboard (for the sun) o prepare lots of rays in yellow, orange and red color so that each student has the chance to choose the colour she/he needs. Equipment Multimedia; Laptop; Mobile devices for the game from step 2. | ||||||||||||||||||||||||||||||||||||||||||||||||||||
| Introduction | Hello students! When we meet someone, we usually say Hello, and in Bulgarian this sounds like that Zdravei. The word comes from the verb "zdraveya", which is no longer used in modern Bulgarian, but has survived in the greeting Zdravei. So, when people in Bulgaria greet each other with the greeting Zdravei, they wish each other to be in good health (zdrave). Do you have something similar in your language? So, today we are going to talk about health. | ||||||||||||||||||||||||||||||||||||||||||||||||||||
| Teaching and learning methods | Discussion Teamwork | ||||||||||||||||||||||||||||||||||||||||||||||||||||
| Interdisciplinary connections | Mother tongue - oral communication. Mathematics - logical thinking skills. Artistic creativity - creating a Flower of Health. | ||||||||||||||||||||||||||||||||||||||||||||||||||||
| Resource teacher or other specialists activities | The lesson does not include written instructions and tasks in which a written response is required. The role of the resource teacher is to help the students of the target group in case they cannot cope with some of the tasks or with a specific step – e.g. in item 2 of step 4, the resource teacher can work individually with the students of the target group, supporting them in coming up with the characteristics by which the categorization should be done and giving them examples. Creating a Flower of Health is a hands-on activity which is engaging and interesting for students with learning disabilities (and for all students). | ||||||||||||||||||||||||||||||||||||||||||||||||||||
| New vocabulary | Healthy life style | ||||||||||||||||||||||||||||||||||||||||||||||||||||
| Work Flow | Step 1 1. Ask the questions and write down all students’ ideas on the board, even if some of them seem unrelated to the question (blue skies thinking): ● What is health to you? ● Why do we want to be healthy? ● How can we maintain our health? 2. Show Annex 1 (slides 1 to 5) and discuss with the whole class: Which of the illustrations show people whose actions contribute to good health? Let's consider and decide together. Step 2 Daily routine: We all perform various activities that are repeated during the day or during the days of the week. These are our habits. Some of them are good for our health and others are harmful to us. Let's see if you can tell them apart? Students play the game on their mobile devices. https://wordwall.net/resource/68814663 Step 3 Do you like to do sports? Sport is good for our health! There are many sports and everyone can choose the one he/she likes best. Let's remember some of the most popular sports. (Annex 1 – slide 6). With the help of the teacher, students name the sports and discuss where each one is practiced, what equipment is needed, whether special facilities are needed and anything specific to the respective sport. Students can add up extra sports, e.g. if someone practices another sport or knows someone who practices another sport, he/she tells the class first-hand impressions. Step 4 1. Divide the class into groups of 4-5 children and read the Letter from the rabbit Gourmand (Annex 1 - slide 7), who wants to be an athlete, but although he trains hard with the other rabbits, he does not succeed in achieving what the others succeed in. What's the problem? How can we help him? Each group discusses the issue and comes up with 2 practical tips for the rabbit Gourmand. In the plenary, the groups share their suggestions and the teacher writes them on the board. 2. Development of reasoning skills through team work. Task: The written proposals to Gourmand should be split in two or more groups, and the students themselves should decide how they will do that. As a first step the teacher could ask the students to identify which ideas are quite similar in content and to combine them into one. The next step is the actual grouping, e.g. ideas related to physical activities and ideas related to mental activities. Students are not expected to articulate clearly on what basis they made the groupings, but should be able to explain their reasoning. After the discussion, if time allows, each group presents the result of their work, or the teacher suggests how to divide the proposals and circles (with the help of the students) the proposals belonging to the different groups in different colours. Step 5 Art: Creating a Flower of Health. Students use a pot of geraniums in which they stick different messages written on paper shamrocks. Do you want us to turn this pot of geranium into a Flower of Health and help other people be healthy? We will show it to the other students and it will communicate different pieces of advice that people should follow in order to be healthy and enjoy a good life. 1. Several suggestions are written in advance on the prepared shamrocks; the suggestions are read in front of the class by individual students and the class decides whether the advice is suitable for the Flower of Health - if so, it is adjusted on a wooden skewer and stuck in the pot. ● Always wash your hands before eating something. ● Eat a lot. ● Take walks in the fresh air. ● Do not overeat. ● Always wash fruit before eating. ● Drink plenty of water. ● Always dress in very warm clothes. ● Temper yourself. 2. Let's see what else is good to do to have good health (Annex 1 - slides 8, 9, 10). 3. Each student receives a paper shamrock and writes a message to put in the Flower of Health (suggested by the presentation or their own ideas). The labeled shamrocks are placed in the pot. | ||||||||||||||||||||||||||||||||||||||||||||||||||||
| Reflection | As feedback for the lesson, students attach rays to the sun, with the teacher instructing them that the yellow ray means "The lesson was useful and I liked it!", the orange ray means "I got interesting information, but it was not enough/ I didn’t like some parts", and, if students choose the red ray, their opinion is that the lesson was not very interesting and the activities were not useful. Students provide their feedback anonymously during the break. | ||||||||||||||||||||||||||||||||||||||||||||||||||||
| Notes | |||||||||||||||||||||||||||||||||||||||||||||||||||||
| Digital Resource | |||||||||||||||||||||||||||||||||||||||||||||||||||||
| 50 | |||||||||||||||||||||||||||||||||||||||||||||||||||||
| | |||||||||||||||||||||||||||||||||||||||||||||||||||||
| 8 |  Grade 2 / Balanced Nutrition Grade 2 / Balanced Nutrition | ||||||||||||||||||||||||||||||||||||||||||||||||||||
| Developed by | Antalya Directorate Of Education | ||||||||||||||||||||||||||||||||||||||||||||||||||||
| Grade | 2 | ||||||||||||||||||||||||||||||||||||||||||||||||||||
| Duration | 60 | ||||||||||||||||||||||||||||||||||||||||||||||||||||
| Energizers | 40 - Who am I? Location: Classroom No. of participants: All the students in a class Organisation: Students get into groups in pairs. Materials: woollen yarn; pieces of cardboard or paper with animal and plant figures printed on them to put around each student's neck. Discovering animals and plants; Materials: woollen thread and drawings of animals and plants. Procedures: Each pupil puts a piece of yarn round their neck with a name tag and a drawing/figure of an animal/plant facing their back. In pairs they will ask each other questions to find out which animal or plant it represents. The number of questions should be agreed beforehand. Ex: Badge with a drawing of an apple tree with apples. Questions: Is it a plant or an animal? Animal Is it a small or large plant? Large Does it bear fruit? Yes Are the fruits red? Yes Are they apples? Yes The tree is called an apple tree. | ||||||||||||||||||||||||||||||||||||||||||||||||||||
| Relaxing Exercises | 20 - Holding legs Participants work in pairs. And you can put a quiet and relaxing music (or sounds like water falling down, sea waves, etc.). Half of the participants are asked to lie down face up, eyes closed, with their left leg extended on the floor and their right leg elevated. Another participant stands up and loops a towel around the heel of the other’s right foot and holds the ends of the towel in his/her hands, and makes soft and gentle movements (upwards and downwards, and sidewards) while the other totally relaxes his/her leg. Then they repeat the same process with the left leg. Then the participants switch roles. | ||||||||||||||||||||||||||||||||||||||||||||||||||||
| Objectives | Students will:
| ||||||||||||||||||||||||||||||||||||||||||||||||||||
| Preparation | Materials: Annex 1: Scissors and glue sticks for each student. Annex 2: Projector and screen or interactive whiteboard for displaying the slides. Annex 3: Crayons, colored pencils, or markers for each student. General Materials:
| ||||||||||||||||||||||||||||||||||||||||||||||||||||
| Introduction |
| ||||||||||||||||||||||||||||||||||||||||||||||||||||
| Teaching and learning methods |
| ||||||||||||||||||||||||||||||||||||||||||||||||||||
| Interdisciplinary connections | Art | ||||||||||||||||||||||||||||||||||||||||||||||||||||
| Resource teacher or other specialists activities | For SEN students, provide additional visual aids and simplified instructions. Offer one-on-one support during activities and ensure that instructions are clear and accessible. | ||||||||||||||||||||||||||||||||||||||||||||||||||||
| New vocabulary |
| ||||||||||||||||||||||||||||||||||||||||||||||||||||
| Work Flow | Step 1: Poster Discussion (10 minutes)
Step 2: Cutting and Grouping Activity (15 minutes)
Step 3: Group Discussion and Chart Making (15 minutes)
Step 4: Healthy Meal Planning Activity (15 minutes)
Step 5: Coloring Activity (15 minutes)
Step 6: Review Activity (10 minutes)
| ||||||||||||||||||||||||||||||||||||||||||||||||||||
| Reflection | Suggested discussion questions to finish the lesson: How can we use the things we talked about today to make healthier choices of food? Can you provide examples of healthy snacks to eat at home? | ||||||||||||||||||||||||||||||||||||||||||||||||||||
| Notes | |||||||||||||||||||||||||||||||||||||||||||||||||||||
| Digital Resource | |||||||||||||||||||||||||||||||||||||||||||||||||||||
| 51 | |||||||||||||||||||||||||||||||||||||||||||||||||||||
| | |||||||||||||||||||||||||||||||||||||||||||||||||||||
| 9 |  Grade 2 / Let's Keep Our Environment Clean Grade 2 / Let's Keep Our Environment Clean | ||||||||||||||||||||||||||||||||||||||||||||||||||||
| Developed by | Antalya Directorate Of Education | ||||||||||||||||||||||||||||||||||||||||||||||||||||
| Grade | 2 | ||||||||||||||||||||||||||||||||||||||||||||||||||||
| Duration | 60 | ||||||||||||||||||||||||||||||||||||||||||||||||||||
| Energizers | 9 - Balloon pop Have everyone form a circle. Instruct the participants to put one piece of information about themselves, e.g. I have 2 sisters, or my mother is called Samy, on a small slip of paper, fold it, and put it in a blown up balloon. Throw the balloons in the middle of the circle and then have people take turns popping a balloon, reading the piece of paper, and guessing to whom the information applies. Participants could wander round the room asking ‘yes/ no’ questions to the other participants but not exactly the statement from the paper slip, e.g. they cannot ask “Have you got 2 sisters? But could ask “Have you got sisters?” and then “Have you got more than 1 sister?’, “Have got less than 3 sisters?”, etc. Game finishes when all participants have identified the author of the paper slip they have. *Note: this exercise should be used if there is enough time. | ||||||||||||||||||||||||||||||||||||||||||||||||||||
| Relaxing Exercises | 36 - Nature lovers Close your eyes and imagine that you doing a nature walk - on the fields or in the mountains. Imagine all the details of what you see and feel: ● What vegetation do you see around you? ● What season is it and what colours are the plants? ● Are there animals in your picture – maybe you see beetles in the grass or hear the birds? ● Is there movement around you – maybe there is a slight breeze and the leaves of the trees are swaying, or a stronger wind is bending their trunks, or is it completely quiet and everything is still? ● Do you smell any aromas? ● Are there people around you? ● How do you feel? Now, keeping this picture in your mind, open your eyes and prepare for the rest of the day. | ||||||||||||||||||||||||||||||||||||||||||||||||||||
| Objectives |
| ||||||||||||||||||||||||||||||||||||||||||||||||||||
| Preparation | Materials: Annex 1: Cut and paste activity with images of pollution types and clean environment actions Annex 2: PowerPoint presentation depicting pollution and ways to keep the environment clean (Slides 1-10) Annex 3: Coloring sheets of pollution types and environmental clean-up activities | ||||||||||||||||||||||||||||||||||||||||||||||||||||
| Introduction | Begin the lesson by asking the students about the environment problems. Listen to their answers and engage in a brief discussion about their answers. Introduce the topic of keep environment clean and pick the students' curiosity by asking if they would like to learn more about how to keep the environment clean. | ||||||||||||||||||||||||||||||||||||||||||||||||||||
| Teaching and learning methods | Visual Learning
Hands-on Activities
Collaborative Learning
| ||||||||||||||||||||||||||||||||||||||||||||||||||||
| Interdisciplinary connections | Art Expression Engage students in a coloring activity related to the clean environment. Provide them with coloring materials and ask them to draw ways to keep environment . Encourage creativity and discussion within the groups. | ||||||||||||||||||||||||||||||||||||||||||||||||||||
| Resource teacher or other specialists activities | Use Visual Aids: Ensure SEN students have a clear view of the slides and provide additional explanations if needed. Provide Assistance: Offer one-on-one help during the cut and paste and coloring activities to support their understanding and creativity. Encourage Participation: Foster an inclusive environment where SEN students feel comfortable sharing their ideas and reflections. | ||||||||||||||||||||||||||||||||||||||||||||||||||||
| New vocabulary |
| ||||||||||||||||||||||||||||||||||||||||||||||||||||
| Work Flow | Step 1: Present Visual Aids (10 minutes)
Step 2: Cut and Paste Activity (15 minutes)
Students have to cut out the pictures of pollution types and actions to keep the environment clean, and then paste them in the correct 'Do' or 'Don't Do' sections on the worksheet. The teacher walks around the classroom to assist students with their cutting and pasting. Step 3: Coloring Sheets (15 minutes) Distribute Coloring Sheets (Annex 3) and instruct students to to color the pictures of the different types of pollution and ways to keep the environment clean. Walk around the classroom to assist students with their coloring and answer any questions they may have. Step 4: Creative Drawing (15 minutes)
Step 5: Recap and Sharing (15 minutes)
| ||||||||||||||||||||||||||||||||||||||||||||||||||||
| Reflection | Ask students to reflect on what they learned.
| ||||||||||||||||||||||||||||||||||||||||||||||||||||
| Notes | |||||||||||||||||||||||||||||||||||||||||||||||||||||
| Digital Resource | |||||||||||||||||||||||||||||||||||||||||||||||||||||
| 52 | |||||||||||||||||||||||||||||||||||||||||||||||||||||
| | |||||||||||||||||||||||||||||||||||||||||||||||||||||
| 10 |  Grade 2 / Exploring animal footprints Grade 2 / Exploring animal footprints | ||||||||||||||||||||||||||||||||||||||||||||||||||||
| Developed by | IPSantarem - Bento Cavadas e Nelson Mestrinho | ||||||||||||||||||||||||||||||||||||||||||||||||||||
| Grade | 2 | ||||||||||||||||||||||||||||||||||||||||||||||||||||
| Duration | 1h15 | ||||||||||||||||||||||||||||||||||||||||||||||||||||
| Energizers | 44 - Mimicking animals The teacher instructs students to mimic the movements of animals in the following sequence: fox, dog, hare, hedgehog.
Figure 1. Fox (Credits: Pexels.com) Figure 2. Dog (Credits: Pexels.com) Figure 3. Hare (Credits: Wikipedia) Figure 4. Hedgehog (Credits: Pixabay) | ||||||||||||||||||||||||||||||||||||||||||||||||||||
| Relaxing Exercises | 44 - Guided walking in a forest Close your eyes and imagine you are walking in a forest. Feel a sense of calm and peace wash over you with each step you take. Imagine the sounds and the smells of the forest. | ||||||||||||||||||||||||||||||||||||||||||||||||||||
| Objectives | Students will:
| ||||||||||||||||||||||||||||||||||||||||||||||||||||
| Preparation | Materials Appendix 1 - Pictures of animals Appendix 2 - Evidences of the presence of animals on nature Appendix 4 - Footprint examples Appendix 5 - Real mammals’ footprints Equipment Laptop and projector Preparation for the lesson
| ||||||||||||||||||||||||||||||||||||||||||||||||||||
| Introduction | If we are walking in a forest, how can we recognize the presence of animals without seeing them? Some animals have fear of humans and instinctively hide when they detect human presence. To ascertain the presence of animals in a forest, we can search for signs of their existence, including animal feces, burrows, gnawed food and footprints. Doing the tasks of this activity, you will be able to identify some animals through their footprints. 5 min | ||||||||||||||||||||||||||||||||||||||||||||||||||||
| Teaching and learning methods | Inquiry-Based learning Collaborative learning | ||||||||||||||||||||||||||||||||||||||||||||||||||||
| Interdisciplinary connections | Sports: walking in a natural environment; practical activity (energizer) Arts: Drawing animals footprints. | ||||||||||||||||||||||||||||||||||||||||||||||||||||
| Resource teacher or other specialists activities | The most part of the tasks of the lesson are comprehensible to most special needs students who have well-preserved cognitive abilities. The lesson does not comprise long written explanations. The role of the special needs teacher or the assistant teacher is to help target group students in case they are not able to cope with some of the tasks or steps. | ||||||||||||||||||||||||||||||||||||||||||||||||||||
| New vocabulary | Animal footprint | ||||||||||||||||||||||||||||||||||||||||||||||||||||
| Work Flow | Part I | Identifying animals on nature
Part II | Studying the characteristics of a footprint
Figure 5. Dog footprint (Credits: Bento Cavadas)
Figure 6. Dog footprint (Credits: Bento Cavadas) Solutions: (A) Shape; (B) Nail; (C) Finger; (D) Pad.
Figure 7. Examples of mammal’ footprints (Credits: Bento Cavadas) Ask them to indicate the animal(s) which footprints have:
Solutions:
20 min Part III | Identifying real animal footprints
Figure 8. Print screen of the video “Guess the animal by footprints” (Credits: Animal Quiz) 7. Play the game https://wordwall.net/pt/resource/77657912 with the students 15min Part IV | Looking for animal’ footprints in nature 8. After the previous activities, students are equipped to go to an outdoor environment and look for real animal footprints or other evidence of the presence of animals in nature. Prepare a field trip to a natural park with different habitats such as forests, wetlands, grasslands, or coastal areas. Each habitat supports a unique array of plant and animal species. Encourage students to observe and document the diversity of life forms they encounter in each habitat and the footprints they found, using the camera of their smartphones or drawing them. Then, they can use an application to share them with their colleagues, such as Padlet® or similar. The field trip is a relevant context to explore the concept of biodiversity and biodiversity protection with your students, and relates this approach with the Sustainable Development Goal 15: Life on land. One day field trip | ||||||||||||||||||||||||||||||||||||||||||||||||||||
| Reflection | Guided discussion:
10 min | ||||||||||||||||||||||||||||||||||||||||||||||||||||
| Notes | |||||||||||||||||||||||||||||||||||||||||||||||||||||
| Digital Resource | Appendix 1 - Pictures of animals Appendix 2 - Evidences of the presence of animals on nature Appendix 4 - Footprint examples | ||||||||||||||||||||||||||||||||||||||||||||||||||||
| 53 | ||
| | ||
| Grade 3
| ||
| 54 | |||||||||||||||||||||||||||||||||||||||||||||||||||||
| | |||||||||||||||||||||||||||||||||||||||||||||||||||||
| 1 |  Grade 3 / Living and non-living Nature Grade 3 / Living and non-living Nature | ||||||||||||||||||||||||||||||||||||||||||||||||||||
| Developed by | Prosveta-Sofia Foundation | ||||||||||||||||||||||||||||||||||||||||||||||||||||
| Grade | 3 | ||||||||||||||||||||||||||||||||||||||||||||||||||||
| Duration | 90 | ||||||||||||||||||||||||||||||||||||||||||||||||||||
| Energizers | 3 - Amoeba An evolution game! Everyone starts off as an amoeba, with the purpose of evolving to a human. All students walk around acting like an amoeba and when they meet with another amoeba, they play one round of rock/paper/scissors. Whoever wins evolves into a worm. When two worms meet they play again rock/paper/scissors and whoever wins turns into a wasp, but whoever loses goes back to becoming an amoeba. This continues until one becomes human. The evolution stages are: amoeba à worm à wasp à chicken à monkey à human. | ||||||||||||||||||||||||||||||||||||||||||||||||||||
| Relaxing Exercises | 7 - Strong as a plant All students spread out in the room and imagine they are plants (eg tulip, grass, oak, pine tree, etc.) but don’t tell the others what plant they are. They listen to the audio recording and with their actions imitate the movements of the plant in different weather conditions (rain, wind, storm, snow, calm weather, etc.) *The teacher plays the sounds from Annex 1 while students complete the activity. | ||||||||||||||||||||||||||||||||||||||||||||||||||||
| Objectives | Students will:
| ||||||||||||||||||||||||||||||||||||||||||||||||||||
| Preparation | Materials Small pieces of paper/ post-it papers: for activity 1, option 2 Equipment Laptop, projector and loud speakers Tablets/ mobiles for students for:
Preparation for the lesson For activity 2, options 2 and 3: Print or write the headings Living things and Non-living things on A4 paper (one set per group) | ||||||||||||||||||||||||||||||||||||||||||||||||||||
| Introduction | Leonardo da Vinci has said that “Nature is the source of all true knowledge.” It is a common truth that we learn all the time from Nature – when looking through the window on a rainy day or while walking in the park; when we are on a family vacation at the seaside or go on a school trip in the mountains. Knowing more about Nature and the things we see around us, makes our lives easier and better. We will learn that all things round us belong to either the group of the living organisms or to the non-living things, and how to know to which one. We will learn about the 5 kingdoms of the living organisms, will play games, work in teams and participate in competitions. | ||||||||||||||||||||||||||||||||||||||||||||||||||||
| Teaching and learning methods | Discussion based learning Collaborative learning Problem-based learning | ||||||||||||||||||||||||||||||||||||||||||||||||||||
| Interdisciplinary connections | Mathematics: reasoning skills, extracting essential information from a video file Active citizenship: team spirit and collaboration | ||||||||||||||||||||||||||||||||||||||||||||||||||||
| Resource teacher or other specialists activities | There are no long written explanations in the lesson. The presentations are available with audio records of the narration. The role of the special needs teacher is to help target group students in case they are not able to cope with some of the tasks or steps. The computer games are activities that most students with learning difficulties enjoy a lot. The team games are a good basis for the inclusion of target group students. | ||||||||||||||||||||||||||||||||||||||||||||||||||||
| New vocabulary | Living organisms Non-living things Reproduction Nutrition Multicellular and unicellular Photosynthesis | ||||||||||||||||||||||||||||||||||||||||||||||||||||
| Work Flow |
Students watch the video explaining the differences between living and non-living things and have the task to put down the characteristics which make living things different from non-living things (optional tip: there are 6 major characteristics described in the video; providing the tip will make the task a bit easier. The correct characteristics are: Livings things grow (1), reproduce (2), breathe (3), feel (4), move (5) and need food (6).) Work process: After watching the video students work individually and make their individual lists of characteristics. If needed, the teacher can play the video again. Secondly, they work in pairs and compare their individual lists with the task to come up with a common list of 6 characteristics. Next step is to have 2 pairs working together. Similarly, they compare their lists and have to agree on the 6 characteristics of living things that make them different from non-living ones. Final step: all groups report their lists of 6 characteristics and agree on a common list for the class.
The teacher shows the questions and the answers on the screen. Students play the game individually on their mobile devices. (10 min.)
| ||||||||||||||||||||||||||||||||||||||||||||||||||||
| Reflection |
The poster is printed (or drawn) on a big sheet of paper for the students to mark their opinion about the lesson activities. The Smileys are to be printed and cut separately, and each type is placed in a separate box. After the lesson students are invited to go to the poster and stick the Smiley face which best presents their opinion about the lesson activities. Explain that they could consider different aspects of each activity – of course, if it was fun, but also – if they learned something useful, whether they felt comfortable doing it, etc. Explain that the evaluation is anonymous, so they can freely express their opinion.
(5 min.) | ||||||||||||||||||||||||||||||||||||||||||||||||||||
| Notes | |||||||||||||||||||||||||||||||||||||||||||||||||||||
| Digital Resource |
Kahoot game – Living vs. Non-living things and their characteristics https://create.kahoot.it/details/330386c6-2a47-4073-8635-89f8e121403c Games
| ||||||||||||||||||||||||||||||||||||||||||||||||||||
| 55 | |||||||||||||||||||||||||||||||||||||||||||||||||||||
| | |||||||||||||||||||||||||||||||||||||||||||||||||||||
| 2 |  Grade 3 / The influence of air, light, temperature, water, soil on the life of plants and animals Grade 3 / The influence of air, light, temperature, water, soil on the life of plants and animals | ||||||||||||||||||||||||||||||||||||||||||||||||||||
| Developed by | AECE - Escola Básica da Zona Verde | ||||||||||||||||||||||||||||||||||||||||||||||||||||
| Grade | 3 | ||||||||||||||||||||||||||||||||||||||||||||||||||||
| Duration | 60 | ||||||||||||||||||||||||||||||||||||||||||||||||||||
| Energizers | 24 - Flashcards Games Create a set of picture cards, related to the topic: The influence of air, light, temperature, water, soil on the life of plants and animals (Appendix 1), which will be scattered on the walls of the classroom at the students’ height. Learners are invited to move around the room to first look at the various flashcards and then select one, which they take down from the wall and take with them to their seat. When everyone has selected a picture, one by one each student will show their picture and justify their choice. | ||||||||||||||||||||||||||||||||||||||||||||||||||||
| Relaxing Exercises | 23 - The Four Seasons Dance Start by moving tables and chairs out of the room, leaving the space wide open, or use the gym or another large space in school. Switch on the computer with speakers, use the music "The Four Seasons" by Antonio Vivaldi" through Youtube. Students are invited to move freely around the space and imagine that they are plants, with roots (the feet) with the stem (the body) with flower (the head) and with leaves (the fingers of the hands). According to the sequence of the indications that are given that reproduce the life of a seed, the students will make corresponding movements, from sowing, with the seed under the ground, the seed germinating, the plant growing and finally the seed giving flower. | ||||||||||||||||||||||||||||||||||||||||||||||||||||
| Objectives | In the end of the lesson students should be able to:
| ||||||||||||||||||||||||||||||||||||||||||||||||||||
| Preparation | Materials: Faces of cardboard boxes (cereal or other) to make the cards Printed images Empty glass yoghurt jars Dried beans Empty 1.5l water bottles to cut in half, using only the base part. Absorbent kitchen paper Transparent film. Potting soil and sand Coloured pencils Scissors Glue Faces of cardboard boxes (cereal or other) to make the cards Printed images Record sheet Cards with statements about environmental factors. Computer with audio access Individual pupils' computers. Printer. Procedure: Pre - Preparation of the lesson: In a moment on a previous lesson according to the timetable management and the teacher’s lessons, propose to the class to make the Germination of the Beans activity. Place 5 beans one per cup wrapped in wet absorbent kitchen paper, cover each cup with cling film, keeping them like in this handmade crafted greenhouse until the seeds germinate (approximately one week). Place them on the windowsill of the classroom so they can sunbathe. The beans should always be moist to ensure that the seed is hydrated and thus germinates, giving rise to a new plant. Class preparation: After the sprouted beans process is completed: According to the teacher's management the time to continue the experiment is defined, involve the whole class in:
| ||||||||||||||||||||||||||||||||||||||||||||||||||||
| Introduction | During the lesson the teacher has to carry out different activities in the field of experimentation/action in order to learn about the natural elements: soil, air, water, temperature and light. Water - Water is indispensable for the life of animals and plants. Some plants live in water all the time, others need a lot of moisture and others need little water. Air - Air is indispensable for animals and plants’ life. Light - Light influences some animals and plants’ life. Temperature - Temperature is an important environmental factor for animal and plant life. All plants need an appropriate temperature in order to grow. Address situations that allow students to acquire knowledge, to be able to understand the importance of environmental factors in the development and preservation of living beings. | ||||||||||||||||||||||||||||||||||||||||||||||||||||
| Teaching and learning methods | Considering that teaching can be approached through the realisation of experimental activities at soil, air and water level, we will invest in: Learning based on questions/situations close to students. It is important that students in their learning are confronted with open-ended problems of their own interest, in which they can develop an inquisitive and investigative path, calling on their prior knowledge, using practical skills and scientific processes as part of a coherent strategy. Students should learn through effective manipulation of material, facilitating awareness of what is being learnt. Co-operative and collaborative learning - work developed in co-operation and collaboration in groups and pairs. New technologies as a way of learning/consolidating content. | ||||||||||||||||||||||||||||||||||||||||||||||||||||
| Interdisciplinary connections | Mother tongue - Identify, organise and record relevant information according to listening objectives; Use words appropriately to explain knowledge and present narratives. Mathematics - Recognise and apply the steps of the problem-solving process. Apply and adapt different problem-solving strategies in different contexts, including the use of technology. Artistic Education - Music - Perform sequences of body movements in different musical contexts; Communicate through body movement according to diversified musical proposals. Citizenship and Development - Sustainable Development; Environmental Education | ||||||||||||||||||||||||||||||||||||||||||||||||||||
| Resource teacher or other specialists activities | All steps of the topic exploration are understandable for pupils with specific needs but with cognitive abilities. The lesson does not include long written explanations. The role of the support or special education teacher is to help pupils in the target group if they are unable to complete any of the tasks or steps, or feel disorientated in understanding something that may be asked. Identifying and manipulating and handling materials, participating in games, exploring content through visualisation of images, etc. are usually well accepted activities and meet the interests and needs of most students. | ||||||||||||||||||||||||||||||||||||||||||||||||||||
| New vocabulary | Environmental factors; survival of living things; … | ||||||||||||||||||||||||||||||||||||||||||||||||||||
| Work Flow | 1st STEP Pair Work: Start by issuing the challenge to pupils "What if you were a plant?". Give each pair a worksheet (Handout 1) with the following questions: ...do your roots like space to move around or do they prefer to stay together in the same space? ...do your roots like to be firm in the soil? ...do your roots like to be very dry? Too wet? Or have a good amount of water available? ...do your leaves like to be in the dark or in the sun and light? ...do your leaves like to be outdoors or underground? ...do your leaves like to be in windy places or sheltered? ...do you like to grow where there are lots of plants or in a place with space to yourself? ...do you like to be in a place with nothing to feed you or a place with lots of good food to grow? 2nd STEP The class as a whole: Confirm the answers given in the previous task through observation and discussion around the bean experiment. 3rd STEP Group Work 4/5 students: Environmental factors that condition the life of plants and animals (water, air, temperature, light and soil) The teacher forms heterogeneous groups of 4/5 pupils and hands in to each group a set of 5 cards (Appendix 2), each card corresponding to an environmental factor. With the identification of the cards face down, he /she asks a pupil from each group to remove a card, which only when turned over allows him to know which factor of the environment has come out. Each group will research on the internet through a search engine (e.g. google) under the supervision of the teacher, the importance of the factor that came out in the draw, for the survival of beings, answering the following questions - Why is this factor important for the life of living beings? - What happens to living things if this factor does not exist? They fill in the back of the picture (factor they are researching (Annex 2 - words - on the back) where they write the result of their research. 4th STEP Each group elects a spokesperson and presents the research result of the element they worked on. | ||||||||||||||||||||||||||||||||||||||||||||||||||||
| Reflection | Guided discussion: What was the most important thing you think you have learnt today? Which activity did you enjoy the most? - Carrying out the bean experiments; - Relaxation activity; - Group dynamics; - The activities organised in pairs; - The activities carried out in a large group; - Research and activities on the computer; - Other... | ||||||||||||||||||||||||||||||||||||||||||||||||||||
| Notes | |||||||||||||||||||||||||||||||||||||||||||||||||||||
| Digital Resource | |||||||||||||||||||||||||||||||||||||||||||||||||||||
| 56 | ||||||||||||||||||||||||||||||||||||||||||||||||||||||||
| | ||||||||||||||||||||||||||||||||||||||||||||||||||||||||
| 3 |  Grade 3 / Functions of the tongue Grade 3 / Functions of the tongue | |||||||||||||||||||||||||||||||||||||||||||||||||||||||
| Developed by | Antalya Directorate Of Education | |||||||||||||||||||||||||||||||||||||||||||||||||||||||
| Grade | 3 | |||||||||||||||||||||||||||||||||||||||||||||||||||||||
| Duration | 60 | |||||||||||||||||||||||||||||||||||||||||||||||||||||||
| Energizers | 18 - Mosquito game The group stands in a circle and the facilitator tells a story about a plague of mosquitoes and that everybody has to kill the mosquitoes so as they don’t get malaria. The facilitator puts up a mosquito on the head of a person who must lower in order to avoid the mosquito. The two persons next to that person must clap their hands above his/her head to kill the mosquito, but the mosquito escapes and it goes on. When the group is already doing the game well and quickly, the facilitator will add more mosquitoes until it is almost impossible for the group to catch as many mosquitoes. | |||||||||||||||||||||||||||||||||||||||||||||||||||||||
| Relaxing Exercises | 8 - Seasons of the year All players sit in a circle, but not too close to one another. The teacher moves like a plant during the seasons of the year. Winter: the plants are small, weak and are crunched together on the ground. Spring: through the stronger sunshine, the plants grow slowly and slowly rise. Summer: through the warm sun, the plants slowly open their arms, the flowers open their blooms are stand up straight. Autumn: the sun rays become weaker. The plants begin to slowly shrivel, the blooms and leaves begin to fall away. | |||||||||||||||||||||||||||||||||||||||||||||||||||||||
| Objectives | Students will:
| |||||||||||||||||||||||||||||||||||||||||||||||||||||||
| Preparation |
| |||||||||||||||||||||||||||||||||||||||||||||||||||||||
| Introduction | Ask students what they know about the tongue and its functions. Show the poster of the tongue and explain that it is a sense organ (Annex 1) responsible for tasting different flavors. | |||||||||||||||||||||||||||||||||||||||||||||||||||||||
| Teaching and learning methods | Visual Aids: Use visual aids such as diagrams, to explain the different parts of the tongue and its functions. Visual representations can make complex information more accessible and memorable. Interactive Demonstrations: Conduct interactive demonstrations to show how the tongue moves and works. For example, demonstrate how the tongue helps in speaking. Taste Testing: Engage students in a taste-testing activity to explore the sense of taste and the tongue's role in detecting different flavors. Use various foods with different tastes, such as sweet, salty, sour, bitter. Sensory Activities: Create sensory activities that involve the tongue and other senses. For example, blindfolded taste tests can help students understand how taste and smell are connected. | |||||||||||||||||||||||||||||||||||||||||||||||||||||||
| Interdisciplinary connections | Science: the tongue is also related to the sense of smell | |||||||||||||||||||||||||||||||||||||||||||||||||||||||
| Resource teacher or other specialists activities | During the taste testing experiment the special needs teacher can provide support to students who may have difficulties. | |||||||||||||||||||||||||||||||||||||||||||||||||||||||
| New vocabulary | Tongue, smell, sense, sour, bitter, salty, sweet, speech | |||||||||||||||||||||||||||||||||||||||||||||||||||||||
| Work Flow |
At the end of the activity students compare the results recorded in the table to demonstrate that the tongue and the sense of smell work together to enhance the perception of flavors.
7. To sum up the experiment tell students that the specific movements of the tongue, in combination with other articulators (lips, teeth), allow us to produce a wide range of sounds and articulate words and sentences, enabling effective communication with others. 8. Oral higyene, Keeping our tongue clean is essential for maintaining good oral hygiene and overall health. We must keep our tongue clean to enhance the sense of taste, for better digestion and in order to have fresh breath. A. Why keep the tongue clean?
B. Tips for keeping the tongue clean:
| |||||||||||||||||||||||||||||||||||||||||||||||||||||||
| Reflection | Ask students to share what they have learned about the functions of the tongue and the sense of taste. Conclusion:
Emphasize the importance of keeping our tongue and teeth clean. | |||||||||||||||||||||||||||||||||||||||||||||||||||||||
| Notes |
| |||||||||||||||||||||||||||||||||||||||||||||||||||||||
| Digital Resource | ||||||||||||||||||||||||||||||||||||||||||||||||||||||||
| 57 | |||||||||||||||||||||||||||||||||||||||||||||||||||||
| | |||||||||||||||||||||||||||||||||||||||||||||||||||||
| 4 |  Grade 3 / Main organs of the human body and their functions Grade 3 / Main organs of the human body and their functions | ||||||||||||||||||||||||||||||||||||||||||||||||||||
| Developed by | Prosveta-Sofia Foundation | ||||||||||||||||||||||||||||||||||||||||||||||||||||
| Grade | 3 | ||||||||||||||||||||||||||||||||||||||||||||||||||||
| Duration | 80 | ||||||||||||||||||||||||||||||||||||||||||||||||||||
| Energizers | 17 - Toaster or Rock Star The group starts in a circle with one person in the center. The person in the center points at someone in the circle and says “Toaster” or “Rock star”.
| ||||||||||||||||||||||||||||||||||||||||||||||||||||
| Relaxing Exercises | 16 - Pass the face It is like the game "telephone" but instead of passing a word or sentence around the group, participants pass a facial expression. | ||||||||||||||||||||||||||||||||||||||||||||||||||||
| Objectives | Students will:
| ||||||||||||||||||||||||||||||||||||||||||||||||||||
| Preparation | Materials Experiment A: fruit, baggies, sunflower or olive oil, lemon juice or vinegar. Experiment B: milk (at least 2% fat), food colouring, dish soap, cotton ball Equipment Laptop, projector and loud speakers Tablets/ mobiles for students (activity 3, activity 5) Preparation for the lesson Print the posters presenting the scientific method (activity 6) For Reflection: print the posters and the Smileys so that you have enough faces of each type for all students; cut the faces along the grid lines. | ||||||||||||||||||||||||||||||||||||||||||||||||||||
| Introduction | An understanding of the body can benefit your own health as you go through life. Familiarity with the human body can help you make healthful choices and prompt you to take appropriate action when signs of illness arise. At some point, everyone will have a problem with some aspect of his or her body and your knowledge can help you to deal with it. This lesson will provide you with an introduction to some of the body organs and their functions. You will learn the major organs of the human body, where they are located in your body and what they are needed for. | ||||||||||||||||||||||||||||||||||||||||||||||||||||
| Teaching and learning methods | Hands-on activities Collaborative learning Problem-based learning | ||||||||||||||||||||||||||||||||||||||||||||||||||||
| Interdisciplinary connections | Mathematics: reasoning skills, extracting essential information Citizenship: implementation of the scientific method in life | ||||||||||||||||||||||||||||||||||||||||||||||||||||
| Resource teacher or other specialists activities | All presentations are available with audio records of the narration. The role of the special needs teacher is to help target group students in case they are not able to cope with some of the tasks or steps. The computer games are activities that most students with learning difficulties enjoy a lot. The hands-on activities (experiments) involve different roles and target group students can choose the role they like most. | ||||||||||||||||||||||||||||||||||||||||||||||||||||
| New vocabulary | |||||||||||||||||||||||||||||||||||||||||||||||||||||
| Work Flow |
Task 1: Name vital processes of the human body; processes which are characteristic of every human being. The teacher writes all answers on the board. Expected answers: eating, breathing, thinking, moving from one place to another. Task 2: Which organs are responsible for each of the shortlisted processes (NFE tool: blue skies thinking). The teacher writes the organs besides each process) Possible answers:
Hint 1: What is this thing all human beings have but it is not an organ? Hint 2: It is all over our bodies, it delivers essential substances like oxygen and nutrients to the body's cells. Hint 3: It transports metabolic waste products away from those same cells. Hint 4: It is fluid. Hint 5: It is red. When students guess the described component of the body, they are asked which organ they associate with the blood. (the heart)
The teacher launches the game on the screen for the students to see the images and choose the correct answer; students answer on their mobile devices. The game can be played in different formats which are suggested in the application.
Title: Simulating digestion in the stomach. (Experiments A).
Title: Simulating how bile breaks down fat. (Experiment B). | ||||||||||||||||||||||||||||||||||||||||||||||||||||
| Reflection |
The printed posters, presenting the activities in the lesson, are placed at different place in the classroom. The Smileys are printed and cut separately, and each type is placed in a different box. After the lesson students are invited to go to the each poster and stick the smiley face which best presents their opinion about the activity on it. Explain that they could consider different aspects of each activity – of course, if it was fun, but also – if they learned something useful, whether they felt comfortable doing it, etc. Explain that the evaluation is anonymous, so they can freely express their opinion.
| ||||||||||||||||||||||||||||||||||||||||||||||||||||
| Notes | |||||||||||||||||||||||||||||||||||||||||||||||||||||
| Digital Resource |
game (Kahoot) https://play.kahoot.it/v2/?quizId=452e0029-606b-448b-a2a0-6b317697112e Game “Organs in the human body and their functions” https://wordwall.net/resource/58004030 | ||||||||||||||||||||||||||||||||||||||||||||||||||||
| 58 | |||||||||||||||||||||||||||||||||||||||||||||||||||||
| | |||||||||||||||||||||||||||||||||||||||||||||||||||||
| 5 |  Grade 3 / Man and healthy lifestyle – keeping oral hygiene and healthy teeth Grade 3 / Man and healthy lifestyle – keeping oral hygiene and healthy teeth | ||||||||||||||||||||||||||||||||||||||||||||||||||||
| Developed by | NART | ||||||||||||||||||||||||||||||||||||||||||||||||||||
| Grade | 3 | ||||||||||||||||||||||||||||||||||||||||||||||||||||
| Duration | 60 | ||||||||||||||||||||||||||||||||||||||||||||||||||||
| Energizers | 31 - Microbes The teacher asks students: What do we know about germs/microbes? How do we protect ourselves from them? The teacher explains what is the relationship between health and hygiene, visually showing how germs make us sick through the following task-experiment: Germs are only afraid of soap and a toothbrush. That is why we regularly wash our clothes, clean our houses, brush our hands and teeth. That's the only way we can get rid of germs. To show what hygiene is and how people should take care and protect themselves from germs in their daily life, play the following game: 1. Ask a student to wash his/her hands thoroughly and dip them in clean water. Obviously, the water will remain clean. After that ask him/her to dig hands into dirt or sand and dip hands again in a soapy solution in another container – it’ll be seen that the water turns cloudy and black. Here are the germs - the soap caught them. 2. The easiest way to convey germs is through touch. Tell the students that you have made a focus and you have magnified the microbes so that they can be seen. Paint your hand with easy-to-wash paint. Shake hands with one of the students, who will shake hands with another, and so on until the last one. This is an easy way to visualize how disease-causing bacteria pass from one person to another. Of course, transmission of the germs can also happen by air-droplet route. To make it comprehensive for the students, explain that when we sneeze or cough, droplets come out of our mouths and when they get into the air, they can infect another person. That's why we have to put our hand over our mouth and turn the other way so as not to put the people around us at risk. Time - 5 minutes. | ||||||||||||||||||||||||||||||||||||||||||||||||||||
| Relaxing Exercises | 32 - I take care of my teeth I take care of my teeth The students get up from their desks and dance with the song, imitating the movements of the Blaguni by brushing their teeth with a brush and toothpaste: https://youtu.be/Gw8YKSz2tNI?feature=shared Time - 5 minutes. | ||||||||||||||||||||||||||||||||||||||||||||||||||||
| Objectives | Students learn about the structure of the oral cavity and teeth; types of teeth and how they decay; the rules for healthy eating and keeping hygiene and healthy teeth. Students will be able to: -apply rules for keeping the hygiene of the oral cavity and teeth. - to make a healthy choice which foods are useful and which are harmful, as well as about the right way of eating to support body growth and strengthening health. | ||||||||||||||||||||||||||||||||||||||||||||||||||||
| Preparation | Appendix 1 Presentation Sand, a basin of clean water and watercolours Pictorial material illustrating the separate topics of the lesson (Appendix 1) Video - Blaguni https://youtu.be/Gw8YKSz2tNI?feature=shared Equipment
| ||||||||||||||||||||||||||||||||||||||||||||||||||||
| Introduction | During the lesson, the teacher involves the students in discussing: What is the oral cavity? Where are the teeth located? What are they used for? How many times a day do you brush your teeth? The teacher together with the students discuss cases that illustrate the importance of hygiene and proper nutrition for people's health. The teacher involves the students in carrying out an experiment, which shows them how to be able to trace for themselves how diseases are transmitted by invisible microbes and why it is necessary to wash our hands often with soap and take care and keep our teeth clean. | ||||||||||||||||||||||||||||||||||||||||||||||||||||
| Teaching and learning methods | Discussion, talk, presentation, picture and video material, learning in small steps, experiments | ||||||||||||||||||||||||||||||||||||||||||||||||||||
| Interdisciplinary connections | Biology, language, arts | ||||||||||||||||||||||||||||||||||||||||||||||||||||
| Resource teacher or other specialists activities | The resource teacher works with SEN students, helping them understand the questions, answer them correctly, comprehend and remember the key words and knowledge, according to their special needs and capabilities. The resource teacher uses visual didactic tools and materials, as well as modern technology, video and audio tools, to stimulate different abilities involved in the learning process. The resource teacher works closely with the general education teacher as well as with the group of SEN students, monitoring whether they have correctly understood the instructions and whether they are coping with the tasks. If necessary, additional explanatory instructions are provided. | ||||||||||||||||||||||||||||||||||||||||||||||||||||
| New vocabulary | Teeth, incisors, canines, molars, oral cavity, bacteria, germs, hygiene. | ||||||||||||||||||||||||||||||||||||||||||||||||||||
| Work Flow | 1. Structure of the digestive system. Slide 2 The teacher asks: Can we live without eating food? How long can we live without water? And without air? Children come to the conclusion on their own that food is necessary for man to live. Through it, he receives the necessary nutrients to grow and develop. After the teacher gets the correct answers from the students, he/she explains that the food processing begins in the oral cavity. The teacher initiates a dialogue with the students asking them: Can we swallow a whole apple? How do we eat food? The teacher explains that in order to be swallowed and go to the stomach, food has to be broken up and smashed by the teeth in the mouth. The saliva in the mouth also helps with this process. 2. Structure of the oral cavity and teeth. Slide 3 The teacher asks the students to describe what their mouth is and what it is surrounded by? He/she explains that a person takes food through the mouth, where outside, the oral cavity is covered by the lips and cheeks. The teacher then asks students what other parts their mouth has? - Tongue and teeth are located there. Then he/she asks the children with which teeth we bite the food most often, which we use to tear it and which we smash it with. He then explains and illustrates with the picture from slide 3: People have three types of teeth: incisors, canines, and molars. Each type of tooth performs a specific job in chewing food. When the food is not chowed well it makes it difficult for the stomach to work. In order to chew food well, we need healthy teeth. 3. Teeth in the different ages – children (milk teeth) and adults (permanent teeth). Slide 4 The teacher asks students how many teeth they had when they were in the first grade? And when they were babies? Then he explains that the first teeth grow until the child is two and a half years old, and children have 20 milk teeth, which later fall out and are replaced by permanent teeth. He asks the children if they remember when they lost their first tooth? Did they go to the dentist if they had a toothache? What did the dentist say? – slide 4 An adult has 32 teeth that are not replaced with new ones, and if one of them breaks down, it causes pain and can lead to its extraction and absence. 4. What are teeth made of and why do they decay? Slide 5 The teacher asks the students if they know what teeth are made of? Do they know anything about their structure? Why are they so white and hard? What is the substance of enamel? After hearing the students' answers, the teacher explains: Teeth are bone structures that are covered with enamel. Enamel is the hardest substance in the human body. The enamel protects the tooth from injury and the penetration of disease-causing microorganisms. When the enamel wears away, the teeth appear yellow. That's why it's important to keep it healthy condition. The teacher asks how to keep our teeth healthy? Why should we not eat sweets and drink sour drinks? After hearing the answers, the teacher explains that there are many bacteria and microbes living in our mouths that convert sugar into a new substance called acid. With improper nutrition and poor hygiene, the acid eats away the tooth enamel and it begins to break down. A hole appears in the tooth, which gradually expands and the tooth begins to hurt. This is a medical condition that requires timely intervention of a dentist. Do not wait until the pain becomes unbearable, go to the dentist quickly. 5. Rules for healthy teeth. Before showing the following pictures, the teacher asks the students to list what they think are the rules we should follow to have healthy teeth and writes them on the board. The teacher then explains the following important aspects of oral and dental hygiene: slide 6, 7, 8, 9, 10 a/ Clean your teeth regularly! – how and how often to brush our teeth. Wash them with a soft brush and a suitable toothpaste in the morning after breakfast and in the evening before going to bed. Sometimes food gets stuck between the teeth and cannot be removed with a brush. Then use special floss or a toothpick, being careful not to injure the gums. b/ Eat the right food! - What is meant by healthy and what is harmful food Do not overeat with sugar and chocolate. Sweet foods and drinks, when they are in large quantities, damage the teeth. Drink more milk. Eat cheese, fruits and vegetables. They strengthen the teeth. Do not drink cold drinks when eating hot food. c/ Visit the dentist at least twice a year! Visit the dentist at least twice a year. During regular examinations, the teeth that have started to decay are detected in time. Then they are easier to treat. At the end of the exercise, the teacher compares the students's answers with the rules on the slides, once again explaining the importance of following these rules and praising the students for their correct answers. Time - 30 minutes | ||||||||||||||||||||||||||||||||||||||||||||||||||||
| Reflection | The students are divided into 2 groups and they have to write down in their notebooks the answers to the following questions: 1st group: What foods should I have to eat properly. Why? 2nd group: What hygiene should I follow to keep my teeth healthy? Homework: Students receive leaflets with a test to be done: 1. How many milk teeth do children have? 2. How many teeth do adults have? 3. An object to brush teeth with. 4. Substance covering teeth. 5. Teeth that bite off food. 6. Teeth that crush and grind food. 7. A person who treats teeth. 8. A tooth that replaces the milk one. Answers: 20 (twenty), 32 (thirty-two), toothbrush, enamel, incisors, molars, dentist, permanent tooth. Time - 5 minutes | ||||||||||||||||||||||||||||||||||||||||||||||||||||
| Notes | |||||||||||||||||||||||||||||||||||||||||||||||||||||
| Digital Resource | |||||||||||||||||||||||||||||||||||||||||||||||||||||
| 59 | |||||||||||||||||||||||||||||||||||||||||||||||||||||
| | |||||||||||||||||||||||||||||||||||||||||||||||||||||
| 6 |  Grade 3 / How plants and animals survive Grade 3 / How plants and animals survive | ||||||||||||||||||||||||||||||||||||||||||||||||||||
| Developed by | NART | ||||||||||||||||||||||||||||||||||||||||||||||||||||
| Grade | 3 | ||||||||||||||||||||||||||||||||||||||||||||||||||||
| Duration | 60 | ||||||||||||||||||||||||||||||||||||||||||||||||||||
| Energizers | 32 - Habitats Habitats Print Appendixes 1 and 2 for each group. If the teacher decides, the cards can be colored and cut out in advance during the art classes. Card game - students are divided into 2 groups, and each group has its own leader, who receives 24 cards with different images of animals and plants (Appendix 1) and 3 sheets with the images of Appendix 2. The group leader gives the cards to the students and is responsible for their correct placement on previously prepared boards with the images of earth, air, water. The teacher can explain that the pictures in Appendix 2 show land, water and air as a habitat where animals and birds live and point out that the cards also include amphibians that live both in water and on land . The task of each group is to arrange as quickly as possible by gluing the cards of plants and animals that live on the ground, in the water and in the air. The game is won by the team that has arranged correctly most of the cards on their board. Time - 5 minutes | ||||||||||||||||||||||||||||||||||||||||||||||||||||
| Relaxing Exercises | 36 - Nature lovers Close your eyes and imagine that you doing a nature walk - on the fields or in the mountains. Imagine all the details of what you see and feel: ● What vegetation do you see around you? ● What season is it and what colours are the plants? ● Are there animals in your picture – maybe you see beetles in the grass or hear the birds? ● Is there movement around you – maybe there is a slight breeze and the leaves of the trees are swaying, or a stronger wind is bending their trunks, or is it completely quiet and everything is still? ● Do you smell any aromas? ● Are there people around you? ● How do you feel? Now, keeping this picture in your mind, open your eyes and prepare for the rest of the day. | ||||||||||||||||||||||||||||||||||||||||||||||||||||
| Objectives | Students will get to know the ways plants and animals adapt to the living conditions and environment in nature. Students will learn: ● what dangers the environment hides; ● how plants and animals adapt to their environment; ● how animals and plants protect themselves from enemies; ● how animals and plants protect themselves from cold, heat and drought. | ||||||||||||||||||||||||||||||||||||||||||||||||||||
| Preparation | ● Relaxing video https://youtu.be/4WO_p9YD30Q ● Presentation - Appendix 3 ● Animal Cards – Appendix 1 ● Appendix 2 – place to put the cards ● glue Equipment ● Internet ● Multimedia/interactive whiteboard ● Laptop | ||||||||||||||||||||||||||||||||||||||||||||||||||||
| Introduction | During the lesson, the teacher involves the students in discussing questions about the different habitats of the various types of animals and plants inhabiting our planet and how they adapt to their habitat, how they protect themselves from enemies in order to survive. The teacher together with the students discuss cases that illustrate the importance of environmental factors for the development and preservation of living beings. The teacher involves the students in conducting an experiment, through which they themselves will be able to follow the development of some plants and the influence of the environment on their development and survival. | ||||||||||||||||||||||||||||||||||||||||||||||||||||
| Teaching and learning methods | Discussion, talk, presentation, picture and video material, learning in small steps, experiments, group work. Co-teaching of the resource and general education teacher. | ||||||||||||||||||||||||||||||||||||||||||||||||||||
| Interdisciplinary connections | Biology, language, art | ||||||||||||||||||||||||||||||||||||||||||||||||||||
| Resource teacher or other specialists activities | The resource teacher works with SEN students, helping them comprehend the questions, answer them correctly, comprehend and remember the key words and knowledge, according to their needs and capabilities. The resource teacher uses additionally visual didactic tools and materials, as well as modern technology, video and audio tools, to stimulate different abilities involved in the learning process. For example, the resource teacher can prepare picture materials in advance together with the SEN student, colour and cut out the cards and work together with the SEN student in the relevant group during the lesson. | ||||||||||||||||||||||||||||||||||||||||||||||||||||
| New vocabulary | Environment, living conditions, adaptation, survival, coloration, living organisms | ||||||||||||||||||||||||||||||||||||||||||||||||||||
| Work Flow | 1. Living conditions The teacher presents the lesson using Presentation from Appendix 3. Students are shown the animals and plants from slide 2 of the Presentation. For each picture, they answer the following questions: ● What is that animal/bird/plant? ● What conditions do they live in? ● What food do they need? ● Other living conditions – temperature, water, sun, …. Then the teacher asks: Are living conditions on our planet the same all over? After that the teacher introduces the living conditions topic - all living organisms need air, water, food, light, adequate heat, etc. conditions to live. In order to survive in certain living conditions, all living organisms have found their home in nature called habitat. Animals and plants have adapted to their environment in different ways. Going through slides – 3-7 the teacher explains the relationship between animals/birds/fish/plants and the environment where they live. Slide 8 introduces the new terminology of the lesson. 2. Enemies protection - animals and plants The teacher successively shows slides 9 - 16 and together with the students discusses the defense mechanisms of the animals and plants shown in the pictures. The teacher lists and visually shows places on our planet that have different living conditions: at the North Pole, in the icy ocean, in the desert, in the forest. The teacher asks the questions: ● How do hare, eagle, turtle and chameleon save themselves from their enemies? ● What color helps animals hide in the snow? And in the sands of the desert? If there is time, the teacher can show the videos in slide 17 about the arctic fox and bear and discuss with the students the consequences of the changes in the living environment to these animals. 3. Cold, heat and drought protection - animals and plants - 5 min. The teacher successively shows slides 18 - 20 and together with the students discusses the protective mechanisms of the animals and plants shown in the pictures. If there is time, the teacher can also look at the interesting facts on slides 21 23. 4. Adaptation of people to the environment - in the desert, in the Arctic, high in the mountains, on the equator - the teacher shows slides 24 and 25, and provokes a discussion Time – 25 minutes | ||||||||||||||||||||||||||||||||||||||||||||||||||||
| Reflection | The teacher shows slide 26 and asks the students where the mistakes are. Then organizes a discussion on the following questions: 1. What do living organisms need (living conditions)? 2. What is coloring? Give examples. Time - 10 minutes | ||||||||||||||||||||||||||||||||||||||||||||||||||||
| Notes | |||||||||||||||||||||||||||||||||||||||||||||||||||||
| Digital Resource |
● Presentation - Appendix 3 ● Animal Cards – Appendix 1 | ||||||||||||||||||||||||||||||||||||||||||||||||||||
| 60 | |||||||||||||||||||||||||||||||||||||||||||||||||||||
| | |||||||||||||||||||||||||||||||||||||||||||||||||||||
| 7 |  Grade 3 / Water - properties, distribution, importance and uses Grade 3 / Water - properties, distribution, importance and uses | ||||||||||||||||||||||||||||||||||||||||||||||||||||
| Developed by | Prosveta-Sofia Foundation | ||||||||||||||||||||||||||||||||||||||||||||||||||||
| Grade | 3 | ||||||||||||||||||||||||||||||||||||||||||||||||||||
| Duration | 60 | ||||||||||||||||||||||||||||||||||||||||||||||||||||
| Energizers | 34 - Who will fill more water in the container? Students are divided in teams and each team is instructed to stand in a column. A large empty container with a measuring scale (eg a transparent bucket for measuring the amount of water) is placed opposite each team. Another bucket full of water is placed next to each team. Each team gets one large cup; the cups for the teams are the same, e.g. 300 ml. The teacher launches the game and the first competitors from the teams scoop up as much water as possible with their cups, then walk to the large containers and pour the water into it, trying not to spill water on the way, and walking as quickly as possible. Afer that they return to their teams and pass the cup to the next participant. The activity continues until the teacher signals the end of the game. The duration should be determined in advance and it should take into consideration the number of students in the teams, so that most students can participate. After the end of the game, the amounts of water in the teams’ containers are compared. The team who have collected more water win the game. | ||||||||||||||||||||||||||||||||||||||||||||||||||||
| Relaxing Exercises | 35 - I need water Find small images (A5 format or smaller) of plants, animals and people, as well as substances or objects of non-living nature (a ball, sand, a table, a book, etc.). Students go around the room and collect the pictures with the images of representatives of living nature (which need water to exist). The game is not competitive. The duration depends on the number of images printed or cut from old magazines. At the end of the game, the participants collect and arrange all the images in one place and formulate what they have in common - water is vital their existence. Another option is, instead of sorting the printed images, ask students to draw something that needs water within 1 minute and have them arrange the drawings as a collage of living nature organisms that need water to exist | ||||||||||||||||||||||||||||||||||||||||||||||||||||
| Objectives | Students will:
| ||||||||||||||||||||||||||||||||||||||||||||||||||||
| Preparation | Materials needed for Step 2, task 3 A. A kettle for heating water (for making tea), which is placed on the teacher's table. B. For each group: ● Glass containers of different shapes and sizes: – Glass (or plastic) water cup with a volume of 250-300 ml; – Transparent tea cup with a saucer with a volume of 200 ml; – Glass jug with cold water; a bottle of sparkling water; – Beakers of different shapes; – Jug with squeezed lemon juice; ● Herbal tea packets (mint, wild berries, hibiscus); ● Sugar, salt, pepper, oil; ● Pebble, coin; ● Pack of ice cubes; ● Tea/cocktail spoons with long handles, at least one of which is metal; ● Candle and a box of matches (to be used under the teacher's supervision); bowl of water/ a spray bottle; ● Kitchen scales; ● Two plastic cups with a volume of 250 – 350 ml; ● Glass jar with a volume of 450 – 550 ml; ● Filter paper; ● Small river pebbles of different sizes and sand; Preparation | ||||||||||||||||||||||||||||||||||||||||||||||||||||
| Introduction | Discussion topics:
| ||||||||||||||||||||||||||||||||||||||||||||||||||||
| Teaching and learning methods | ● Student-centered teaching approach – students:
● Learning through questions/situations close to the students – when students are faced with problems close to their interests, they develop their spirit of inquiry and love for new knowledge; they use the acquired knowledge to develop new practical skills. ● Practical activities – connection to real life. | ||||||||||||||||||||||||||||||||||||||||||||||||||||
| Interdisciplinary connections | Mother tongue - finding, organizing and recording relevant information according to the objectives of the task; using suitable vocabulary to present scientific facts from observations. Mathematics – recognizing and applying individual steps of a problem solving process; applying different ways of solving problems in different contexts. Fine arts - presentation of the results of the experiments through a drawing. Civic Education - Sustainable Development; Environmental education. | ||||||||||||||||||||||||||||||||||||||||||||||||||||
| Resource teacher or other specialists activities | The role of the resource teacher is to help the students of the target group if they have difficulty with the experiments or feel disoriented to understand something. During the process of coming up to conclusions and noting them in the worksheet, the resource teacher should provide support in reflecting the results | ||||||||||||||||||||||||||||||||||||||||||||||||||||
| New vocabulary | Properties of water, states of water, purification, pollution. | ||||||||||||||||||||||||||||||||||||||||||||||||||||
| Work Flow | Step 1: What is it? Guessing game: The teacher asks the question Which substance is most common in nature? and subsequently provides hints so that student come to the final answer Water. Hint 1: It is necessary for the existence of all living things - plants, animals and humans. The teacher records on the board students' guesses that match hint 1. If there is more than one guess, he/she continues with Hint 2. Hint 2 : It is a liquid. If more than one guess is left, he/she continues with Hint 3. Hint 3: It has no color, taste or smell. The activity continues until only one suggestion is left - Water. Step 2: I'm a scientist! Conducting experiments is an activity by which scientists determine whether their assumptions are correct.
Step 3: Uses of water in everyday life.
Brainstorming Question: Where do we use water in everyday life? All answers are recorded. 2. Logical thinking: After the brainstorming activity, students are divided in 3 groups and each group has the task to divide the listed uses of water into different categories, taking into account a characteristic that unites some of the listed uses of water and distinguishes the group from the other categories. If students cannot decide how to do the grouping, the teacher can guide them by suggesting different areas in which water is used: in the household, in the production of industrial goods, in farms, in transport (as the cheapest transport) , for fun activities, etc. The teacher writes students' answers on the board and finally summarizes the uses of water on the big screen with slide 5 of Annex 1. Step 4: Water Pollution What can people do to keep water clean? (brainstorming) Students come up with possible actions orally and the teacher writes down the answers. Step 5: I'm a scientist! (water purification) Students are instructed to do different experiments through which they simulate different water purification techniques. (Handout 3) The experiments can be done in pairs or students are divided into 3 groups, each group being responsible for conducting one experiment. The groups then take turns presenting the experiment they were responsible for to the whole class. Expected results: in the first two experiments the water is not purified well, and in experiment 3 we get clear water (purified). The teacher explains again experiment 3 and tells students that it demonstrates the principle that is applied in drinking water treatment plants. Step 6: I love nature! 1. What can we personally do to contribute to protecting water as a valuable natural resource and protecting it from pollution - brainstorm, then use Annex 1, slide 6. 2. What can the authorities do to protect water as a valuable natural resource and to protect it from pollution: short brainstorming activity, then use Annex 1, slide 7. | ||||||||||||||||||||||||||||||||||||||||||||||||||||
| Reflection | I love nature and protect water from pollution! Students are divided in teams with the task to create posters on the topic of their personal contribution to reducing water consumption and protecting it from pollution. | ||||||||||||||||||||||||||||||||||||||||||||||||||||
| Notes | |||||||||||||||||||||||||||||||||||||||||||||||||||||
| Digital Resource | |||||||||||||||||||||||||||||||||||||||||||||||||||||
| 61 | |||||||||||||||||||||||||||||||||||||||||||||||||||||
| | |||||||||||||||||||||||||||||||||||||||||||||||||||||
| 8 |  Grade 3 / First Aid Grade 3 / First Aid | ||||||||||||||||||||||||||||||||||||||||||||||||||||
| Developed by | AECE - Escola Básica da Zona Verde | ||||||||||||||||||||||||||||||||||||||||||||||||||||
| Grade | 3 | ||||||||||||||||||||||||||||||||||||||||||||||||||||
| Duration | 60 | ||||||||||||||||||||||||||||||||||||||||||||||||||||
| Energizers | 36 - I know my colleagues Location: Classroom/Interior No. of participants: All the students in a class. Organisation: To the sound of music, students move randomly around the room. Materials: Radio or computer with background music, A4 sheets of paper with the outline of a human face and felt-tip pens. Game description: Each pupil writes their name legibly on a sheet of A4 paper on which the outline of a human face has already been drawn. The sheets are spread out randomly on the floor, along with a felt-tip pen for each. To the sound of calm music, the students walk freely around the room. When the music stops, each student has to stand in front of the sheet with the name of a classmate. While the music is still playing (about 30 seconds), each student draws a physical feature of their classmate's face on the sheet in front of them (e.g. their eyes). As soon as the music starts again, the students walk back through the pages and, when the music stops, they continue to complete the face in front of them. So on and so forth until the teacher has finished this part of the activity (this will happen when the teacher notices that the faces have a lot of elements drawn on them). Each "owner" of their portrait picks it up and looks at how their classmates have represented them. Collectively, reflection on how we know others and how they know us... the depth of the reflection depends on the time available and the characteristics of the group. Collectively, reflection on how we know others and how they know us... the depth of the reflection depends on the time available and the characteristics of the group. | ||||||||||||||||||||||||||||||||||||||||||||||||||||
| Relaxing Exercises | 30 - Face and nose Location: Classroom No. of participants: All the students in a class Organisation: Students seated in the classroom, each in their own place. Materials: None. With the students seated in a circle, the teacher starts by distributing three sentences to each student: The teacher starts by saying: There's a pesky old fly coming. It's landed on your nose. Try to get it out without using your hands. And just like that, it shrinks your nose. Make as many wrinkles in your nose as you can. Pull your nose up hard. O.K. You've pushed the fly away. Now you can relax your nose. Oops, here it comes again! See if you can swat it away! Wrinkle your nose tightly. Hold it as tight as you can. O.K., the fly is gone. 4 You can relax your face. Notice when you wrinkle your nose, your cheeks. Your mouth, forehead and eyes also helped and tightened up. So when you relax your nose, your whole face relaxes too. And that feels good. Oh-oh! This time the old fly is back. But now it's landed on your forehead. It makes lots of wrinkles. Try to catch it in the middle of all those wrinkles. Keep your forehead tight. OK, you can relax now. I'm glad the fly is gone. Now you can relax. Let your face be smooth; not a single wrinkle. Feel your face nice and smooth and relaxed. | ||||||||||||||||||||||||||||||||||||||||||||||||||||
| Objectives |
In the end of the lesson students will be able to:
| ||||||||||||||||||||||||||||||||||||||||||||||||||||
| Preparation | Resources Computer with speakers Individual computers Internet access Wall panel Tape to fix the images and phrases to the panel A4 sheets of paper Scratching material Record sheets An illustration of a first aid box containing: bandages, instant ice pack, gloves, scissors, antiseptic, painkillers and anti-inflammatories, thermometer, compresses, tweezers, healing ointment, cotton buds, adhesive tape, saline solution and band-aids. Cards with images representing: burns, haemorrhages, strains, fractures, animal bites and bruises. Three sentences printed out for each image mentioned above, with the procedures to be followed in the situations presented. | ||||||||||||||||||||||||||||||||||||||||||||||||||||
| Introduction | In this lesson the teacher should emphasise the importance of knowing procedures that contribute to preserving/improving the health of their body, as well as acquiring knowledge that will enable them to solve problems they may come across, in relation to knowledge of simple procedures suitable for burns, haemorrhages, strains, fractures, animal bites and haematomas. | ||||||||||||||||||||||||||||||||||||||||||||||||||||
| Teaching and learning methods |
| ||||||||||||||||||||||||||||||||||||||||||||||||||||
| Interdisciplinary connections |
Mother Tongue - Select relevant information according to the listening objectives and record it using different techniques. Speak clearly and articulate words appropriately. Citizenship and Development - Human rights. Health | ||||||||||||||||||||||||||||||||||||||||||||||||||||
| Resource teacher or other specialists activities | All the steps in the exploration of the topic are understandable to students with specific needs but with cognitive abilities. The lesson does not include long written explanations. The role of the support or special education teacher is to help the students in the target group if they can't if they are unable to carry out any of the tasks or steps, or feel disorientated in understanding something that may be asked of them. Identifying and manipulating and handling materials, taking part in games, exploring content by visualising images, etc., are usually well accepted and meet the interests and needs of most students. | ||||||||||||||||||||||||||||||||||||||||||||||||||||
| New vocabulary | First aid, burns, haemorrhages, strains, fractures, animal bites and bruises. | ||||||||||||||||||||||||||||||||||||||||||||||||||||
| Work Flow | 1st step - In pairs - What is first aid? Answer using the Mentimeter application, in the "Wordcloud" option (Appendix 1). - Students write three words on their individual computers that they think answer the question posed. 2nd step - large group - In the large group, reading out the words that have emerged. - Recording them on paper (each student records the words) (Appendix 2) sheet divided into 3 columns. - Viewing a powerpoint explaining, using simple words, what first aid is (showing the contents of a first aid box). (Appendix 3) 3rd step - Large group - Oral comparison, in the large group, between the explanation given in the powerpoint and the conceptions the students revealed in the first activity. - Recording on the sheet already used (Appendix 1) what first aid is and the materials that make up the first aid box. 4th step - Small group - Divide the class into seven groups. Each group is given a picture of each situation: burns, haemorrhages, sprains, fractures, animal bites and bruises. (Appendix 4) - Each group is also given a set of three sentences corresponding to simple procedures appropriate to each situation, which the students must order correctly, according to the sequence of procedures to be adopted. (Appendix 4) The teacher goes through the groups and guides the ordering of the procedures, if necessary. 5th step- Small group - Each group presents to the class the situation they have been given and the correct sequence of procedures to adopt. 6th step - Large group - The correctly organised images and sentences are displayed on a wall panel in the room. | ||||||||||||||||||||||||||||||||||||||||||||||||||||
| Reflection | Completion of a multiple-choice question (Appendix 5) Guided discussion: What do you think you learnt that was important today? What activity did you enjoy the most? - Group dynamics - Game - Answering on the computer (Mentimeter) - The powerpoint - The activity in pairs - Large group activities - Small group activities - Answering the class question - Relaxation activity | ||||||||||||||||||||||||||||||||||||||||||||||||||||
| Notes | |||||||||||||||||||||||||||||||||||||||||||||||||||||
| Digital Resource | Appendix 1: https://sen-power.eu/atividades1/pdf/880_Appendix 1 First AID.pdf Appendix 2: https://sen-power.eu/atividades1/pdf/880_Appendix 2 First AID.pdf Appendix 3: https://sen-power.eu/atividades1/digital/880/Appendix 3 First AID.pptx Appendix 4: https://sen-power.eu/atividades1/pdf/880_Appendix 4 First AID.pdf Appendix 5: https://sen-power.eu/atividades1/pdf/880_Appendix 5 First AID.pdf | ||||||||||||||||||||||||||||||||||||||||||||||||||||
| 62 | |||||||||||||||||||||||||||||||||||||||||||||||||||||
| | |||||||||||||||||||||||||||||||||||||||||||||||||||||
| 9 |  Grade 3 / States of matter: Reversible transformations Grade 3 / States of matter: Reversible transformations | ||||||||||||||||||||||||||||||||||||||||||||||||||||
| Developed by | AECE - Escola Básica da Zona Verde | ||||||||||||||||||||||||||||||||||||||||||||||||||||
| Grade | 3 | ||||||||||||||||||||||||||||||||||||||||||||||||||||
| Duration | 60 | ||||||||||||||||||||||||||||||||||||||||||||||||||||
| Energizers | 35 - Ice cubes Location: Classroom/Interior No. of participants: All the students in a class. Organisation: Students work in pairs. Materials: Container with ice cubes; dry paper towels. The students organise themselves into pairs. Each pair is given an ice cube which they try to melt using only their hands as quickly as possible. The pair that manages to completely break up the ice cube wins. | ||||||||||||||||||||||||||||||||||||||||||||||||||||
| Relaxing Exercises | 29 - Paper ball game Location: Classroom/ Indoor - Large space No. of participants: All students in a class Organisation: Students arranged in a circle. Materials: White A4 sheets of paper, one per student and one biros per student (each student has their own), quiet music. Description: With the students sitting in a circle, the teacher starts by handing out three sentences to each student: One thing they can do Something they like One thing they own Once this part of the exercise is over, the teacher starts to play some relaxing music and the ball of paper is passed calmly from hand to hand, until the teacher stops to the music and at that point the student who has the ball, unrolls the first (last) sheet of the ball and reads what is written and tries to identify to whom it belongs to. The teacher turns the music back on and the ball passes from hand to hand again. When the teacher stops the music again, the same thing is repeated, i.e. the student unrolls another sheet of paper, reads what is written on it and tries to guess to whom it belongs to. In a calm atmosphere, the game continues until the teacher stops it, or until all the sheets have been unrolled and all the students have played. When the students can't identify who the sheet belongs to, the teacher identifies him/her. | ||||||||||||||||||||||||||||||||||||||||||||||||||||
| Objectives |
In the end of the lesson students will be able to:
| ||||||||||||||||||||||||||||||||||||||||||||||||||||
| Preparation |
Resources: Scratching material (charcoal pencils, coloured pencils, black acetate pens...) Glue, tape Computer with speakers Individual computers Internet access/Forms A4 size transparent plastic bag A4 sheets of drawing paper paraffin, candle and dessert plate Matches Bowl 2 balloons 0.5 litre water bottle (clear plastic) A packet of school milk (single dose) A transparent glass Fridge (with freezer) if available at the school. Soup plate Salt Record sheet Pre-preparation: Ensure that the classroom or another space that is easy for the students to access and observe has a window with transparent glass that receives sunlight for most of the day. The teacher should make sure that the students have prior knowledge from previous years: everything around us belongs to a state: solid, liquid or gas. Preparation: (a week before the plan is implemented.) 1st Individually, in Arts /Visual Arts, students draw a picture of a natural landscape that includes spaces with water. (Appendix 1) 2nd In a large group, they select one of the drawings.
The drawing is removed from the bag. A little water is poured into the bag and the bag is taped shut on one of the windows in the room. (Appendix 1)
| ||||||||||||||||||||||||||||||||||||||||||||||||||||
| Introduction | During the lesson, emphasise the importance of taking part in simple activities to demonstrate scientific thinking: questioning, hypothesising, predicting answers, experimenting, organising and analysing the information in order to reach conclusions and communicate them. Students should use observation, direct experience, or watch videos, photos/images..., that provide a variety of activities and dynamics that should allow them to notice the differences between the characteristics of solids, liquids and gases. The teacher should involve students in carrying out experimental activities that lead them to discover the existence of reversible transformations of some materials in various states (condensation, evaporation, solidification, dissolution, fusion). | ||||||||||||||||||||||||||||||||||||||||||||||||||||
| Teaching and learning methods |
| ||||||||||||||||||||||||||||||||||||||||||||||||||||
| Interdisciplinary connections |
Mother Tongue - Select relevant information according to the listening objectives and record it using different techniques. Speak clearly and articulate words appropriately. Arts - Demonstrate expressive and creative skills in their artisticexpressive and creative skills in their artwork, demonstrating the knowledge they have acquired. Citizenship and Development - Sustainable Development, Environmental Education. | ||||||||||||||||||||||||||||||||||||||||||||||||||||
| Resource teacher or other specialists activities | All the steps of the topic are explored in a way for students with specific needs with cognitive abilities can understand them. The lesson does not include long written explanations. The role of the support or special education teacher is to help the students in the target group if they can't or are unable to carry out any of the tasks or steps, or feel disorientated in understanding something that may be asked to them. Identifying and manipulating and handling materials, taking part in games, exploring contents by visualising images, etc., are usually well accepted and meet the interests and needs of most students. | ||||||||||||||||||||||||||||||||||||||||||||||||||||
| New vocabulary | Condensation; evaporation; solidification; dissolution; fusion; reversible transformations; temperature. | ||||||||||||||||||||||||||||||||||||||||||||||||||||
| Work Flow |
1st step - Large group The teacher asks the students to look at some of the materials she has placed on the table: balloons, a glycerine candle, a bottle of liquid water, a glass of milk, school materials/scratch pads... On the teacher's instructions, the students gather the available materials according to their state: solid, liquid and... The group realises that none of the materials presented fall into the gaseous state. 2nd step - Large group To encourage discussion about how the gaseous state can be represented. A student fills a balloon. The balloon is tied so that the air doesn't escape and placed next to the empty balloon. The two balloons are placed side by side. One of the students unties the balloon and lets the air out. Through oral questioning of the students and their spontaneous interventions or those provoked by the teacher, students are led to conclude that the air contained in the balloon has come out and mixed with the surrounding air and this is an example of a gaseous material. 3rd step - Large group Each student is given a sheet of paper (appendix 2) on which they will record what they see and conclude from observing/doing the experiments, which will lead them to an understanding of reversible transformations. - Fusion/Solidification - Light the candle on the dessert plate and watch the glycerine melting - fusion: going from a solid to a liquid state. The paraffin that has melted with the heat of the flame, in contact with the cold plate solidifies - solidification. - Solidification/Fusion- Collect the bottle of water that has been placed in the freezer and see how the water changes from a liquid to a solid state - solidification. Observe the bottle after an hour and see that the ice begins to melt, changing from a solid to a liquid - fusion. - Evaporation/Condensation - Observe that the level of water in the bag stuck to the glass has decreased - evaporation. At the same time, watch small droplets formed on the top of the bag - condensation. - Dissolution - Observe that the salt dissolved in the water reappears in solid particles after the water has evaporated. During the experiments, the teacher encourages students to participate orally, so that they can conclude the names of the phenomena observed: condensation; evaporation; solidification; dissolution; fusion and that there are states of matter that are reversible. Temperature influences this reversibility. | ||||||||||||||||||||||||||||||||||||||||||||||||||||
| Reflection | Guided discussion: Ask students to do an interactive activity for evaluation, through Forms. (Appendix 3) What do you think you learnt that was important today? What activity did you enjoy the most? - The experiences; - Relaxation activity; - Group dynamics - Game; - The large group activities. | ||||||||||||||||||||||||||||||||||||||||||||||||||||
| Notes | |||||||||||||||||||||||||||||||||||||||||||||||||||||
| Digital Resource | Appendix 1:https://sen-power.eu/atividades1/pdf/881_Appendix 1.pdf Appendix 2: https://sen-power.eu/atividades1/pdf/881_Appendix 2.pdf Appendix 3: | ||||||||||||||||||||||||||||||||||||||||||||||||||||
| 63 | |||||||||||||||||||||||||||||||||||||||||||||||||||||
| | |||||||||||||||||||||||||||||||||||||||||||||||||||||
| 10 |  Grade 3 / Types of movement Grade 3 / Types of movement | ||||||||||||||||||||||||||||||||||||||||||||||||||||
| Developed by | Antalya Directorate Of Education | ||||||||||||||||||||||||||||||||||||||||||||||||||||
| Grade | 3 | ||||||||||||||||||||||||||||||||||||||||||||||||||||
| Duration | 60 | ||||||||||||||||||||||||||||||||||||||||||||||||||||
| Energizers | 19 - Grab the finger In a circle, place right finger on next person s left palm. Try to grab a finger before yours gets grabbed. After doing several times switch; place left finger on next person s right palm and repeat the process for a few times. | ||||||||||||||||||||||||||||||||||||||||||||||||||||
| Relaxing Exercises | 7 - Strong as a plant All students spread out in the room and imagine they are plants (eg tulip, grass, oak, pine tree, etc.) but don’t tell the others what plant they are. They listen to the audio recording and with their actions imitate the movements of the plant in different weather conditions (rain, wind, storm, snow, calm weather, etc.) *The teacher plays the sounds from Annex 1 while students complete the activity. | ||||||||||||||||||||||||||||||||||||||||||||||||||||
| Objectives | Students will:
| ||||||||||||||||||||||||||||||||||||||||||||||||||||
| Preparation | Preparation Print Annex 2 and Annex 3 for each student Equipment Computer and projector (for Annex 1) | ||||||||||||||||||||||||||||||||||||||||||||||||||||
| Introduction | Introduction: Good morning, class! Today, we are going to learn about how different things move. This lesson is called 'Movement Types of Entities.' We will look at how animals, people, and even some objects move! Movement Activity: Before we start, let's have some fun! I want everyone to stand up and do as instructed. Ready? Let's go!
| ||||||||||||||||||||||||||||||||||||||||||||||||||||
| Teaching and learning methods | Visual Learning: Using images and videos to demonstrate movement. Kinesthetic Learning: Engaging students in group activities and matching exercises. Collaborative Learning: Encouraging group discussions and presentations. | ||||||||||||||||||||||||||||||||||||||||||||||||||||
| Interdisciplinary connections | Math Art Physical education | ||||||||||||||||||||||||||||||||||||||||||||||||||||
| Resource teacher or other specialists activities | For SEN students: Use larger, more visually clear images to assist with matching activities. Offer one-on-one support during group activities and provide additional time for completing worksheets if needed. | ||||||||||||||||||||||||||||||||||||||||||||||||||||
| New vocabulary | Movement Entity | ||||||||||||||||||||||||||||||||||||||||||||||||||||
| Work Flow | Step 1: Explanation of movement properties: The teacher starts the lesson by providing a definition of movement and movement types: Movement: The act or process of moving; a change in place or position. Movement types describe how different things move. Let's think about living things like animals and plants first. Animals: Animals move to find food, escape from danger, or find a place to live. Examples:
Plants also have movement, even if it's not as obvious. Some plants can turn their leaves towards the sunlight, and others can close their flowers at night. Movement of Non-Living Things: Non-living things also move because of some force acting on them. Examples:
Step 2: Direct Instruction Introduce different types of motion: There are lots of different ways things move. For example, birds fly in the air, fish swim in water, and cars drive on the road.
3.Guided Practice (Group Activity): Living Entities and Their Movements: Divide students into small groups. Provide each group with a copy of Annex 2 showing various entities and their movements. The groups have to fill in the blanks. 4. Share and Discuss: Each group presents their answers and explains why they think the entity moves in that way. Ask groups to mime the movements of the animals when sharing their answers. Step 3: Independent Practice Provide each student with a copy of Annex 3 showing various non-living entities and their movements. Their task is to fill in the blanks. Observation: Walk around the room, providing assistance and checking for understanding. Step 4: ClosingSuggested questions: Name the different ways animals move. Name the different ways objects like cars or balls move. Write one sentence about your favorite part of today's lesson and share it with a partner. | ||||||||||||||||||||||||||||||||||||||||||||||||||||
| Reflection | Suggested discussion questions: What was the most interesting movement type you learned about today? Which activity from today’s lesson did you like most? | ||||||||||||||||||||||||||||||||||||||||||||||||||||
| Notes | |||||||||||||||||||||||||||||||||||||||||||||||||||||
| Digital Resource | |||||||||||||||||||||||||||||||||||||||||||||||||||||
| 64 | |||||||||||||||||||||||||||||||||||||||||||||||||||||
| | |||||||||||||||||||||||||||||||||||||||||||||||||||||
| 11 |  Grade 3 / The Water Cycle: A Journey Through States of Matter Grade 3 / The Water Cycle: A Journey Through States of Matter | ||||||||||||||||||||||||||||||||||||||||||||||||||||
| Developed by | Antalya Directorate Of Education | ||||||||||||||||||||||||||||||||||||||||||||||||||||
| Grade | 3 | ||||||||||||||||||||||||||||||||||||||||||||||||||||
| Duration | 60 | ||||||||||||||||||||||||||||||||||||||||||||||||||||
| Energizers | 38 - Good morning - good afternoon Location: Classroom/Interior No. of participants: All students in a class Organization: Students standing in a circle Material: A blindfold Game description: The teacher draws a student to go into the middle blindfolded. The other students hold hands and walk around the circle. The blindfolded student touches a classmate who has to say "good morning" or "good afternoon". At this point, the blindfolded student tries to find out who their classmate is. If they do, they switch and so on until the teacher decides to keep the game going. | ||||||||||||||||||||||||||||||||||||||||||||||||||||
| Relaxing Exercises | 9 - Lion's breath Lion’s breath is a playful way to release and relax into more peaceful feelings. The trainer tells students that they are going to do a breath called the lion’s breath in order to let go of feelings or thoughts we no longer want. This breath is very helpful in getting those ideas out of us and pushing them far away. Instructions
| ||||||||||||||||||||||||||||||||||||||||||||||||||||
| Objectives |
| ||||||||||||||||||||||||||||||||||||||||||||||||||||
| Preparation | Materials:
| ||||||||||||||||||||||||||||||||||||||||||||||||||||
| Introduction | Start with a simple question to engage the students: "What happens to water after it rains?" Show a basic illustration of the water cycle, pointing out rain, clouds, and bodies of water like lakes and oceans (Annex 1). Briefly explain that water moves in a cycle, changing from liquid to gas and sometimes to solid. Tell the students they'll get to see how water travels through this cycle in today's lesson, making the process clear and understandable. | ||||||||||||||||||||||||||||||||||||||||||||||||||||
| Teaching and learning methods |
| ||||||||||||||||||||||||||||||||||||||||||||||||||||
| Interdisciplinary connections | Geography: Understand the water cycle's role in weather patterns and climate. Environmental Science: Discuss the importance of water conservation and the impact of the water cycle on ecosystems. | ||||||||||||||||||||||||||||||||||||||||||||||||||||
| Resource teacher or other specialists activities | Collaborate with the science lab coordinator to organize a water cycle demonstration. If available, use digital media to enhance the learning experience with interactive water cycle simulations. | ||||||||||||||||||||||||||||||||||||||||||||||||||||
| New vocabulary | Evaporation, Condensation, Precipitation, Collection, Water Vapor, Cycle, States of Matter. | ||||||||||||||||||||||||||||||||||||||||||||||||||||
| Work Flow |
Setup (5 min): Distribute the materials to each student or pair: a clear plastic cup, a small piece of clay, plastic wrap, a rubber band, and a small rock. Ask students to place a piece of clay inside the bottom of their cup to act as a landscape and pour a small amount of water to create a 'lake'. Step-by-Step Experiment (15 min): Create the 'Lake' (2 min): Instruct students to pour water into the cup, filling it just enough to cover the clay—this represents a body of water in the water cycle. Evaporation Phase (2 min): Have students cover the top of the cup with plastic wrap and secure it with a rubber band. Explain that the plastic wrap acts like the atmosphere, and the water in the cup will heat up and evaporate, turning into water vapor. Simulate the Sun (3 min): Use a desk lamp with an incandescent bulb to consistently mimic sunlight, carefully positioning it to warm the water safely without overheating. If using actual sunlight, ensure it is direct and strong. Discuss how the sun heats water bodies, leading to evaporation. Note: It's advisable to set up this experiment at the beginning of the lesson to allow sufficient time for observation until the end. Condensation Phase (3 min): Explain that as the water vapor cools, it turns back into liquid, forming droplets on the underside of the plastic wrap. This demonstrates condensation—when water vapor turns into clouds. Forming 'Rain' (3 min): Place the small rock in the center of the plastic wrap, right above the water. This will create a low point for water droplets to collect and eventually 'rain' back into the cup, showing precipitation. Observation (5 min): Allow the students a few minutes to watch as condensation forms. Encourage them to make observations and predictions about what will happen over the course of the experiment. Use this time to discuss with students how this small-scale experiment represents the larger water cycle happening around the world. Wrap-Up (at the end of the class or the following day): Return to the experiment to observe the results. There should be droplets on the inside of the plastic wrap and possibly some water that has dripped back into the 'lake'. Discuss the cycle they observed—evaporation (water heating up and rising), condensation (forming droplets), and precipitation (water falling back to the 'lake'). Reinforce the concepts by asking students to describe each stage and how it contributes to the water cycle. This hands-on experiment provides a visual and practical demonstration of the water cycle, helping students grasp these foundational scientific concepts through active participation and observation. | ||||||||||||||||||||||||||||||||||||||||||||||||||||
| Reflection | Have students share what they learned from the experiment and how it relates to the water cycle they see in nature. Encourage them to ask questions or share any thoughts on how water impacts life on Earth. | ||||||||||||||||||||||||||||||||||||||||||||||||||||
| Notes | Ensure safety during the experiment, especially if using warm water to speed up evaporation. | ||||||||||||||||||||||||||||||||||||||||||||||||||||
| Digital Resource | |||||||||||||||||||||||||||||||||||||||||||||||||||||
| 65 | |||||||||||||||||||||||||||||||||||||||||||||||||||||
| | |||||||||||||||||||||||||||||||||||||||||||||||||||||
| 12 |  Grade 3 / Classification of animals based on their food habits Grade 3 / Classification of animals based on their food habits | ||||||||||||||||||||||||||||||||||||||||||||||||||||
| Developed by | Prosveta-Sofia Foundation | ||||||||||||||||||||||||||||||||||||||||||||||||||||
| Grade | 3 | ||||||||||||||||||||||||||||||||||||||||||||||||||||
| Duration | 60 | ||||||||||||||||||||||||||||||||||||||||||||||||||||
| Energizers | 39 - My body Location: Classroom No. of participants: All students in a class Organisation: Students in a standing circle Materials: None Game description: Start the game with all the students and teacher forming a standing circle. The teacher starts the game by saying the name of a body part. The student next to him/her (it doesn't matter if they're left or right) will place their hand on the body part the teacher says and name another body part and the next student will place their hand on the named body part and so on, until everyone has named a body part and placed a named body part. You mustn't repeat body parts, whoever does it, loses and leaves the game. | ||||||||||||||||||||||||||||||||||||||||||||||||||||
| Relaxing Exercises | 36 - Nature lovers Close your eyes and imagine that you doing a nature walk - on the fields or in the mountains. Imagine all the details of what you see and feel: ● What vegetation do you see around you? ● What season is it and what colours are the plants? ● Are there animals in your picture – maybe you see beetles in the grass or hear the birds? ● Is there movement around you – maybe there is a slight breeze and the leaves of the trees are swaying, or a stronger wind is bending their trunks, or is it completely quiet and everything is still? ● Do you smell any aromas? ● Are there people around you? ● How do you feel? Now, keeping this picture in your mind, open your eyes and prepare for the rest of the day. | ||||||||||||||||||||||||||||||||||||||||||||||||||||
| Objectives | Students will: ● learn which are the main 3 groups of animals according to their food habits; ● develop their analytical skills; ● improve their teamwork skills; ● improve their digital competences. | ||||||||||||||||||||||||||||||||||||||||||||||||||||
| Preparation | Print enough copies of Handout 1 for each group. Cut the photos individually so that each photo is on a separate card. ● Print out Handout 2, page 1 and cut the words along the lines of the table; each student should get one word. If there are not enough words, make another copy of page 1 and distribute words to the remaining students. ● Print Handout 3 in 2 copies – one for Team 1 and one for Team 2; or make more copies so that more students in the teams can read the task. ● Print Handout 4 in 2 copies – one for each team (teams 3 and 4), or make more copies so that more students can read the task. ● Print out Handout 5 in 4 copies – one for each team (teams 1, 2, 3 and 4), or make more copies so that more students can read the task. ● Print Handout 6 and cut the emotion plates separately. Equipment ● Mobile devices for each student, or one for two students – for the computer game ● Internet connection – for the computer game. | ||||||||||||||||||||||||||||||||||||||||||||||||||||
| Introduction | In order to study nature more easily, we group the things around us, taking into account specific characteristics that unite the representatives of a given group and separate them from other groups. We already know that there is living and non-living nature; furthermore, organisms from living nature are also divided into different groups. Today's activity is about grouping things by different characteristics, but you are the ones who have to decide which characteristic you will use to separate the organisms we are going to talk about. | ||||||||||||||||||||||||||||||||||||||||||||||||||||
| Teaching and learning methods | Learning in small steps Cooperative learning Problem-based learning Guided research | ||||||||||||||||||||||||||||||||||||||||||||||||||||
| Interdisciplinary connections | Mother tongue - used all the time, in the performance of all tasks. Mathematics – reasoning skills. Physical education - developing students' coordination skills during the game at the beginning of the lesson. Music - in the energizer (students must follow the set rhythm and move to it, repeating the words according to the teacher's instructions). | ||||||||||||||||||||||||||||||||||||||||||||||||||||
| Resource teacher or other specialists activities | The activities are practical and require logical thinking skills, so they do not imply difficulties in the implementation by students with SEN who have well-preserved cognitive abilities. The lesson does not include long written explanations. In case of problems with communication or teamwork, the resource teacher can complete the tasks individually with the student, then join the group and present the corresponding suggestion. In the logic tasks of Step 3, the resource teacher can work with the student and illustrate each step through a graphic representation. | ||||||||||||||||||||||||||||||||||||||||||||||||||||
| New vocabulary | Herbivores, carnivores, omnivores | ||||||||||||||||||||||||||||||||||||||||||||||||||||
| Work Flow | Step 1: revision (team work) 1. Divide the class in teams of 4 students. Each team receives the cards from Handout 1. Teams have the task to discuss and decidе how to divide the images in 2 groups. Students are not told how they should split the images; they only are provided with the tip that the cards in each group should be similar considering a specific characteristic which distinguishes them from the images in the other group. (hint: the groups are (1) images of non-living things, and (2) images of living organisms.) 2. Each team summarizes how they have divided the cards from Handout 1 and reports the feature(s) that the images from Group 1 share and the corresponding feature for Group 2. 3. The class comes to a joint decision about the division of the images in 2 groups, taking into account the opinion of the different teams (NFE tool - snowballing): 3.1. Teams 1 and 2 work together; similarly teams 3 and 4 work together, as well as teams 5 and 6, etc. If the teams are an odd number, the last team joins one of the othe teams of 2. In these larger teams of 2, discussion takes place about how the images should be divided. If both teams divided the images the same way, there is no nothing to be discussed. If there are different opinions, the large group of the t teams discusses both options and comes up with one opinion. 3.2. In the next step, all larger groups communicate their joint decision on dividing the animals into 2 groups, and if there are differences, they discuss them and agree on a shared opinion. 3.3. Expected result - The two groups are: (1) images of non-living nature with the following characteristics – the things from the images do not grow, do not need food, do not reproduce; (2) organisms of living nature – they eat, grow and reproduce. 4. Working in groups (or individually) - students are asked to divide the images of the living organisms in 3 groups using the computer game https://wordwall.net/resource/73014695 , each of the three groups being described by its characteristics instead of the name of the group. Step 2 1. Each student receives a card with the name of an animal (Handout 2, page 1) and the task to research what it eats, which can be done using a mobile device with access to the Internet, or through encyclopedias for animals. 2. Students are divided into groups of 5 and each group writes down the names of the 5 animals on a piece of paper, and next to each animal - the results of the research about its eating habits. Sample records: Handout 2, page 2_1. 3. All groups performs the following activities: 3.1. Circle in green the foods that belong to the plant group and the foods that belong to the animal group - in red. Sample records: Handout 2, page 2_2. 3.2. The groups report the results of the task from item 2, and the teacher writes down all the animals and their food habits on the board. Sample record of the food of some of the animals: Handout 2, page 3_1. 3.3. Students take turns to go to the board and circle plant foods in green and animal foods in red. Sample entry: Handout 2, page 3_2. 3.4. One student is chosen to mark in green the animals that feed only on plants. These animals are called herbivores. 3.5. Another student comes out and marks in red the animals that eat only meat (they eat other animals or their meat). These animals are called carnivores. 3.6. A third student marks with a different color all the remaining animals that eat both plants and meat. These animals are called omnivorous. Sample entry: Handout 2, page 4. Step 4 (logic problems – team work) The students are divided into 4 teams, which have the task to solve the following logic problems in 2 rounds. Round 1: (all teams work simultaneously) ● Teams 1 and 2 receive Handout 3 with the description of the task. The two teams try to decide how to get the fox, the hen and the bag of corn across the river; they can act out the crossing of the river or graphically label the individual steps. The team that finds the solution first, presents it to the rest of the class. ● Teams 3 and 4 receive Handout 4 with the description of the task. The two teams try to find out how to get the animals across the river; they can act out the transfer of the animals across the river or graphically label the individual steps. The team that finds the solution first, presents it to the rest of the class. Round 2: All teams receive Handout 5 and try to work out the solution to the task. If a team signals that they are ready, this ends the game (temporarily or permanently). The team acts out their solution. The other teams observe the suggested steps. If, at a certain point a sheep is eaten, the presenting team ends its presentation, and the other teams continue thinking about the solution until another team signals that they have found a way how to do the transfer, and the acting procedure is repeated. *Another option is to set the task to be solved at home (after the end of the lesson), and the solutions are presented (acted out) in another lesson during the following days. | ||||||||||||||||||||||||||||||||||||||||||||||||||||
| Reflection | Directed reflection - you can implement some of the described activities and ask the following questions (10 minutes) ● How did you feel during the lesson? The following plate with emotions are placed at different corners of the room (Handout 6): 1. Interested; 2. Satisfied; 3. Confused; 4. Surprised; 5. Excited; 6. Happy; 7. Embarrassed; 8. Uneasy. Students go to the plate that best represents how they felt during the lesson. When students break in the 8 groups, they share in their group why they chose that feeling (2 min). A representative of the group then reports to the other groups why the students in the group chose the corresponding feeling. (Emotion plates: Handout 6) ● What new things did you learn? (related to the animals or not) ● How can you make use of what you learned during the lesson? | ||||||||||||||||||||||||||||||||||||||||||||||||||||
| Notes | |||||||||||||||||||||||||||||||||||||||||||||||||||||
| Digital Resource | Computer game (Step 1) | ||||||||||||||||||||||||||||||||||||||||||||||||||||
| 66 | ||
| | ||
| Grade 4
| ||
| 67 | |||||||||||||||||||||||||||||||||||||||||||||||||||||
| | |||||||||||||||||||||||||||||||||||||||||||||||||||||
| 1 |  Grade 4 / Human activities and their effect on the oceans Grade 4 / Human activities and their effect on the oceans | ||||||||||||||||||||||||||||||||||||||||||||||||||||
| Developed by | AECE - Escola Básica da Zona Verde | ||||||||||||||||||||||||||||||||||||||||||||||||||||
| Grade | 4 | ||||||||||||||||||||||||||||||||||||||||||||||||||||
| Duration | 60 | ||||||||||||||||||||||||||||||||||||||||||||||||||||
| Energizers | 25 - Plastic, Plastic, Plastic ... In a large group, students are challenged to look around and name 3 things near them that are made of plastic, or contain plastic. The learners are reminded that they can also pay attention to their clothes for this they just have to look at the labels of their clothes, if the labels say for example "polyester", "polyamide", "acrylic", "elastane", it means that this clothes are made of plastic. | ||||||||||||||||||||||||||||||||||||||||||||||||||||
| Relaxing Exercises | 24 - Music From the Sea Move tables and chairs out of the classroom, ask students to spread out around the room and find the position that is most comfortable for them. Silently, and listening to a relaxing music of the seabed from a video, which the teacher selects and projects, the learners imagine being a living being at the bottom of a calm and clean sea. This activity should not exceed 5 minutes. | ||||||||||||||||||||||||||||||||||||||||||||||||||||
| Objectives | Students should be able to:
| ||||||||||||||||||||||||||||||||||||||||||||||||||||
| Preparation | Materials
Pre-preparation of the lesson. Painting of the room's placard, with techniques students’ choice and teachers should stimulate the activity, in a visual arts class, using acrylic paints, watercolours and collages with waste papers to build algae-like elements, which can be made with newspaper, rolled up, or balls from scraps of silk or crepe / crinkle papers. While some learners paint the base of the scene, others draw sea creatures on white sheets (they can be used on one side, to stimulate reused paper) Illustrating the drawings according to individual preferences, these will be glued to the bottom base of the scene after it dries Preparing for the lesson Choose a video related to the topic to start the lesson. Blue cardboard labelled with the brainstorming title "Sea pollution - everyone's problem". (Appendix 1)
Titles and sheets with questions printed on A3.
Name the various types of marine litter and highlight the most common.
A3 cards already printed for the 5th lesson step - making awareness-raising posters. | ||||||||||||||||||||||||||||||||||||||||||||||||||||
| Introduction | It is important that students in their learning are confronted with current everyday problems. Focusing on prior knowledge, using practical skills and strategies, students should be alerted to the impact of sea pollution / marine litter on the environment, talk about its consequences: death of marine animals, fish, mammals and birds, poorer quality of sea water, dirty beaches, public health issues, etc. Students should be led to identify among the diversity of materials, (plastic, metal, wood, rubber, glass and paper), the one that is found in greater quantity in the sea - plastic and its effect on sea life. | ||||||||||||||||||||||||||||||||||||||||||||||||||||
| Teaching and learning methods |
| ||||||||||||||||||||||||||||||||||||||||||||||||||||
| Interdisciplinary connections | Mother tongue - Selecting relevant information according to the objectives of listening and record it using different techniques. Distinguishing between facts and opinions, implicit and explicit information, essential and accessory, denotation and connotation. Mathematics - Developing confidence in their mathematical skills and knowledge, and the ability to analyse their own work and regulate their learning. – Developing persistence, autonomy and willingness to deal with situations involving mathematics in their school career and in life in society. Artistic Education - Visual Arts Manifest expressed in creative skills of students’ plastic productions, showing the knowledge acquired. Using various processes to record ideas (e.g. graphic diaries), planning (e.g. project, portfolio) and work (e.g. individual, group and network). | ||||||||||||||||||||||||||||||||||||||||||||||||||||
| Resource teacher or other specialists activities | All steps of the topic exploration are understandable for pupils with specific needs but with cognitive abilities. The lesson does not include long written explanations. The role of the support or special education teacher is to help pupils in the target group if they are unable to complete any of the tasks or steps, or feel disorientated in understanding something that may be asked. | ||||||||||||||||||||||||||||||||||||||||||||||||||||
| New vocabulary | Sea pollution; sea litter; living habits; "Refuse" and "Rethink" concepts; 5 R's policy; microplastics. | ||||||||||||||||||||||||||||||||||||||||||||||||||||
| Work Flow | 1st STEP The class as a whole: Marine pollution, everyone's problem! Sources of marine pollution. Introduce the topic with the support of an educational video or documentary (chosen by the teacher) available on the internet. The chosen video should not be longer than 5 to 6 minutes. 2nd STEP Individual work: The board previously decorated by the pupils in a visual arts class, representing the seabed scenario. 3rd STEP Group Work: 4/5 students Research on the computer information about Sea litter which is originated on different land and sea sources but is mainly the result of people's living and consumption habits. Each group will direct the research to answer one of the 5 questions and complete a collective poster to occupy the classroom board, deliberately prepared for this purpose, that is to receive only material worked in class. On this board there should already be the questions and the defined space where the students will paste the answers. A3 printed sheets. (Appendix 2)
4th STEP Class as a whole: Among the diversity of materials, (plastic, metal, wood, rubber, glass and paper), the one that is found in the greatest quantity in the seas is the plastic and learners should concentrate on the its effects on marine life. Students should recognise the relationship between "plastic use" and "marine litter" by Watching the film: A Bottle's Odyssey – UNEnvironmentProgramme The rubbish on beaches and in the oceans belongs to all of us. When we don't put it in the right place after using it, it travels far away. 5th STEP Start the activity with a group exploration of all the posters and then move on to individual work, providing one poster to each student, according to their preference. If it is necessary to repeat the printing of any poster, the teacher will select the one(s) that make the most sense to repeat. It's time to get to work! Where do we start? What can we do to prevent sea pollution?
How do we do it? Prepare awareness posters (Appendix 3) to be distributed/ posted after class in the school corridors. Extra Activity A possibility to be developed later in another class. Black Tides: What is the effect on seabirds. In a different class / moment that the teacher considers appropriate, develop the following experiment: MATERIAL Water, cooking oil and a bird feather. PROCEDURE Pour a few drops of water on the feather and observe. Spread cooking oil on the feather, pour water over the feather again and observe. Pupils should record what they observe and discuss the results, comparing them with what happens in reality after a 'Black Tide'. | ||||||||||||||||||||||||||||||||||||||||||||||||||||
| Reflection | Guided discussion: What was the most important thing you think you have learnt today? Which activity did you enjoy the most? - Watching the videos: The one used in the 1st moment of the lesson - Sea pollution, a problem for everyone! - The one used in the 4th moment of the lesson - The Odyssey of a plastic bottle. - A Bottle's Odyssey - Relaxation activity; - Group dynamics; - Research and activities on the computer; - The activities carried out in large group. - Individual activity - Brainstorming on ; - Realisation of posters; - Other. | ||||||||||||||||||||||||||||||||||||||||||||||||||||
| Notes | |||||||||||||||||||||||||||||||||||||||||||||||||||||
| Digital Resource | |||||||||||||||||||||||||||||||||||||||||||||||||||||
| 68 | |||||||||||||||||||||||||||||||||||||||||||||||||||||
| | |||||||||||||||||||||||||||||||||||||||||||||||||||||
| 2 |  Grade 4 / The secrets of water – the 3 states of water Grade 4 / The secrets of water – the 3 states of water | ||||||||||||||||||||||||||||||||||||||||||||||||||||
| Developed by | NART | ||||||||||||||||||||||||||||||||||||||||||||||||||||
| Grade | 4 | ||||||||||||||||||||||||||||||||||||||||||||||||||||
| Duration | 45 | ||||||||||||||||||||||||||||||||||||||||||||||||||||
| Energizers | 28 - How to melt ice? Arrange 4 tables far apart in the room. Divide the students into 4 groups - in each group there should be 1 student who only records what the other are doing. Give each group materials which include paper towels and a specific number (3 -4) of ice cubes on a plate. Encourage students to use the materials to try and melt the ice quickly! Tell them they have 5 minutes to work. After the allotted 5 minutes have passed, end the game appropriately. Time – 6 min. | ||||||||||||||||||||||||||||||||||||||||||||||||||||
| Relaxing Exercises | 27 - What helps ice melt? Collect the materials used in the energizer and ask the students to wipe the tables with the paper to make them dry. Ask the students to take their seats. Ask groups to share the steps of the melting process within their group. Discuss what worked and why? Discuss also what they would do in a different way the next time! Time – 4 min. | ||||||||||||||||||||||||||||||||||||||||||||||||||||
| Objectives | At the end of the lesson student: - Recognizes the three states of water: solid, liquid, and gas; - Describes, based on experiments, the changes in the state of water. | ||||||||||||||||||||||||||||||||||||||||||||||||||||
| Preparation | The preparation starts with the energizer. Support materials and technology: • Magnets –sticks and balls of the same size and type. All sticks have the same colour and all balls have a colour different from that of the sticks. • As an alternative to the magnets toothpicks and plasticine in 2 colours can be used. The number of magnets or toothpicks and plasticine should allow each child to make their water molecule. Prepare sets for each table in your class depending on the number of students and how many students are at one table. • 3 transparent plastic cups/vessels with different capacities – 200, 400, 750 ml. • Plastic saucer and bowl. • Ice cubes of the same size. There must be enough cubes for the activities described below. • Table salt, baking soda, sand. • A small piece of styrofoam or cork. • Measuring cup for liquids. | ||||||||||||||||||||||||||||||||||||||||||||||||||||
| Introduction | Students will explore the different states of water – solid, liquid and gas – and how they change from one state to another. | ||||||||||||||||||||||||||||||||||||||||||||||||||||
| Teaching and learning methods | Learning in small steps Breaking instructions down into smaller parts Using patterns Using technology and visualization Providing real-life examples Using manipulatives | ||||||||||||||||||||||||||||||||||||||||||||||||||||
| Interdisciplinary connections | Mathematic Geography History Arts | ||||||||||||||||||||||||||||||||||||||||||||||||||||
| Resource teacher or other specialists activities | Almost all the steps of the lesson are comprehensible to most special needs students who have well-preserved cognitive abilities. The lesson does not comprise long written explanations, and long instructions, which are difficult for the target group students (TGSt). The role of the special needs teacher or the assistant teacher is to help TGSt in case they are not able to cope with some of the tasks or steps. | ||||||||||||||||||||||||||||||||||||||||||||||||||||
| New vocabulary | solution, molecules, atoms, particle of an element, oxygen, hydrogen, solid, fluid, liquid, sea level, water cycle, volume, crystal, gas | ||||||||||||||||||||||||||||||||||||||||||||||||||||
| Work Flow | 1. Continue the conversation which you have started during the energizing exercise. Tell the students that they will stay researchers. Place a 3 large glasses of water in front of the students. Fill 2/3 of the glasses with water. Drop 2-3 pebbles into one glass. The pebbles fall to the bottom. Place a few ice cubes in the second glass. The ice remains on top. Place the piece of styrofoam or cork in the third glass. It stays on top. Ask students if they know why this happens. Ice is frozen water, isn’t it? Ice is a solid, isn’t it? When water freezes, its molecules move farther apart, making ice less dense than water. There is more air between the molecules. This means that ice will be lighter than the same volume of water, and so, ice will float in water. Water freezes at 0° Celsius. Water is the only substance that expands when it freezes. This is one of the extraordinary properties of water. Demonstrate this as follows: Take a clear glass and fill it to the top with ice cubes. Leave the glass on the window - in the sun or near a heating device. Tell the students that together you will find how much of the glass will be filled with water after the ice melts. Water will fill less volume than the ice cubes. Ask students where in nature one can find the most ice and if they know what ice is used for - to chill drinks, to keep food cold and fresh, in fishing, ice skating, to create ice sculptures and even houses. In the past, ice was used instead of refrigerator. You can make a presentation with Appendix 1. 2. Tell the students that they already know what ice is made of - water. But what is water made of? Let the students guess - some of them may know the correct answer. Everything is made of atoms. An atom is the smallest particle of an element, like oxygen or hydrogen. Atoms join together to form molecules. A water molecule has three atoms: two hydrogen (H) atoms and one oxygen (O) atom. That's why water is sometimes referred to as H2O. A single drop of water contains billions of water molecules. Show them the water molecule. Allow students to make their own water molecules using toothpicks and plasticine or magnets.
3. Ask the students if they remember when touching the ice, was it dry or wet? They should answer that it was dry at first and then became wet as it started melting. Liquid water is wet and fluid. We are the most familiar with that form of water. We use liquid water in many ways, including washing and drinking. Ask them to give examples of liquid water – rivers, lakes, seas, the water we drink. Make a quick summary by asking students if they can now say what the two main states of water are - they should answer - liquid and solid. Show them what water and ice molecules look like.
Ask them if, they had swum in the sea, in a lake, in the ocean, and if they had felt the difference in the temperature of the water - warm water on the surface, and cold - below. Tell them that you are now going to do an experiment to discover some more properties of water. Put 3 glasses of different capacities, the saucer and the bowl on the table where all the students can see. Pour exactly 100 ml of water successively into a measuring cup. After each filling, pour the cup into the appropriate container. Students will be able to see that the same quantity occupies a different shape and volume in different containers. This is because water has no shape – it takes the shape of the vessel in which we pour it. You can also do this experiment with students by dividing them into groups. Give each group 1 container of different capacity and 1 measuring cup with 100 ml water. Each group pours the liquid from the measuring cup into their container. Then they go around the other tables and observe what have happened to the amount of water. Ask them about other features of water - no taste, no colour, no smell. Tell them that they will have the task to do at home - use water to make something that has colour, smell and taste. 4. Ask them if they can point out another state of water. If they have studied the topic of the water cycle, they should answer that it is the water vapour that evaporates from the water basins. Water as a gas—vapour is always present in the air around us. We cannot see it most of the time - even now in the classroom there is water in the air. But sometimes we can - ask them if they can guess when we see water as a gas that rises... When we boil water, water changes from a liquid to gas or water vapour. When some of the water vapor cools, it can be seen as a small cloud called steam. This cloud of steam is a mini-version of the clouds we see in the sky. At sea level, steam is formed at 100° Celsius. Water vapour attaches to small bits of dust in the air. It forms raindrops in warm temperatures. In cold temperatures, it freezes and forms snow or hail.
Gases/vapour do not have their own volume and shape, but occupy the shape and volume of the vessel or space in which they are placed. 5. On their own decision teacher can do the following experiment while working on another topic or decide to have an art class in which students make drawings on the water topic. The preparation for the experiment takes 5 minutes and it can be done at the end of the class. The results reporting can be done at the end of some other lesson. Time – 25 min. ICE MELTING EXPERIMENTS - WHAT MAKES ICE MELT FASTER? In this experiment, you will investigate what makes ice melt faster, by adding several different solids to ice. SUPPLIES:
STEP 1: Add 4 to 5 ice cubes to 6 cakebaking cups. Make sure the same amount of ice is in each one. STEP 2: Add 3 tablespoons of each solid to a separate container of ice:
Cup 4, cup 5 and cup 6 are your controls and will have nothing added to the ice.
STEP 3: Set a timer to check back on the ice cubes every 10 minutes over 1/2 hour and record your results. Now, turn the data into a graph! What did you find caused the ice melt fastest? It’s no surprise that adding salt made the ice melt fastest. Baking soda was second as it’s a type of salt and can lower the freezing point of water. However it is a powder. Sand did not do much! So, why does salt melt ice? Why does salt melt ice? Salt works to lower the freezing or melting point of water. Salt interferes with ice crystals and by mixing with liquid water on the melting ice it speeds up the melting process. Therefore, water in the seas or oceans freezes much less often and at much lower temperatures - because there is salt in them. | ||||||||||||||||||||||||||||||||||||||||||||||||||||
| Reflection | Final wrap-up Watch together with your students 1 or 2 of the suggested videos. They summarize most information given in the lesson. Make a mind map with the word water and the associations it evokes. Give the students a task to do at home - make coloured ice cubes using only fruits, vegetables, coffee or tea. Coloured ice cubes can be used by people in different drinks. Then discuss with the students what fruits, vegetables or other foods they used. What did they use the ice cubes for? Working time – 10 min. | ||||||||||||||||||||||||||||||||||||||||||||||||||||
| Notes | https://www.youtube.com/watch?v=Q-VDIryEbl0&ab_channel=EducationalVideos https://www.youtube.com/watch?v=6U62i4cbEP0&ab_channel=AtomicSchool https://www.youtube.com/watch?v=rEJ5yuFR3f8&ab_channel=LearnBright https://www.youtube.com/watch?v=GsUftZBXs7s&ab_channel=Periwinkle https://www.youtube.com/watch?v=rEJ5yuFR3f8&ab_channel=LearnBright | ||||||||||||||||||||||||||||||||||||||||||||||||||||
| Digital Resource | |||||||||||||||||||||||||||||||||||||||||||||||||||||
| 69 | ||||||||||||||||||||||||||||||||||||||||||||||||||||||||||||
| | ||||||||||||||||||||||||||||||||||||||||||||||||||||||||||||
| 3 |  Grade 4 / Sound and light; sources and their effect on people's life Grade 4 / Sound and light; sources and their effect on people's life | |||||||||||||||||||||||||||||||||||||||||||||||||||||||||||
| Developed by | NART | |||||||||||||||||||||||||||||||||||||||||||||||||||||||||||
| Grade | 4 | |||||||||||||||||||||||||||||||||||||||||||||||||||||||||||
| Duration | 45 | |||||||||||||||||||||||||||||||||||||||||||||||||||||||||||
| Energizers | 29 - How to make a wave?
| |||||||||||||||||||||||||||||||||||||||||||||||||||||||||||
| Relaxing Exercises | 28 - Which waves do we see and which do we hear?
Duration – 2 min. | |||||||||||||||||||||||||||||||||||||||||||||||||||||||||||
| Objectives |
| |||||||||||||||||||||||||||||||||||||||||||||||||||||||||||
| Preparation | Prepare a slide presentation as follows: 2. Slide LIGHT
3. Slide – examples of vibration and of the medium in which sound propagates
4. Video - Sound and vibration: do you hear what I hear? https://www.youtube.com/watch?v=pcWiWjxhKE8&ab_channel=MightyOwl 5. Prepare the classroom environment, so that all students can stand straight first with arms raised perpendicular to the body (like a T), and second - in a circle. That kind of a space is important for the first exercise. 6. Think how to arrange the classroom and the students in order so that they can easily turn to each other and be divided into 5 groups during the lesson. Materials: Equipment: | |||||||||||||||||||||||||||||||||||||||||||||||||||||||||||
| Introduction | Sounds have a tremendous impact on our lives. Thanks to sounds, we can understand each other, enjoy music, orientate ourselves. Sounds are constantly around us. Sometimes we don't notice them, sometimes they can endanger our health. | |||||||||||||||||||||||||||||||||||||||||||||||||||||||||||
| Teaching and learning methods | Learning in small steps | |||||||||||||||||||||||||||||||||||||||||||||||||||||||||||
| Interdisciplinary connections | Music | |||||||||||||||||||||||||||||||||||||||||||||||||||||||||||
| Resource teacher or other specialists activities | Almost all steps of the lesson are comprehensible to most special needs students who have well-preserved cognitive abilities. The lesson does not comprise long written explanations. The role of the special needs teacher or the assistant teacher is to help target group students in case they are not able to cope with some of the tasks or steps. | |||||||||||||||||||||||||||||||||||||||||||||||||||||||||||
| New vocabulary | • sound | |||||||||||||||||||||||||||||||||||||||||||||||||||||||||||
| Work Flow | 1. Start the lesson saying that students will learn more about sounds and the ways in which they exist in our lives. Duration – 5 min. 2. Then, present the slide with the sound and the photo of thunder and lightning. Duration – 5 minutes 3. Tell the students that you are now going to do a very important experiment that will help them understand more about sounds and light. Duration: 5 min. 4. Then ask the students what they have felt and understood. The groups with the musical instruments should now respond that they hear a sound and feel a vibration. The group with the flashlight should answer that the light is best seen when it is dark, when there is no fog, when there are no other light sources around to distract the light from the flashlight. Ask the students to wave their hands quickly - from the wrist down, in front of their eyes – as if the hands imitate bee wings. We hear the sound with our ear, but our brain helps us distinguish each different sound and recognize it. Thus we can never mistake the nightingale's song for the the sound of a mixer. The listening and hearing skills are extremely important because we communicate, learn, love, care, demonstrate what we can do by speaking. Words are sounds that we produce ourselves. 5. Continue with the topic by telling the students that you are now going to focus their attention on the strength of different types of sounds and what the waves of these sounds look like. Recall again that the source of sound is vibrating bodies.
Draw students’ attention to what sounds look like as a graphic image – as a graphical representation of the waves and as a shape. Note how rhythmic and uniformly repetitive the sound of the song of crickets is, and how different the human laughter or the wind sound is. | |||||||||||||||||||||||||||||||||||||||||||||||||||||||||||
| Reflection | Guided discussion: Duration 5 min. On teacher decision - some humor.
| |||||||||||||||||||||||||||||||||||||||||||||||||||||||||||
| Notes |
Bioluminescence on Camera - https://www.youtube.com/watch?v=9HXXQBz6Vv0&ab_channel=NationalGeographic | |||||||||||||||||||||||||||||||||||||||||||||||||||||||||||
| Digital Resource | ||||||||||||||||||||||||||||||||||||||||||||||||||||||||||||
| 70 | |||||||||||||||||||||||||||||||||||||||||||||||||||||
| | |||||||||||||||||||||||||||||||||||||||||||||||||||||
| 4 |  Grade 4 / Gravitational Force of Magnets Grade 4 / Gravitational Force of Magnets | ||||||||||||||||||||||||||||||||||||||||||||||||||||
| Developed by | Antalya Directorate Of Education | ||||||||||||||||||||||||||||||||||||||||||||||||||||
| Grade | 4 | ||||||||||||||||||||||||||||||||||||||||||||||||||||
| Duration | 60 | ||||||||||||||||||||||||||||||||||||||||||||||||||||
| Energizers | 16 - Back to back Participants find a pair of similar size and weight. They sit on the floor, back to back with their pair. They hold their arms. They have to get up, while keeping the arms and backs together. After trying once-twice with their pair they switch pairs. They can repeat this process with other pairs for a few times. | ||||||||||||||||||||||||||||||||||||||||||||||||||||
| Relaxing Exercises | 5 - Use a word that describes their feelings/thoughts Students are asked to close their eyes (if comfortable) for a minute and think of a word that describes their feelings/thoughts after finishing the resource. Then the students open their eyes and one by one say their word to the classroom | ||||||||||||||||||||||||||||||||||||||||||||||||||||
| Objectives | Students will: · learn about magnets and their poles. · discover which objects are attracted by magnets through experimentation. · learn how and where magnets are used in everyday life. identify the substances of the objects used in the experiment activity. | ||||||||||||||||||||||||||||||||||||||||||||||||||||
| Preparation | Materials:
Preparation: Print out
Annex 3: the Powerpoint presentation is to be played to the students on a screen. | ||||||||||||||||||||||||||||||||||||||||||||||||||||
| Introduction | Through “Let’s get to know the magnets” activity, students will learn the types of the magnets. By doing an experimenting, they will observe which types of objects a magnet attracts or repels, substances of the objects, poles of the magnets, which pole attracts a push and which pole repel each other. (Annex 1) Through a brain-storming activity, and watching Annex 3, students will learn areas of use of magnets in everyday life. | ||||||||||||||||||||||||||||||||||||||||||||||||||||
| Teaching and learning methods | A student-centered teaching approach Practical activities - real-life connections | ||||||||||||||||||||||||||||||||||||||||||||||||||||
| Interdisciplinary connections | Social Sciences (Science, Technology and Society) | ||||||||||||||||||||||||||||||||||||||||||||||||||||
| Resource teacher or other specialists activities | During the experimental activities the special needs teacher could provide support by sitting next to students who may have learning difficulties. | ||||||||||||||||||||||||||||||||||||||||||||||||||||
| New vocabulary | Magnet, Pole, iron, copper, nickel, attraction | ||||||||||||||||||||||||||||||||||||||||||||||||||||
| Work Flow |
Show the objects you have brought (any objects made of iron, nickle, wood, plastics, copper, steel). Show the objects one by one and ask:
Students make a table with 4 columns. In the first column they write the name of the object; in the 2nd column they write what it is made of; in the 3rd column they write YES/NO – this is their prediction whether the object will be attracted by the magnet or not; the 4th column is for step 2 when they will put the result from the experiment. (Annex 1)
Now, it is time for experiments! Let’s find out if the predictions were correct.
- Put the magnet close to the object; move it in different directions so that different parts of the magnet come close to the object; - Check whether you feel a force of attraction or nothing between the magnet and your object; - Write down which objects are attracted by the magnet in column 4 of the table. 3. At the end of the activity, all groups present their findings to the whole class. The teacher writes the results on the board and the class makes the conclusion (magnets attract metal objects). The teacher also opens Annex 2 “What substances are not attracted by a magnet?” on the smartboard.
Question for brainstorming: “Do you know where magnets are used in our daily life?”. If students cannot come up with ideas, provide some tips, e.g. tip 1: Think of household appliences; Tip 2: Think of household applience in which the door closes auromatically when being close to the main body (answer: refigirator) OR simply think of fridge magnets; Some cupboards and drawers also use magnets to keep the doors closed. The teacher elicits the answers and writes them on the board.
The teacher plays the powerpoint presentation (Annex 3) on the smartboard which illustrates where magnets are used in our life. | ||||||||||||||||||||||||||||||||||||||||||||||||||||
| Reflection | The teacher starts a guided dialogue with the students and asks: Imagine you have a pile of waste producrs in front of you. In this pile there are fruit peels, plastic bottles, iron pieces and silver items. You also have a strong magnet. Which materials can you separate quickly from the rest of the waste products by using the magnet? | ||||||||||||||||||||||||||||||||||||||||||||||||||||
| Notes | |||||||||||||||||||||||||||||||||||||||||||||||||||||
| Digital Resource | Annex 1 - A table for listing objects and magnetic attraction Annex 2 - What substances are not attracted by a magnet? Annex 3 - Powerpont presentation | ||||||||||||||||||||||||||||||||||||||||||||||||||||
| 71 | |||||||||||||||||||||||||||||||||||||||||||||||||||||
| | |||||||||||||||||||||||||||||||||||||||||||||||||||||
| 5 |  Grade 4 / Soil permeability Grade 4 / Soil permeability | ||||||||||||||||||||||||||||||||||||||||||||||||||||
| Developed by | AECE - Escola Básica da Zona Verde | ||||||||||||||||||||||||||||||||||||||||||||||||||||
| Grade | 4 | ||||||||||||||||||||||||||||||||||||||||||||||||||||
| Duration | 60 | ||||||||||||||||||||||||||||||||||||||||||||||||||||
| Energizers | 42 - Back-to back drawing Location: Classroom No. of participants: All the students in a class Organisation: Students divided into pairs. Materials: A5 sheet of paper and pens. Picture cards (may or may not be associated with the subject or theme of the lesson) Game description: Students in pairs sit with their backs to each other. One of the students in each pair is given a sheet of paper and a pen and the other pair is shown a picture of something that is easy to draw (a flower, a house). The student who has the picture must describe the illustration for his / her partner to draw, without saying what it is. They are allowed to describe shapes, sizes and textures, but not what it is, e.g. "Draw a rose". Once the drawings are finished, they are compared with the original to see if the communication was good. Working time - 10 min. | ||||||||||||||||||||||||||||||||||||||||||||||||||||
| Relaxing Exercises | 40 - Senses To the sound of calm music, the students are instructed to focus and write down on a sheet of paper five things they can see, four things they can touch, three things they can hear, two things they can smell and one thing they can taste. | ||||||||||||||||||||||||||||||||||||||||||||||||||||
| Objectives |
In the end of the lesson students will be able to:
| ||||||||||||||||||||||||||||||||||||||||||||||||||||
| Preparation | Resources: - computer with speakers - video projector - Scratching material (charcoal pencils, coloured pencils, pens...) Experiment: - transparent (gobelet) jars - coffee/cotton strainers/filters - different soil samples (sandy, clay and loam) - container with water (bottle) - record sheet (Appendix 2) - Showing photos and videos of the stages of the experiment. Preparation: 1. prepare the room for working in groups: organise the tables in the room to group 4 to 5 students together. 2. gather enough materials for each group. Each group should have: 3 empty 1.5 litre plastic bottles, transparent jars or glasses, three strainers (paper filters, cotton discs...); the same quantity of 3 different soil samples; a container of water 3. print out record sheets (one per student) *Note: throughout the lesson, it is desirable that the students make their own discoveries and share the results they have observed. If it is not possible for the students to carry out the experiment as a group, the teacher can conduct the experiment for the whole class. | ||||||||||||||||||||||||||||||||||||||||||||||||||||
| Introduction | Soil is the solid part of the earth's crust. It has different constitutions depending on the area of the planet and the climate. Realise the usefulness of using soil and find ways to preserve it. | ||||||||||||||||||||||||||||||||||||||||||||||||||||
| Teaching and learning methods |
| ||||||||||||||||||||||||||||||||||||||||||||||||||||
| Interdisciplinary connections |
Mother Tongue– Oral work (comprehension and expression) with a view to interacting appropriately in the context and for various purposes; Artistic Expressions - Appropriation and Reflection: learning the knowledge of visual communication and understanding the symbolic systems of different artistic languages, identifying and analysing concepts, contexts and techniques in different visual narratives with a specific and appropriate vocabulary, applying the knowledge learnt in situations of observation and/or plastic experimentation, stimulating the development of their style of representation; Citizenship and Development - Sustainable Development; Environmental Education. | ||||||||||||||||||||||||||||||||||||||||||||||||||||
| Resource teacher or other specialists activities | All the steps are understandable for students with specific needs but cognitive abilities. The lesson integrates strategies that use video/images to make it easier for all students to grasp the topic. Experimentation and group work allow students to get involved and participate actively, manipulating materials. The role of the special education teacher or support teacher is to help the target group (TGSt) by explaining what is being observed or guiding them through some of the tasks or stages, whenever necessary. | ||||||||||||||||||||||||||||||||||||||||||||||||||||
| New vocabulary | Clay soil, sandy soil, loamy soil, permeability | ||||||||||||||||||||||||||||||||||||||||||||||||||||
| Work Flow | 1st step - large group The teacher begins by explaining that in this lesson they are going to be "scientists" and carry out an experiment on the permeability of different types of soil. Ask the class about the topic and what they think "permeability" means. Enrich or redirect the students' answers if they find it difficult to explain/exemplify using the example of waterproof materials: rucksacks, raincoats, umbrellas...). 2ndstep - large group Move the topic covered in the first discussion to soils. Present the 3 types of soil (clay, sand and loam) and explore their characteristics with the students. (Appendix 1 - Powerpoint presentation) 3rd step - small group Ask the students to fill in on the record sheet (Appendix 3) only the one that says "Before the experiment" regarding their expectations of what will happen. 4th step - small group Carrying out the experiment The groups carry out the experiment as shown in the pictures. (Appendix 2). The pictures should be shown at two different times: The pictures numbered 1 to 6 will be shown at this point. The pictures from 6A to 10 should be presented after the various groups have carried out the experiment. The experiment is carried out step by step and each group records its observations on the record sheet 1 (Appendix 3) in the section where it says "After the experiment". 4th step - large group Each group presents the results they observed. The teacher shows the students' record sheet (Appendix 3) and compiles their observations. The results are discussed and the conclusions are presented orally. At this point, the students' conclusions are compared with the photos (Appendix 2) from 6A to 10. 5th step - large group The teacher presents a Powerpoint on the use of different types of soil and how they can be used to create different forms of art (Appendix 4 - use of soils). 6th step- individual work Afterwards, a formative mini-test (Appendix 5 ) is applied, containing, among other things, this type of question: "What is permeability?" "What types of soil are there?" "Do all soils retain water in the same way?" "Which type of soil offers the best conditions for farming?" | ||||||||||||||||||||||||||||||||||||||||||||||||||||
| Reflection | The teacher summarises the most relevant information from the lesson and asks the students: What was the activity you enjoyed the most? - The experiments - Relaxation activity - Group dynamics - Game - Large group activities - The small group activities . Other... | ||||||||||||||||||||||||||||||||||||||||||||||||||||
| Notes | |||||||||||||||||||||||||||||||||||||||||||||||||||||
| Digital Resource | Appendix 1: https://sen-power.eu/atividades1/digital/885/Appendix 1.pptx Appendix 2: https://sen-power.eu/atividades1/pdf/885_Appendix 2.pdf Appendix 3: https://sen-power.eu/atividades1/fotos/885_Appendix 3.pdf Appendix 4: https://sen-power.eu/atividades1/digital/885/Appendix 4.pptx Appendix 5: https://sen-power.eu/atividades1/fotos/885_Appendix 5.pdf video: https://sen-power.eu/atividades1/videos/885_Video 6A.mp4 | ||||||||||||||||||||||||||||||||||||||||||||||||||||
| 72 | |||||||||||||||||||||||||||||||||||||||||||||||||||||
| | |||||||||||||||||||||||||||||||||||||||||||||||||||||
| 6 |  Grade 4 / Orientation: the basics to find your way Grade 4 / Orientation: the basics to find your way | ||||||||||||||||||||||||||||||||||||||||||||||||||||
| Developed by | AECE - Escola Básica da Zona Verde | ||||||||||||||||||||||||||||||||||||||||||||||||||||
| Grade | 4 | ||||||||||||||||||||||||||||||||||||||||||||||||||||
| Duration | 60 | ||||||||||||||||||||||||||||||||||||||||||||||||||||
| Energizers | 43 - Guided movement Suggestion Play a game of "turn", "half-turn" and "quarter-turn" movements from a starting position common to all (it could be a dance with repetitive movements) or a team game: blindfold a student from each team and their mates have to give them clues to get to a previously agreed point or play an individual game, like a "labyrinth" (starting point and finding the route to the end point). | ||||||||||||||||||||||||||||||||||||||||||||||||||||
| Relaxing Exercises | 41 - What would you do if ... Ask students to think about what they would do if they were... Let each student think and say what they want to be and be able to do, using words or themes around the topic of the lesson plan. E.g. If I were the sun... if I were a star, if I were the night, if I were the ocean or let the students freely think and create. Give the students a few minutes to think in silence. Each student participates in two or three words in turn, according to the teacher's instructions. | ||||||||||||||||||||||||||||||||||||||||||||||||||||
| Objectives |
In the end of the lesson students will be able to:
| ||||||||||||||||||||||||||||||||||||||||||||||||||||
| Preparation |
Resources: Scratching material (charcoal pencils, coloured pens, ...) Glue, tape Computer with speakers Internet access Computer and video projector - Question file - Appendix 3 - Worksheet – Appendix 3 - Questions – Appendix 4 Preparation: 1.Prepare presentations in advance. 2. Print out the images to display in the room (sun, star, compass) on A4 paper (Appendix 2) and place them separately in a high place that is visible to all the students, with enough space nearby so that the students can stand next to the image. 3. Print out the question file (appendix 3). Pre-research on Youtube about ways of orienting in ancient times. 4. Print out the record sheets (one per student) (appendix 4). 5. Create the Spinning Roulette https://spinthewheel.io/pt- free application, with the phrases in appendix 5. | ||||||||||||||||||||||||||||||||||||||||||||||||||||
| Introduction | Identifying forms of spatial orientation as a way of relating to the world allows students to understand the dynamics of the planet and how, through the position of the stars or using instruments, it is possible to identify their relative position. They also realise how technological developments today make it possible to locate people and objects using artificial satellites placed in space. | ||||||||||||||||||||||||||||||||||||||||||||||||||||
| Teaching and learning methods | Learning in small steps, taking into account the different starting points and learning rhythms of the students. Learning through visualisation and experimentation. Using group work for co-operative and collaborative learning. - To raise awareness of what is being learnt, encourage learning based on concrete situations that are close to the students. | ||||||||||||||||||||||||||||||||||||||||||||||||||||
| Interdisciplinary connections | Mother Tongue: oral skills (comprehension and expression) with a view to interacting appropriately in the context and for various purposes (namely, explaining knowledge, presenting narratives, arguing on the basis of points of view). Maths: in the 1st Cycle, it is important that students begin to develop spatial reasoning, with an emphasis on visualisation and spatial orientation, which are essential for understanding the space in which they move, having access to various physical experiences (routes, views, plans) and/or using materials that support the construction of their spatial perceptions. Physical-motor expression: Providing formative activities, such as games, competitions and other tasks in pairs or homogeneous and heterogeneous groups, which enable students to: - take part in skill sequences, choreographies, etc; - solve problems in game situations. | ||||||||||||||||||||||||||||||||||||||||||||||||||||
| Resource teacher or other specialists activities | The lesson is informative and takes place in the area of general knowledge. It does not include lengthy written explanations or instructions. The teacher's role is to provide guidance and help to summarise the most important information and answer questions. When practising relative positions (N, S, E, W), the words "a turn", "half a turn", "a quarter of a turn", etc. can be used (related to learning maths). The support or special education teacher can help students to perform the movements correctly. | ||||||||||||||||||||||||||||||||||||||||||||||||||||
| New vocabulary | Guidance, compass, pole star, cardinal points | ||||||||||||||||||||||||||||||||||||||||||||||||||||
| Work Flow | 1st step - Large group The teacher begins the lesson by informing the students that they will be learning about Orientation. Then he / she shows a Powerpoint presentation (Appendix 1) to the students. After placing pictures around the room: 1 sun, 1 star, 1 compass (Appendix 2), ask questions from the "Question file" (Appendix 3) and let the students move around the room to find the picture that they think will be the correct answer. Afterwards the teacher asks the students to briefly justify their choices. 2ndStep - Large group The teacher poses a problem question: "How can we guide ourselves in places where there are no signs, for example in the middle of the ocean or the desert?" Starting with this problem question, the teacher tries to get the students to name possible ways of finding their way around. All answers are valid at this stage.
Going back in time, refer to ways of guidance in earlier times, when there wasn't enough technology to use such advanced instruments compared to today. (Present a Youtube search on the topic). 3rd Step - Large group The teacher talks to the students about what they have observed and shows them the pictures below (by projecting them on the board) asking Then the teacher asks the students to place themselves as in the image. They have to relate themselves with the sun on display in the room.
Finally, hand out a worksheet/record (Appendix 4) to each student and ask them to fill it in. 4th Step - Large group Game Play spinning roulette https://spinthewheel.io - free application to be prepared before this plan is put into practice. Continue the topic by asking students questions (Appendix 5) using the roulette wheel to assess the forms of guidance they have learnt. Organise a guidance course in a later activity at the school, or even in the classroom, on the day the plan is implemented or on another day. There may also be room to organise a course outside | ||||||||||||||||||||||||||||||||||||||||||||||||||||
| Reflection | The teacher sums up the most relevant information from the lesson, asking the students: "What do you think are the most important things you have learnt today?" "If you found yourself in a similar situation to those described, do you think you would be able to find your way around?" "What did you enjoy learning the most? "Can you name three different ways of guiding yourself?" | ||||||||||||||||||||||||||||||||||||||||||||||||||||
| Notes | |||||||||||||||||||||||||||||||||||||||||||||||||||||
| Digital Resource | Appendix 1: https://sen-power.eu/atividades1/digital/886/Appendix 1.pptx Appendix 2: https://sen-power.eu/atividades1/pdf/886_Appendix 2.pdf Appendix 3: https://sen-power.eu/atividades1/pdf/886_Appendix 3.pdf Appendix 4: https://sen-power.eu/atividades1/pdf/886_Appendix 4.pdf Appendix 5: https://sen-power.eu/atividades1/pdf/886_Appendix 5.pdf Digital tool: https://spinthewheel.io | ||||||||||||||||||||||||||||||||||||||||||||||||||||
| 73 | |||||||||||||||||||||||||||||||||||||||||||||||||||||
| | |||||||||||||||||||||||||||||||||||||||||||||||||||||
| 7 |  Grade 4 / Exploring Ecosystems: Habitats and Biodiversity Grade 4 / Exploring Ecosystems: Habitats and Biodiversity | ||||||||||||||||||||||||||||||||||||||||||||||||||||
| Developed by | Antalya Directorate Of Education | ||||||||||||||||||||||||||||||||||||||||||||||||||||
| Grade | 4 | ||||||||||||||||||||||||||||||||||||||||||||||||||||
| Duration | 60 | ||||||||||||||||||||||||||||||||||||||||||||||||||||
| Energizers | 37 - Move like me! Play rhythmic music, e.g. https://www.youtube.com/watch?v=kVi8ICWu3WI , and give instructions to the students what to do. All actions are repeated twice; when chanting the words for the first time, the shows the movement as a guide, and the students repeat the words and movements. When the line is repeated, student chant the words on their own and do the movement. When chanting Animals in Action, everyone choose what animal to imitate. ● Run, run, run like a cheetah (the teacher chants and shows the action) ● Run, run, run like a cheetah (students chant and do the action) ● Swing, swing, swing like a monkey (twice: 1st time –teacher; 2nd time - students) ● Fly, fly, fly like an eagle (twice) ● Rows, rows, rows like a sea turtle (twice) ● Animals in action (twice) ● Animals in action (twice) ● Animals in action (twice) ● Climb, climb, climb like a squirrel (twice) ● Spin, spin, spin like a duck (twice) ● Move, move, move like a gorilla (twice) ● Step, step, step like an elephant (twice) ● Animals in action (twice) ● Animals in action (twice) | ||||||||||||||||||||||||||||||||||||||||||||||||||||
| Relaxing Exercises | 20 - Holding legs Participants work in pairs. And you can put a quiet and relaxing music (or sounds like water falling down, sea waves, etc.). Half of the participants are asked to lie down face up, eyes closed, with their left leg extended on the floor and their right leg elevated. Another participant stands up and loops a towel around the heel of the other’s right foot and holds the ends of the towel in his/her hands, and makes soft and gentle movements (upwards and downwards, and sidewards) while the other totally relaxes his/her leg. Then they repeat the same process with the left leg. Then the participants switch roles. | ||||||||||||||||||||||||||||||||||||||||||||||||||||
| Objectives |
| ||||||||||||||||||||||||||||||||||||||||||||||||||||
| Preparation | Materials:
| ||||||||||||||||||||||||||||||||||||||||||||||||||||
| Introduction |
| ||||||||||||||||||||||||||||||||||||||||||||||||||||
| Teaching and learning methods |
| ||||||||||||||||||||||||||||||||||||||||||||||||||||
| Interdisciplinary connections | Art: Draw or sketch an ecosystem emphasizing the relationships between organisms. Geography: Relate ecosystems to different geographical areas students are familiar with | ||||||||||||||||||||||||||||||||||||||||||||||||||||
| Resource teacher or other specialists activities | Resource teachers can assist with differentiated instruction for students needing extra support, providing simpler examples or more guided activities. | ||||||||||||||||||||||||||||||||||||||||||||||||||||
| New vocabulary | Ecosystem, Biodiversity, Organism, Habitat. | ||||||||||||||||||||||||||||||||||||||||||||||||||||
| Work Flow | Step 1: Introduction to Habitats (5 minutes): Objective: Introduce students to the concept of habitats and their critical role in supporting diverse life forms. Activities: Begin with a brief explanation of what a habitat is—mention that it's a place where plants and animals live and find everything they need to survive. Resource: Use Annex 2, which provides simple definitions and visual cues about habitats, to help students visualize and understand the concept clearly. Step 2: Discussion on Habitat Types (10 minutes): Objective: Familiarize students with different types of habitats and the specific conditions and life forms each supports. Activities: Discuss various habitats such as forests, oceans, deserts, grasslands, wetlands, mountains, and polar regions. Resource: Utilize "Exploring Different Types of Habitats Presentation" from Annex 1 to show vivid images and key characteristics of each habitat type. Guide students through the presentation, explaining how each habitat meets the needs of its unique flora and fauna. Interactive Element: Ask questions like, "What animals do you think live in forests?" or "Why do you think deserts have very few plants?" to encourage participation and critical thinking. Step 3: Hands-On activity(20 minutes): Objective: Allow students to apply their knowledge creatively by illustrating a habitat of their choice. Activities: Provide each student with paper and crayons or colored pencils. Instruct them to draw a habitat incorporating some of the discussed elements, e.g. plants, animals, and landscape features which are typical of their chosen habitat. Resource: Refer back to the images and descriptions in Annex 1 during the activity for inspiration and accuracy. Encourage students to depict not just animals and plants but also elements like water sources, types of soil, and weather conditions. Step 4: Sharing and Learning (10 minutes): Objective: Enhance learning through peer sharing and discussion, fostering a deeper understanding of the diversity and importance of habitats. Activities: Have students present their drawings to the class. Each student should explain why they chose their particular habitat, which organisms they included, and how these organisms are adapted to their environment. Discussion Points: Encourage feedback and questions from peers to stimulate dialogue and reinforce learning. Questions might include, "How do the animals from your drawing find food in their habitat?" or "What challenges might this habitat face from environmental changes?" Resource: Conclude the session by summarizing key points from the "Exploring Different Types of Habitats Presentation" in Annex 1, relating them back to the students' drawings and discussions. | ||||||||||||||||||||||||||||||||||||||||||||||||||||
| Reflection |
Ask students to think about one action they can take to help preserve habitats, encouraging them to be proactive in their communities. | ||||||||||||||||||||||||||||||||||||||||||||||||||||
| Notes | |||||||||||||||||||||||||||||||||||||||||||||||||||||
| Digital Resource | |||||||||||||||||||||||||||||||||||||||||||||||||||||
| 74 | |||||||||||||||||||||||||||||||||||||||||||||||||||||
| | |||||||||||||||||||||||||||||||||||||||||||||||||||||
| 8 |  Grade 4 / Magnificent Matter: Exploring States and Changes Grade 4 / Magnificent Matter: Exploring States and Changes | ||||||||||||||||||||||||||||||||||||||||||||||||||||
| Developed by | Antalya Directorate Of Education | ||||||||||||||||||||||||||||||||||||||||||||||||||||
| Grade | 4 | ||||||||||||||||||||||||||||||||||||||||||||||||||||
| Duration | 60 | ||||||||||||||||||||||||||||||||||||||||||||||||||||
| Energizers | 37 - Move like me! Play rhythmic music, e.g. https://www.youtube.com/watch?v=kVi8ICWu3WI , and give instructions to the students what to do. All actions are repeated twice; when chanting the words for the first time, the shows the movement as a guide, and the students repeat the words and movements. When the line is repeated, student chant the words on their own and do the movement. When chanting Animals in Action, everyone choose what animal to imitate. ● Run, run, run like a cheetah (the teacher chants and shows the action) ● Run, run, run like a cheetah (students chant and do the action) ● Swing, swing, swing like a monkey (twice: 1st time –teacher; 2nd time - students) ● Fly, fly, fly like an eagle (twice) ● Rows, rows, rows like a sea turtle (twice) ● Animals in action (twice) ● Animals in action (twice) ● Animals in action (twice) ● Climb, climb, climb like a squirrel (twice) ● Spin, spin, spin like a duck (twice) ● Move, move, move like a gorilla (twice) ● Step, step, step like an elephant (twice) ● Animals in action (twice) ● Animals in action (twice) | ||||||||||||||||||||||||||||||||||||||||||||||||||||
| Relaxing Exercises | 15 - Moving like a toy The teacher uses a magic word to change the students into many string-loaded (wind-up) toys. At the teacher’s signal, the toys start to move across the class, as many robots, to get their sits. They have to move more quickly at the beginning and then gradually more and more slowly, because their charge is finishing. Some of them will be frozen in the middle of the room, and the teacher has to give their cranks one more turn to help them reach their seats | ||||||||||||||||||||||||||||||||||||||||||||||||||||
| Objectives |
| ||||||||||||||||||||||||||||||||||||||||||||||||||||
| Preparation | Materials
Preparation for the lesson
| ||||||||||||||||||||||||||||||||||||||||||||||||||||
| Introduction |
| ||||||||||||||||||||||||||||||||||||||||||||||||||||
| Teaching and learning methods | Scavenger Hunt Activity: Students use the worksheet from Annex 1 to find and document examples of solids, liquids, and gases: Experimental approach: Demonstration of the changes of the states of matter. | ||||||||||||||||||||||||||||||||||||||||||||||||||||
| Interdisciplinary connections | Physics: Basic introduction to molecular theory and how heat energy affects the states of matter. Art: Creating visual representations of matter and its changes. | ||||||||||||||||||||||||||||||||||||||||||||||||||||
| Resource teacher or other specialists activities | The resource teacher can: - help facilitate the experiments, ensuring safety and understanding. - provide additional real-life examples or hands-on activities to reinforce the concepts. | ||||||||||||||||||||||||||||||||||||||||||||||||||||
| New vocabulary | States of Matter: solid, liquid, gas. Changes of State: melting, freezing, evaporation, condensation, sublimation. | ||||||||||||||||||||||||||||||||||||||||||||||||||||
| Work Flow | Step 1: Introduction to Matter (5 minutes):
Solids: Describe how they maintain a fixed volume and shape. Liquids: Explain that they have a fixed volume but take the shape of their container. Gases: Note that they fill any container they are in, having neither fixed shape nor volume.
Step 2: Scavenger Hunt Instructions and Activity (25 minutes): Provide each student or group with a copy of the "States of Matter Scavenger Hunt" worksheet from Annex 1. Instructions:
Allow students to walk around and make their observations, assisting them as needed to ensure they correctly identify and understand each state. Step 3: Show real-time transitions between different states of matter to enhance understanding.
| ||||||||||||||||||||||||||||||||||||||||||||||||||||
| Reflection |
| ||||||||||||||||||||||||||||||||||||||||||||||||||||
| Notes | Recap the key concepts learned about the states of matter and their transitions. Emphasize the relevance of these concepts in everyday life and the natural world. | ||||||||||||||||||||||||||||||||||||||||||||||||||||
| Digital Resource | |||||||||||||||||||||||||||||||||||||||||||||||||||||
| 75 | |||||||||||||||||||||||||||||||||||||||||||||||||||||
| | |||||||||||||||||||||||||||||||||||||||||||||||||||||
| 9 |  Grade 4 / Nutrition and respiration of plants Grade 4 / Nutrition and respiration of plants | ||||||||||||||||||||||||||||||||||||||||||||||||||||
| Developed by | Prosveta-Sofia Foundation | ||||||||||||||||||||||||||||||||||||||||||||||||||||
| Grade | 4 | ||||||||||||||||||||||||||||||||||||||||||||||||||||
| Duration | 60 | ||||||||||||||||||||||||||||||||||||||||||||||||||||
| Energizers | 12 - Body spelling Option 1 Teacher asks students to write their name in the air using different parts of their body, for example with the hand/leg/elbow/nose. Option 2 The teacher assigns the students the task of writing the name of a plant in the air, using different parts of the body (hand, leg, elbow, nose, etc.) Option 3 If time allows, the teacher divides the class into several groups and each group receives the name of a plant which is to be written with the participants' bodies, e.g. Tulip. | ||||||||||||||||||||||||||||||||||||||||||||||||||||
| Relaxing Exercises | 8 - Seasons of the year All players sit in a circle, but not too close to one another. The teacher moves like a plant during the seasons of the year. Winter: the plants are small, weak and are crunched together on the ground. Spring: through the stronger sunshine, the plants grow slowly and slowly rise. Summer: through the warm sun, the plants slowly open their arms, the flowers open their blooms are stand up straight. Autumn: the sun rays become weaker. The plants begin to slowly shrivel, the blooms and leaves begin to fall away. | ||||||||||||||||||||||||||||||||||||||||||||||||||||
| Objectives |
| ||||||||||||||||||||||||||||||||||||||||||||||||||||
| Preparation | Materials for each student: o straws; o plastic cups; o water; o cut pieces of yarn, about 10-15 cm longer than the straws. Preparation Experiment 1 should be prepared and launched about one week before the lesson. Materials: Alcohol, a suitable container in which a green broadleaf leaf is placed. Activities: o enough alcohol is poured into the prepared container so that to cover the leaf; o the leaf is placed in the container; it must be completely immersed in the alcohol; o the container is placed somewhere in the classroom so that it is visible by all students. Experiment 2 – preparation: For the day of the lesson students are asked to bring a straw with yarn threaded through it. This can be done at home with the parents’ help. The yarn can be threaded through the straw with a needle; it is advisable to make a knot at one end so that it does not come out, and the other end should hang outside the straw. In class, the yarn is pulled so that there are a few centimeters hanging from both sides of the straw. | ||||||||||||||||||||||||||||||||||||||||||||||||||||
| Introduction | Once upon a time, in a magical garden filled with vibrant colours and sweet fragrances, there lived a community of plants. These plants were not just ordinary plants; they were the guardians of the garden, spreading joy and beauty wherever they grew. Now, let's peek into the secret lives of these plants and uncover the mysteries of their nutrition and respiration. Every day, the plants soaked up the warm sunlight and danced in the gentle breeze. But did you know they also ate their meals through their roots? Yes, it's true! Just like how we enjoy delicious food to grow big and strong, plants absorb nutrients from the soil to fuel their growth. They drink water like it's their favourite juice and slurp up yummy nutrients like nitrogen, phosphorus, and potassium to stay healthy. But wait, there's more! Just like us, plants need to breathe too. But instead of lungs like ours, they have tiny pores called stomata on their leaves. Through these stomata, plants take in carbon dioxide, the same gas we exhale, and release oxygen, the air we love to breathe! Isn't that incredible? Now, let's imagine we're taking a closer look inside a plant cell. Deep within, there are tiny factories called chloroplasts. These magical factories work day and night, using sunlight, water, and carbon dioxide to create food for the plant through a process called photosynthesis. It's like a green magic show happening right inside the leaves! But just like us after a big meal, plants need rest too. When the sun sets and the night falls, they switch gears and start a different kind of breathing called respiration. During respiration, plants take in oxygen and release carbon dioxide, just like we do. This process helps them break down the food they made during the day and gives them the energy they need to grow and thrive. So, the next time you stroll through a garden or admire a lush forest, remember the amazing adventures of plant nutrition and respiration happening all around you. Just like us, plants have their own way of eating, breathing, and growing, making our world a greener and more wonderful place to live in. | ||||||||||||||||||||||||||||||||||||||||||||||||||||
| Teaching and learning methods | Discussion brainstorming Scientific approach – hypothesis, experiment, conclusion | ||||||||||||||||||||||||||||||||||||||||||||||||||||
| Interdisciplinary connections | Mother tongue Social skills | ||||||||||||||||||||||||||||||||||||||||||||||||||||
| Resource teacher or other specialists activities |
| ||||||||||||||||||||||||||||||||||||||||||||||||||||
| New vocabulary | Photosynthesis, carbon dioxide | ||||||||||||||||||||||||||||||||||||||||||||||||||||
| Work Flow | Step 1
Step 2 1. The lesson continues with a demonstration of Experiment 1, which has been prepared by the teacher in the time before the lesson as follows: - 7 days before the lesson, the students are shown a green leaf of a plant that is immersed in a glass container filled with alcohol. The container is left somewhere in the classroom where everyone can see it. - On the day of the lesson, the glass container is placed on a visible place and the class observes the changes that have occurred in the leaf (the alcohol has extracted the chlorophyll from the leaf and it has acquired its natural brown color). The experiment clearly shows what happens to plants in autumn - chlorophyll moves from the leaves to the tree's stem and they change their colour, they wither and fall down. 2. Experiment 2 Each student receives a glass of water and the straw with the threaded yarn. The straw is dipped into the water and after a few minutes the students can see and feel how the top end has become wet. Experiment 2 demonstrates how water-dissolved nutrients found in the soil are transported to the leaves. Step 3
| ||||||||||||||||||||||||||||||||||||||||||||||||||||
| Reflection | A. Feedback - contents section. Summary of the main aspects of the new information through the following activities: ● Students are divided into 5 groups, and each student receives a sticker for belonging to the respective group and attaches it to their clothes: o Water and nutrients group o Sun group o Carbon dioxide group o Oxygen group o Chlorophyll group When the teacher launches the activity, students should regroup in teams so that the new teams present the process of plant nutrition (ideally, each team should have one representative of the 5 groups). If the number of students is not a multiple of 5, in some teams there will be more representatives of the Water group, for example, or the Sun group, etc. The newly formed teams act out the process of nutrition in plants. B. Feedback - training activities. The teacher draws a straight line on the floor or stretches a rope, in both cases marking the middle (of the line or rope). One end is marked with a PLUS sign, or a smiling emoticon, printed on a sheet of A4 size paper, and the other end - with a MINUS sign, or a displeased emoticon. Students are told that they will evaluate the different activities in the lesson by their position along the line/rope. To carry out the assessment, the teacher lists in sequence the activities that have been carried out, and after hearing the name of each activity, students take their place along the the line/rope. If time permits, time can be provided for a brief sharing of impressions among the students who have appreciated the respective activity in a similar way. Example: Evaluation of the computer game of activity 3 (item 2): some students have positioned themselves around the PLUS sign/smiling emoticon, others are at the point that marks the middle, and a third group is at the part with negative evaluation. The discussion takes place within these 3 groups, after which each group chooses one representative who summarizes the opinions - why the people in the group did/did not like the activity (the computer game). | ||||||||||||||||||||||||||||||||||||||||||||||||||||
| Notes | |||||||||||||||||||||||||||||||||||||||||||||||||||||
| Digital Resource | Sam and the tree Video animation about the nutrition and respiration of plants | ||||||||||||||||||||||||||||||||||||||||||||||||||||
| 76 | |||||||||||||||||||||||||||||||||||||||||||||||||||||
| | |||||||||||||||||||||||||||||||||||||||||||||||||||||
| 10 |  Grade 4 / Classification of animals - invertebrates and vertebrates: fish, amphibians, reptiles, birds, mammals Grade 4 / Classification of animals - invertebrates and vertebrates: fish, amphibians, reptiles, birds, mammals | ||||||||||||||||||||||||||||||||||||||||||||||||||||
| Developed by | Prosveta-Sofia Foundation | ||||||||||||||||||||||||||||||||||||||||||||||||||||
| Grade | 4 | ||||||||||||||||||||||||||||||||||||||||||||||||||||
| Duration | 60 | ||||||||||||||||||||||||||||||||||||||||||||||||||||
| Energizers | 3 - Amoeba An evolution game! Everyone starts off as an amoeba, with the purpose of evolving to a human. All students walk around acting like an amoeba and when they meet with another amoeba, they play one round of rock/paper/scissors. Whoever wins evolves into a worm. When two worms meet they play again rock/paper/scissors and whoever wins turns into a wasp, but whoever loses goes back to becoming an amoeba. This continues until one becomes human. The evolution stages are: amoeba à worm à wasp à chicken à monkey à human. | ||||||||||||||||||||||||||||||||||||||||||||||||||||
| Relaxing Exercises | 6 - Bee breathing The teacher instructs the students to get in a comfortable position to practice bee breathing. They have to imagine that they are sitting on a leaf or a flower petal, to sit straight and allow the leaf or petal to gently support them. The teacher gives students the following instructions: Breathe in, allowing the air to just gently come in through your nose, filling up your lungs. As you breathe out, buzz like a bee. See how long your buzz can last. See how far your bee is going to fly before sitting down and resting again. Buzz. Buzz. Buzz. On the next breath, see if your bee can fly with a loud, strong buzz. On the next breath, see if your bee can fly with a soft buzz. When the exercise is finished, the teacher gives time for a short discussion: Does it feel different with a strong or a soft buzz? How does your body feel? Optional (use if time allows): After breathing practice, draw a picture of a bumblebee and the leaf or flower that you were “sitting on” in your imagination. This picture can be used as a relaxation practice reminder. When you see the picture, practice being like a Bee on a leaf and practice a Bee breath. | ||||||||||||||||||||||||||||||||||||||||||||||||||||
| Objectives | Students will:
| ||||||||||||||||||||||||||||||||||||||||||||||||||||
| Preparation | Equipment
Preparation 1. Print Handout 1 double-sided. 2. Print Handout 2 on thick paper or cardboard; make, if possible, color copies; print single-sided. Then cut the cards along the outline of the table and put the same cards together (the same colour cards). 3. Provide a large table to arrange the cards face down. | ||||||||||||||||||||||||||||||||||||||||||||||||||||
| Introduction | Do you like animals? Yes, we all love animals and they are part of our life. Animals come in all shapes, sizes, and colours, but do you know that they can also be grouped into different categories based on their similarities? This process of sorting and organizing animals is called classification. Scientists use a special system to classify animals. It helps us understand the relationships between different animals and how they are related to each other. This system has several levels of classification.
| ||||||||||||||||||||||||||||||||||||||||||||||||||||
| Teaching and learning methods | Learning through games and practical activities Group work | ||||||||||||||||||||||||||||||||||||||||||||||||||||
| Interdisciplinary connections | Mathematics – reasoning skills Physical education – the importance of incorporating movement games in the learning process Arts – creating a poster; presenting the characteristics of the animal groups in a creative way | ||||||||||||||||||||||||||||||||||||||||||||||||||||
| Resource teacher or other specialists activities | The lesson does not include written instructions and tasks in which a written response is created. The role of the resource teacher is to help target group students in case you cannot cope with a task or a particular step. Step 4 game is a hands-on activity that is engaging and interesting for students with learning disabilities (and beyond). The resource teacher can direct students to the group to which examples of animals they know belong. Creating the poster from step 6 is also a hands-on activity in which the students of the target group can be actively involved. | ||||||||||||||||||||||||||||||||||||||||||||||||||||
| New vocabulary | Invertebrates Vertebrates Amphibians Reptiles Mammals | ||||||||||||||||||||||||||||||||||||||||||||||||||||
| Work Flow | Step 1 Students watch the video – classification of animals https://www.youtube.com/watch?v=HLI0re6P-iA Step 2 Students play games which teach them the major characteristics of the six groups of animals. The characteristics are not explained in advance. Students will learn them by playing the games several times.
Students have 2 minutes to play each game as many times as they can without recording their names in the leader board; this is a preparation for the final rounds which count for ranking the best players. (10 min) Step 3 Students compete in the final rounds of the 5 games for vertebrate animals. The teacher instructs the students to launch:
and write their names in the leader board when they finish answering the questions. The student who is ranked as the 1st one on the leader board receives a notice board with the word FISH written on it (Handout 1, p.1 and 2) and does not participate in the following games. Similarly, students compete in the game Amphibians https://wordwall.net/resource/72148764 and write their names in the leader board; the winner receives a notice board with the word AMPHIBIANS written on it (Handout 1, p.3 and 4) and does not participate in the rest of the games.
At the end of Step 3 you will have 5 students (who were the winners in the five games) and who are holding plates with the names of the 5 groups of (vertebrate) animals: FISH, AMPHIBIANS, REPTILES, BIRDS, and MAMMALS. Step 4 The five students with the plates go to different places in the classroom. The teacher holds the plate INVERTEBRATES. On the back of each plate, the student who is responsible for the corresponding group of animals has a list of the correct characteristics of the animals in his/her group. (Handout 1) The cards from Handout 2 are cut separately on cardboard paper and spread face-down on a large space. The cards with the same colour are tied together and the students who choose the packs comprising several cards (pack1 with 5 cards reading “I have a spine”; pack 2 – 3 cards “I am cold-blooded”; pack 3 – 2 cards “I am warm-blooded”; pack 4 – 2 cards “I lay soft eggs to reproduce”; pack 5 - 2 cards “I lay hard-shelled eggs to reproduce”) will have more than one card but all their cards read the same information. Each student chooses randomly a card (or a pack of cards), reads the information and goes to the corresponding animal groups which bears the characteristic written on the card. When a student goes to the group where he/she believes his/her characteristic belongs to, the group leader (one of the five students with the plates or the teacher, who is responsible for the Invertebrates) checks the correctness of the choice, and redirects the student to another group, if being wrong. The students who have made the correct choice, stay by the group leaders. The students with the packs of cards need to go to all the groups that have the characteristic written on the cards - they give one card to the group leader and go to the next group; they stay by the group leader where they deliver the last card. Step 5 The groups come to the front one by one and present the corresponding group of animals. Example (group FISH): the group leader presents the group “We are fish.”, and the students from the group present the characteristics one after the other reading them from the cards – “I am a fish. I have a spine.”, “I am a fish. I am cold-blooded.”, “I am a fish. I live underwater.”, “I am a fish. I can breathe underwater with my gills.”, “I am a fish. I have scales and fins.”, “I am a fish. I lay soft eggs to reproduce.”. Step 6 Groups are provided with flipchart paper or any large-sized paper and are instructed to create a poster about the animals belonging to their groups. They can glue the plate with the name of the group and the paper cards with the characteristics of the animals. To make their poster more attractive, they can draw some of the animals belonging to the group, their habitat or whatever they consider relevant. The posters are displayed on the walls of the classroom. | ||||||||||||||||||||||||||||||||||||||||||||||||||||
| Reflection | The teacher draws a straight line on the floor (or brings a piece of rope several meters long (e.g. 15 m, depending on the available space in the classroom) and places two plates at the ends – one with a smiling face, and one with an unhappy face. Students stand all together away from the line, and when the teacher names an activity from in the lesson, they find their place along the line to indicate if they liked the activity or not. List of activities:
| ||||||||||||||||||||||||||||||||||||||||||||||||||||
| Notes | Step 6 could be done as a follow-up activity in an Art lesson, or it can be split in two phases – the first one being done in class, and the second one – in a couple of days. As a preparation for the second phase students could be asked to bring pictures of animals belong to their group, so that they can glue them on the posters. | ||||||||||||||||||||||||||||||||||||||||||||||||||||
| Digital Resource | Video (step 1) | ||||||||||||||||||||||||||||||||||||||||||||||||||||
| 77 | |||||||||||||||||||||||||||||||||||||||||||||||||||||
| | |||||||||||||||||||||||||||||||||||||||||||||||||||||
| 11 |  Grade 4 / Extinct animals Grade 4 / Extinct animals | ||||||||||||||||||||||||||||||||||||||||||||||||||||
| Developed by | IPSantarem - Bento Cavadas e Nelson Mestrinho | ||||||||||||||||||||||||||||||||||||||||||||||||||||
| Grade | 4 | ||||||||||||||||||||||||||||||||||||||||||||||||||||
| Duration | 60 | ||||||||||||||||||||||||||||||||||||||||||||||||||||
| Energizers | 46 - Mimicking extinct animals The teacher instructs students to mimic the movements of extinct animals in the following sequence: T-rex, Dodo, Smilodon. Figure 1. T-rex (Credits: wikipedia) Figure 2. Dodo (Credits: Wikipedia) Figure 3. Smilodon (Credits: Wikipedia) | ||||||||||||||||||||||||||||||||||||||||||||||||||||
| Relaxing Exercises | 46 - Find my friends Close your eyes and imagine that you and your friends are the last dinosaurs on Earth. You are a pterosaur, a flying dinosaur. Imagine that you are calmly flying on ancient Earth trying to find your friends. | ||||||||||||||||||||||||||||||||||||||||||||||||||||
| Objectives | Students will:
| ||||||||||||||||||||||||||||||||||||||||||||||||||||
| Preparation | Materials Images of dinosaur skeletons Equipment Laptop and projector Preparation for the lesson
National Museum Australia. Prehistoric Australia for kids. https://www.nma.gov.au/learn/kspace/prehistoric-australia-110-million-years-ago/kids Keiran, M. (1998). T-Rex. Back to the Cretaceous. IMax. Royal Tyrrell Museum. https://6a25bbd04bd33b8a843e-9626a8b6c7858057941524bfdad5f5b0.ssl.cf5.rackcdn.com/files/educator_guides/23d6563cf90cf10792662d0a1e5401fe.pdf National Museum of Natural History. Paleontology resources. Extinction of plants and animals. https://naturalhistory.si.edu/education/teaching-resources/paleontology/extinction-over-time | ||||||||||||||||||||||||||||||||||||||||||||||||||||
| Introduction | Life extinction is common in the history of life on Earth. Life has suffered many extinctions. One famous example is the one that caused the extinction of the dinosaurs. However, currently we are facing massive extinction of several species due to human impact. 5 min | ||||||||||||||||||||||||||||||||||||||||||||||||||||
| Teaching and learning methods | Inquiry-Based learning Collaborative learning | ||||||||||||||||||||||||||||||||||||||||||||||||||||
| Interdisciplinary connections | Language: Reading books of extinct or endangered species. Arts: Drawing causes of animal extinction. | ||||||||||||||||||||||||||||||||||||||||||||||||||||
| Resource teacher or other specialists activities | The most part of the tasks of the lesson are comprehensible to most special needs students who have well-preserved cognitive abilities. The lesson does not comprise long written explanations. The role of the special needs teacher or the assistant teacher is to help target group students in case they are not able to cope with some of the tasks or steps. | ||||||||||||||||||||||||||||||||||||||||||||||||||||
| New vocabulary | Extinction | ||||||||||||||||||||||||||||||||||||||||||||||||||||
| Work Flow | Part I | Extinctions on the past
20 min
Each group should present their solutions to the other groups and compare the differences and similarities. 30 min Part II | Extinctions on the present
20 min Part III | Looking for endangered species on my country
Each group should present their ideas to the other group in class. 60 min | ||||||||||||||||||||||||||||||||||||||||||||||||||||
| Reflection | Guided discussion: Watch again the video Extinct and endangered animals and ask students
10 min Additional ideas to explore with students: Extinction is an ecological process that occurred during the time of the dinosaurs and still occurs today and causes the disappearance of one species. Causes of extinction include: • competition by other or new species (Keiran, 1998). • a better adapted predator • depletion of resources within an environment • introduction of disease • changes in climate • changes in geography. | ||||||||||||||||||||||||||||||||||||||||||||||||||||
| Notes | |||||||||||||||||||||||||||||||||||||||||||||||||||||
| Digital Resource | |||||||||||||||||||||||||||||||||||||||||||||||||||||
| 78 | ||
| | ||
| Интердисциплинарни уроци
| ||
| 79 | |||||||||||||||||||||||||||||||||||||||||||||||||||||
| | |||||||||||||||||||||||||||||||||||||||||||||||||||||
| 1 |  Interdisciplinary lessons / Water - Measuring rain Interdisciplinary lessons / Water - Measuring rain | ||||||||||||||||||||||||||||||||||||||||||||||||||||
| Developed by | IPSantarém | ||||||||||||||||||||||||||||||||||||||||||||||||||||
| Grade | 2 | ||||||||||||||||||||||||||||||||||||||||||||||||||||
| Duration | 50 | ||||||||||||||||||||||||||||||||||||||||||||||||||||
| Energizers | 26 - Water cycle Explain to the kids the process of the water cycle (evaporation, condensation, precipitation) in simple terms. Play some music and have the kids dance around the play area. When the music stops, call out one of the water cycle stages. When a stage is called out, the kids must quickly freeze in place, acting out the corresponding stage (e.g., spinning to represent evaporation or forming a group to mimic precipitation). Continue playing the music and calling out stages intermittently. | ||||||||||||||||||||||||||||||||||||||||||||||||||||
| Relaxing Exercises | 25 - Raindrops Close your eyes and imagine that you are a water drop that falls in the ocean when it is raining. Imagine how you can return to the cloud due to the water cycle process. | ||||||||||||||||||||||||||||||||||||||||||||||||||||
| Objectives | Students will:
| ||||||||||||||||||||||||||||||||||||||||||||||||||||
| Preparation | Materials 1 tray Tubes Water bottles Equipment Laptop and projector Digital resources YouTube® educational videos Preparation for the lesson
| ||||||||||||||||||||||||||||||||||||||||||||||||||||
| Introduction | For the teacher: This interdisciplinary lesson plan aims that students explore the quantity used to measure precipitation by doing hand-on experiments. When primary school students are asked about how to measure the rain falling from the clouds, many of them would answer that volume is the proper quantity to measure it. However, volume does not allow comparisons between the quantities of rain that fall in different regions, whereas millimetres do. The lesson plan follows the inquiry-based learning approach. | ||||||||||||||||||||||||||||||||||||||||||||||||||||
| Teaching and learning methods | . | ||||||||||||||||||||||||||||||||||||||||||||||||||||
| Interdisciplinary connections | Inquiry-Based learning Collaborative learning | ||||||||||||||||||||||||||||||||||||||||||||||||||||
| Resource teacher or other specialists activities | Almost all the steps of the lesson are comprehensible to most special needs students who have well-preserved cognitive abilities. The lesson does not comprise long written explanations. The role of the special needs teacher or the assistant teacher is to help target group students in case they are not able to cope with some of the tasks or steps. | ||||||||||||||||||||||||||||||||||||||||||||||||||||
| New vocabulary | Flood, water, water cycle, prevention, damage | ||||||||||||||||||||||||||||||||||||||||||||||||||||
| Work Flow |
Start the lesson by asking students what they know about water and the water cycle. Explain the water cycle (evaporation, condensation, precipitation) in simple terms and using visuals. Educational resource for kids about the water cycle: https://youtu.be/ncORPosDrjI Part II | Measuring precipitation Start the Part II by presenting the news from Annex 1 to students. Then ask the question: How is rainfall measured? Collect their initial ideas. They might say that volume is a good idea to measure rainfall. At this stage you accept all answers. Next, engage students in the following experiment. What you need:
Observation: Some bottles must have a round cross section while others should have other shapes (Figure 1).
Figure 1. Plastic bottles with different shapes (Source: Freepik). Instructions:
Figure 2. Model of the experiment.
Discussion:
Conclusion The main observation from this experience is that volume is not a good measure for rainfall because volume varies according to the area of the cross section of the plastic bottles. The height of the columns of water does not vary between the recipients, and that is the reason why millimetres of column of water is a better measure for rainfall. Moreover, millimetres of the column of water allows comparison of precipitation between different zones. 5 min | ||||||||||||||||||||||||||||||||||||||||||||||||||||
| Reflection | Guided discussion - 5 min:
| ||||||||||||||||||||||||||||||||||||||||||||||||||||
| Notes | Grade 2 - Nature Science Grade 3 - Mathematics | ||||||||||||||||||||||||||||||||||||||||||||||||||||
| Digital Resource | Annex 1 https://sen-power.ipsantarem.pt/atividades1/pdf/656_Annex1.pdf | ||||||||||||||||||||||||||||||||||||||||||||||||||||
| 80 | |||||||||||||||||||||||||||||||||||||||||||||||||||||
| | |||||||||||||||||||||||||||||||||||||||||||||||||||||
| 2 |  Interdisciplinary lessons / Water: Flooding in urban environment Interdisciplinary lessons / Water: Flooding in urban environment | ||||||||||||||||||||||||||||||||||||||||||||||||||||
| Developed by | IPSantarém | ||||||||||||||||||||||||||||||||||||||||||||||||||||
| Grade | 2 | ||||||||||||||||||||||||||||||||||||||||||||||||||||
| Duration | 50 | ||||||||||||||||||||||||||||||||||||||||||||||||||||
| Energizers | 26 - Water cycle Explain to the kids the process of the water cycle (evaporation, condensation, precipitation) in simple terms. Play some music and have the kids dance around the play area. When the music stops, call out one of the water cycle stages. When a stage is called out, the kids must quickly freeze in place, acting out the corresponding stage (e.g., spinning to represent evaporation or forming a group to mimic precipitation). Continue playing the music and calling out stages intermittently. | ||||||||||||||||||||||||||||||||||||||||||||||||||||
| Relaxing Exercises | 25 - Raindrops Close your eyes and imagine that you are a water drop that falls in the ocean when it is raining. Imagine how you can return to the cloud due to the water cycle process. | ||||||||||||||||||||||||||||||||||||||||||||||||||||
| Objectives | Students will:
| ||||||||||||||||||||||||||||||||||||||||||||||||||||
| Preparation | Materials
Equipment
Digital resources
Preparation for the lesson
| ||||||||||||||||||||||||||||||||||||||||||||||||||||
| Introduction | Climate change consequences, such as flooding, are a major problem for many European cities. Flooding typically occurs when prolonged rain falls over several days, when intense rain falls over a short period of time, or when an ice or debris jam causes a river or stream to overflow onto the surrounding area. Flooding can also result from the failure of a water control structure, such as a levee or dam. The most common cause of flooding is water due to rain and/or snowmelt that accumulates faster than soils can absorb it or rivers can carry it away (National Weather Service). According to the Federal Emergency Management Agency (FEMA), urban flooding is “the inundation of property in a built environment, particularly in more densely populated areas, caused by rain falling on increased amounts of impervious surfaces and overwhelming the capacity of drainage systems.” In this lesson you are going to explore urban flooding causes and consequences with primary school students. | ||||||||||||||||||||||||||||||||||||||||||||||||||||
| Teaching and learning methods | Inquiry-Based learning Collaborative learning | ||||||||||||||||||||||||||||||||||||||||||||||||||||
| Interdisciplinary connections | Mathematics: reasoning skills Arts: creating a city with Lego® | ||||||||||||||||||||||||||||||||||||||||||||||||||||
| Resource teacher or other specialists activities | Almost all the steps of the lesson are comprehensible to most special needs students who have well-preserved cognitive abilities. The lesson does not comprise long written explanations. The role of the special needs teacher or the assistant teacher is to help target group students in case they are not able to cope with some of the tasks or steps. | ||||||||||||||||||||||||||||||||||||||||||||||||||||
| New vocabulary | flood, water, water cycle, prevention, damage | ||||||||||||||||||||||||||||||||||||||||||||||||||||
| Work Flow | Part I | Flooding
Part II | Rainfall and urban flooding
What you need:
Instructions: Phase 1 | Simulation of rainwater drainage in a city, without rainwater blockage
Figure 1. Model of the experiment. 3. After the drain water falls into the plastic bottle or the measuring cup, the students should count the time in order to mark on the plastic bottle or measuring cup (e.g. using a marker), the amount of water that drained during the first minute, then during the second minute, and so on, until no more drain water flows. 4. Ask students to measure the amount of water inside the plastic bottle, or if they use a measuring cup – to calculate the amount of water, identifying the amount corresponding to each minute. The data can be registered in the table (Annex 1):
Phase 3 | Simulation of heavy rain Simulation of normal rain:
Simulation of heavy rain:
30 min Discussion:
Example of a hypothetical graphical representation. 20 min Conclusion The main idea of this experiment is that students understand better the causes of urban flooding. One cause is the blockage of rainwater drains. Another cause is heavy rain in a short period of time. At the same time, students will have the opportunity to use mathematical language to quantitatively represent, describe and interpret phenomena arising from the experimental environment, with obvious connections to the subject under study - urban flooding. | ||||||||||||||||||||||||||||||||||||||||||||||||||||
| Reflection | Guided discussion (5 min)
Pedagogical suggestion:
| ||||||||||||||||||||||||||||||||||||||||||||||||||||
| Notes | Grade 2: Nature Science Grade 3: Mathematics | ||||||||||||||||||||||||||||||||||||||||||||||||||||
| Digital Resource | Annex 1 https://sen-power.ipsantarem.pt/atividades1/pdf/657_Annex1.pdf | ||||||||||||||||||||||||||||||||||||||||||||||||||||
| 81 | |||||||||||||||||||||||||||||||||||||||||||||||||||||
| | |||||||||||||||||||||||||||||||||||||||||||||||||||||
| 3 |  Interdisciplinary lessons / Measuring human footprints Interdisciplinary lessons / Measuring human footprints | ||||||||||||||||||||||||||||||||||||||||||||||||||||
| Developed by | IPSantarem | ||||||||||||||||||||||||||||||||||||||||||||||||||||
| Grade | 3 | ||||||||||||||||||||||||||||||||||||||||||||||||||||
| Duration | 30 | ||||||||||||||||||||||||||||||||||||||||||||||||||||
| Energizers | 31 - Microbes The teacher asks students: What do we know about germs/microbes? How do we protect ourselves from them? The teacher explains what is the relationship between health and hygiene, visually showing how germs make us sick through the following task-experiment: Germs are only afraid of soap and a toothbrush. That is why we regularly wash our clothes, clean our houses, brush our hands and teeth. That's the only way we can get rid of germs. To show what hygiene is and how people should take care and protect themselves from germs in their daily life, play the following game: 1. Ask a student to wash his/her hands thoroughly and dip them in clean water. Obviously, the water will remain clean. After that ask him/her to dig hands into dirt or sand and dip hands again in a soapy solution in another container – it’ll be seen that the water turns cloudy and black. Here are the germs - the soap caught them. 2. The easiest way to convey germs is through touch. Tell the students that you have made a focus and you have magnified the microbes so that they can be seen. Paint your hand with easy-to-wash paint. Shake hands with one of the students, who will shake hands with another, and so on until the last one. This is an easy way to visualize how disease-causing bacteria pass from one person to another. Of course, transmission of the germs can also happen by air-droplet route. To make it comprehensive for the students, explain that when we sneeze or cough, droplets come out of our mouths and when they get into the air, they can infect another person. That's why we have to put our hand over our mouth and turn the other way so as not to put the people around us at risk. Time - 5 minutes. | ||||||||||||||||||||||||||||||||||||||||||||||||||||
| Relaxing Exercises | 31 - I love nature I love nature The teacher gives instruction to the students to close their eyes and while listening to the music try to imagine that they are walking in nature. Teacher asks them to remember what plants there are. Listening to the music lasts about 1 minute. The teacher then gives the floor to a few students to tell what plants they imagined, what they looked like, how big they were, did they have blossoms or were they just leaves. Time – 5 minutes | ||||||||||||||||||||||||||||||||||||||||||||||||||||
| Objectives | Students will:
| ||||||||||||||||||||||||||||||||||||||||||||||||||||
| Preparation | Materials Paper (A4) and markers Ruler (to measure the students’ footprint) Measuring tape (toe measure the students’ height) Equipment Laptop and projecto | ||||||||||||||||||||||||||||||||||||||||||||||||||||
| Introduction | Human footprints are more than just impressions left behind in the ground. They are a symbol of our existence and interaction with the world. From ancient times to the present, footprints have represented our journey, movement, and impact on the environment. In a literal sense, they are physical marks that record our presence, whether on a sandy beach, muddy path, or frozen terrain. On a broader scale, human footprints also represent our "footprint" on the planet. This includes our contributions to climate change, deforestation, and biodiversity loss, as well as the cultural and historical traces we leave in art, architecture, and innovation. Understanding human footprints, in both their physical and metaphorical forms, helps us reflect on our relationship with nature, the consequences of our actions, and the paths we carve for future generations. This is a mathematics and science interdisciplinary activity because it connects measurement with the human body. 5 mi | ||||||||||||||||||||||||||||||||||||||||||||||||||||
| Teaching and learning methods | Inquiry-Based learning Collaborative learning | ||||||||||||||||||||||||||||||||||||||||||||||||||||
| Interdisciplinary connections | Mathematics: reasoning and measuring skills Arts: drawing footprints Sports: practical activity (energizer) | ||||||||||||||||||||||||||||||||||||||||||||||||||||
| Resource teacher or other specialists activities | Almost all the steps of the lesson are comprehensible to most special needs students who have well-preserved cognitive abilities. The lesson does not comprise long written explanations. The role of the special needs teacher or the assistant teacher is to help target group students in case they are not able to cope with some of the tasks or steps. | ||||||||||||||||||||||||||||||||||||||||||||||||||||
| New vocabulary | Footprint | ||||||||||||||||||||||||||||||||||||||||||||||||||||
| Work Flow | Part I | Measuring footprints
Figure 1. Information that each student should write in the footprint. Part I | Footprint sequence
Figure 2. Example of a sequence of footprints arranged by increasing size. 20 min | ||||||||||||||||||||||||||||||||||||||||||||||||||||
| Reflection | Guided discussion:
10 min | ||||||||||||||||||||||||||||||||||||||||||||||||||||
| Notes | |||||||||||||||||||||||||||||||||||||||||||||||||||||
| Digital Resource | |||||||||||||||||||||||||||||||||||||||||||||||||||||
| 82 | |||||||||||||||||||||||||||||||||||||||||||||||||||||
| | |||||||||||||||||||||||||||||||||||||||||||||||||||||
| 4 |  Interdisciplinary lessons / Dinosaur locomotion Interdisciplinary lessons / Dinosaur locomotion | ||||||||||||||||||||||||||||||||||||||||||||||||||||
| Developed by | IPSantarem - Bento Cavadas e Nelson Mestrinho | ||||||||||||||||||||||||||||||||||||||||||||||||||||
| Grade | 3 | ||||||||||||||||||||||||||||||||||||||||||||||||||||
| Duration | 2h30 | ||||||||||||||||||||||||||||||||||||||||||||||||||||
| Energizers | 45 - The dinosaur energizer Ask each student to think of their favourite dinosaur and be ready to share it with the class. Then, organize the students in a straight line, standing side by side. Now, each student should imitate the dinosaur movement following these steps:
After everyone has had a turn, gather the students for a brief discussion. Ask them to share what they noticed about the different types of dinosaur movements. Discuss how the structure and size of each dinosaur might have influenced its way of moving. As an alternative: If the school has a large enough sandpit, a short activity could be organised to make students realise the relationship between the way humans move and the marks registered on the ground. This activity would consist of asking students to freely produce footprints in the sand as a result of walking (A) or running (B) (Figure 3). Figure 3. Walking and running footprints. The aim of this exploration would be to realise that the higher the speed of movement, the further apart the footprints tend to be arranged on the track, as well as more aligned (B), as opposed to walking, where consecutive footprints tend to be closer together and more side by side (A). Some engaging questions are:
At this stage the teacher can organise a more structured demonstration, with a chosen student, to compare the two situations. | ||||||||||||||||||||||||||||||||||||||||||||||||||||
| Relaxing Exercises | 45 - Guided fantasy with dinosaurs Close your eyes and take a deep breath in. Slowly exhale and feel your body relax. Imagine that you are in a lush, green prehistoric landscape filled with tall trees, colourful plants, and the distant sounds of gentle dinosaur calls. In your mind, picture a gentle, friendly dinosaur, like a Brachiosaurus or a Triceratops, peacefully grazing or moving through the landscape. Notice the dinosaur’s size, shape, and the way it moves slowly and gracefully. Imagine the texture of its skin and the calm look in its eyes. Relax the most during this exercise. | ||||||||||||||||||||||||||||||||||||||||||||||||||||
| Objectives | Students will:
| ||||||||||||||||||||||||||||||||||||||||||||||||||||
| Preparation | Materials Dinosaur (theropod) footprints (Appendix 1) Equipment Laptop and projector or interactive board Digital resources Preparation for the lesson
Figure 1. Dinosaur footprint track.
If you prefer to organize the activity in an indoor setting, like a corridor, a hall or a porch, you can use footprints printed on paper (see annex I). As an outdoor alternative, you can adapt the footprint by turn it into to a template and use it to paint them on the floor.
Figure 2. Foot length, pace length and stride length. For a footprint length of between 22 and 24 cm (don’t exceed 25 cm) use a stride length of about 2,50 m. Watch this video to learn more about dinosaur footprints: https://youtu.be/RTMAe9TSdZQ | ||||||||||||||||||||||||||||||||||||||||||||||||||||
| Introduction | Dinosaurs are among the main focuses of young students’ conceptual interest. Studying dinosaur footprints and tracks can raise their awareness of ancient animals and the causes of their extinction. Although the approach to the study of dinosaur tracks proposed in this work is simple, it must be done with great rigor, bearing in mind that measuring correctly the footprints is needed. 5 min | ||||||||||||||||||||||||||||||||||||||||||||||||||||
| Teaching and learning methods | Inquiry-Based learning Collaborative learning | ||||||||||||||||||||||||||||||||||||||||||||||||||||
| Interdisciplinary connections | Mathematics: reasoning and measuring skills Arts: drawing dinosaur footprints | ||||||||||||||||||||||||||||||||||||||||||||||||||||
| Resource teacher or other specialists activities | Almost all the steps of the lesson are comprehensible to most special needs students who have well-preserved cognitive abilities. The lesson does not comprise long written explanations. The role of the special needs teacher or the assistant teacher is to help target group students in case they are not able to cope with some of the tasks or steps. | ||||||||||||||||||||||||||||||||||||||||||||||||||||
| New vocabulary | Dinosaur Footprints Tracks | ||||||||||||||||||||||||||||||||||||||||||||||||||||
| Work Flow | Part I | Dinosaur extinction Start the lesson asking students what they know about dinosaur extinction. Ask them to explore the following online pages:
Then, ask students to identify if they initial ideas are similar to the reason for dinosaur extinction proposed by science. To promote discussion, the teacher can ask students some of the following questions:
Part II | Dinosaur size and dynamics Step 1: Get to know the footprint track - Appendix 1 The students are taken to the school site where the footprint track was created. The students are told that the trackway is a record of dinosaur's activity in the distant past and that we can extract information from it about the dinosaur's characteristics and behaviour. The simulated track is similar to many that can be found around the world (Figure 4). Figure 4. Dinosaur footprint in Alcanede, Portugal. The tridactyl footprints indicate that they were produced by a theropod dinosaur. At this stage it makes sense to ask the students what additional information this track can provide. What characteristics of the track can be measured? For example, the length of the footprint, which give us information about the size of the animal, can be measured. Students are asked to organise themselves in pairs to measure and record the length of the footprint. These are aspects to take into consideration:
Figure 5. Foot length. Students can use a ruler to measure, as it is a short length. They can also use a tape measure, which they will need later to measure the other parameters of the track.
After measuring and recording the foot length, the working pairs should recognise two other parameters of the track, namely the pace length and the stride length, according to the following diagram (Figure 6). Figure 6. Foot length, pace length and stride length. Students are also required to measure and record these two elements of track data. The pace length should be understood as the distance between two consecutive footprints, measured from heel to heel; stride length as the distance between two consecutive footsteps of the same foot, also measured between two corresponding points (as before, for example, from heel to heel). Again, it’s important to realise that:
At this stage of the work, students will have the opportunity to obtain simple but relevant additional information about the theropod dinosaur from the data collected, just by using simple mathematical models. The size of the footprint gives us an idea of the size of the dinosaur that produced it. An important parameter is the size of the leg, usually referred to as the hip height, is an indicator of the size of the dinosaur (Figure 7) Figure 7. Hip height (H). For a small theropod (with a foot length of less than 25 cm), the hip height can be estimated by multiplying the footprint length by 4.5. Students must now multiply their measurement for the foot length by 4.5 to determine the hip height of the dinosaur. Stride length tells us whether the dinosaur moved faster or slower: the longer the stride, the faster it moved. However, this is relative, depending on the size of the leg, which in this context we call hip height. This means that a certain stride length could mean faster displacement for a dinosaur with shorter legs, or a slower locomotion for a dinosaur with longer legs. For this reason, discovering the type of dinosaur locomotion responsible for the trackway involves assessing the stride length in relation to the hip height. So, students must divide the value of the stride length (measured on the track) by the hip height (determined in the previous step). If this ratio is found to be:
In this case, as a reference with a stride length of 250 cm, for a footprint of 24 cm, the hip height would be: Hip height=4,5 × foot lenght=4,5×24=108 cm After obtaining this value, the students can use a tape measure to represent what this dinosaur's hip height would be. Students can imagine how tall was the dinosaur. Then, they should calculate the dinosaur locomotion, as in the following example: Dinosaur locomotion=Stride length : Hip height= 250 : 108=2.3 (Dinosaur was trotting) To carry out the division, the teacher can authorise students, if considered appropriate, to use a calculator or, alternatively, engage in “pencil and paper” calculation (algorithm) or use any other calculation strategies, according to the level of the students. It is not important to achieve an exact result, but only an approximation that allows the ratio to be compared with the reference values provided (2 and 2.9).
| ||||||||||||||||||||||||||||||||||||||||||||||||||||
| Reflection | Guided discussion:
| ||||||||||||||||||||||||||||||||||||||||||||||||||||
| Notes | |||||||||||||||||||||||||||||||||||||||||||||||||||||
| Digital Resource | |||||||||||||||||||||||||||||||||||||||||||||||||||||
| 83 | ||
| | ||
Bibliography
| ||
| | ||
| Indice | Page | |
| Credits | 3 | |
| Acknowledgements | 4 | |
| Preface | 5 | |
| Introduction | 6 | |
| Instruction to teachers | 7 | |
| Class preparation | 8 | |
| Non Formal Education | 11 | |
| Use of Digital Tools | 15 | |
| Evaluation | 16 | |
| Energizers | 17 | |
| Relaxing Exercises | 23 | |
| 1 - Grade 1 / Healthy lifestyle | 31 | |
| 2 - Grade 1 / Diversity in Nature: living and non-living things | 32 | |
| 3 - Grade 1 / Changes in Nature According to the Seasons | 33 | |
| 4 - Grade 1 / The importance of the Sun | 34 | |
| 5 - Grade 1 / Parts of a plant: root, stem, leaf, blossom, fruit | 35 | |
| 6 - Grade 1 / Body Security: Risk behaviours for individual and collective health and safety | 36 | |
| 7 - Grade 1 / Basic needs of the living beings – animals and plants | 37 | |
| 8 - Grade 1 / Recycling | 38 | |
| 9 - Grade 1 / Healthy foods and beverages | 39 | |
| 10 - Grade 1 / Reading tree rings; parts of plants | 40 | |
| 11 - Grade 1 / Classification of plants based on the structure of the stem: trees, shrubs and grasses. Deciduous and coniferous trees. | 41 | |
| 1 - Grade 2 / Domestic and wild animals. People and animals. | 43 | |
| 2 - Grade 2 / Biodiversity and responsible attitude towards Nature | 44 | |
| 3 - Grade 2 / The human body: Sensory organs | 45 | |
| 4 - Grade 2 / Effect of the movement and shape of the Earth on human life | 46 | |
| 5 - Grade 2 / Means of transport. Pollution. | 47 | |
| 6 - Grade 2 / Plants | 48 | |
| 7 - Grade 2 / Growing healthy! Growing strong! | 49 | |
| 8 - Grade 2 / Balanced Nutrition | 50 | |
| 9 - Grade 2 / Let's Keep Our Environment Clean | 51 | |
| 10 - Grade 2 / Exploring animal footprints | 52 | |
| 1 - Grade 3 / Living and non-living Nature | 54 | |
| 2 - Grade 3 / The influence of air, light, temperature, water, soil on the life of plants and animals | 55 | |
| 3 - Grade 3 / Functions of the tongue | 56 | |
| 4 - Grade 3 / Main organs of the human body and their functions | 57 | |
| 5 - Grade 3 / Man and healthy lifestyle – keeping oral hygiene and healthy teeth | 58 | |
| | ||
| 6 - Grade 3 / How plants and animals survive | 59 | |
| 7 - Grade 3 / Water - properties, distribution, importance and uses | 60 | |
| 8 - Grade 3 / First Aid | 61 | |
| 9 - Grade 3 / States of matter: Reversible transformations | 62 | |
| 10 - Grade 3 / Types of movement | 63 | |
| 11 - Grade 3 / The Water Cycle: A Journey Through States of Matter | 64 | |
| 12 - Grade 3 / Classification of animals based on their food habits | 65 | |
| 1 - Grade 4 / Human activities and their effect on the oceans | 67 | |
| 2 - Grade 4 / The secrets of water – the 3 states of water | 68 | |
| 3 - Grade 4 / Sound and light; sources and their effect on people's life | 69 | |
| 4 - Grade 4 / Gravitational Force of Magnets | 70 | |
| 5 - Grade 4 / Soil permeability | 71 | |
| 6 - Grade 4 / Orientation: the basics to find your way | 72 | |
| 7 - Grade 4 / Exploring Ecosystems: Habitats and Biodiversity | 73 | |
| 8 - Grade 4 / Magnificent Matter: Exploring States and Changes | 74 | |
| 9 - Grade 4 / Nutrition and respiration of plants | 75 | |
| 10 - Grade 4 / Classification of animals - invertebrates and vertebrates: fish, amphibians, reptiles, birds, mammals | 76 | |
| 11 - Grade 4 / Extinct animals | 77 | |
| 1 - Interdisciplinary lessons / Water - Measuring rain | 79 | |
| 2 - Interdisciplinary lessons / Water: Flooding in urban environment | 80 | |
| 3 - Interdisciplinary lessons / Measuring human footprints | 81 | |
| 4 - Interdisciplinary lessons / Dinosaur locomotion | 82 | |
| Bibliography | 83 | |


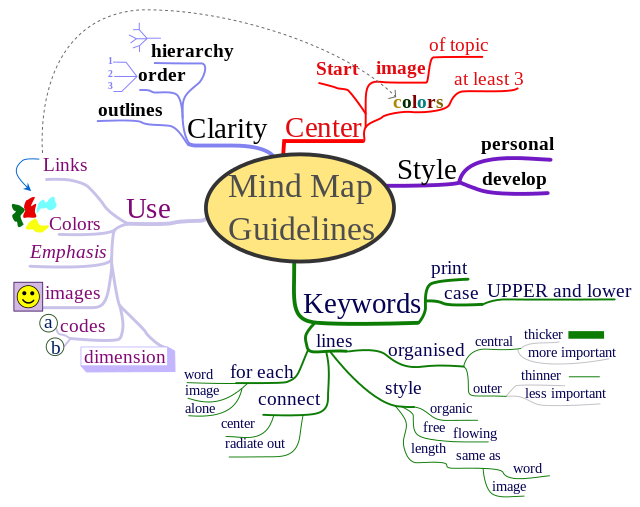


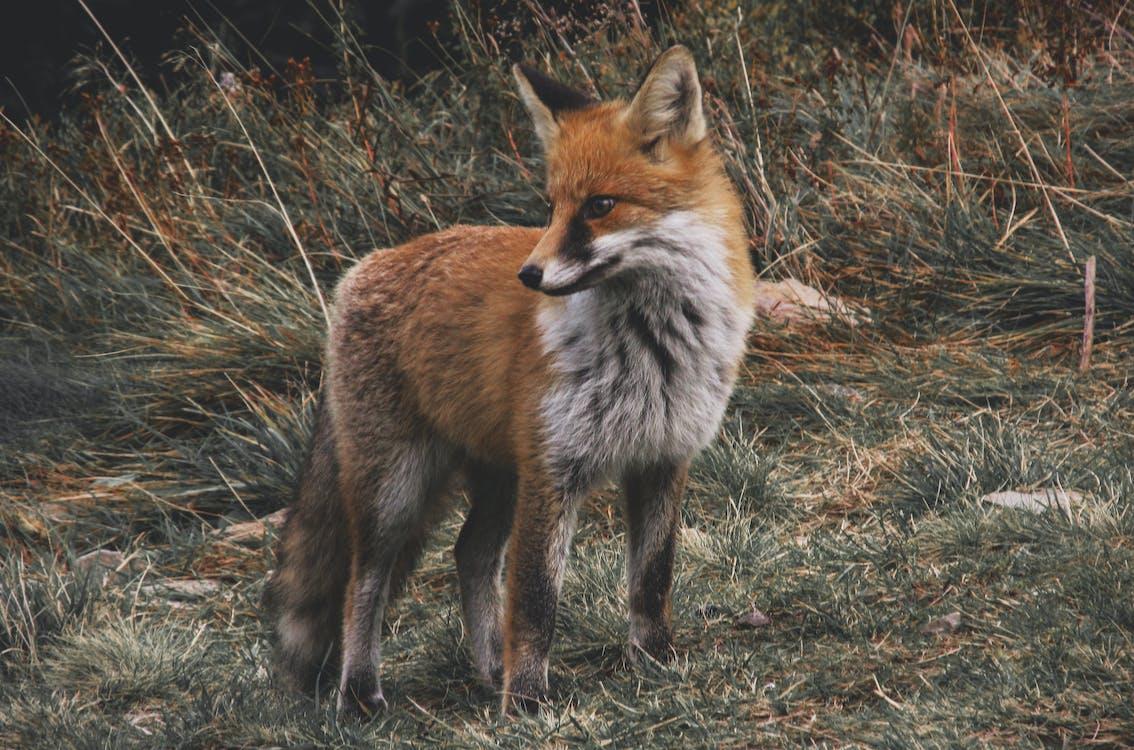
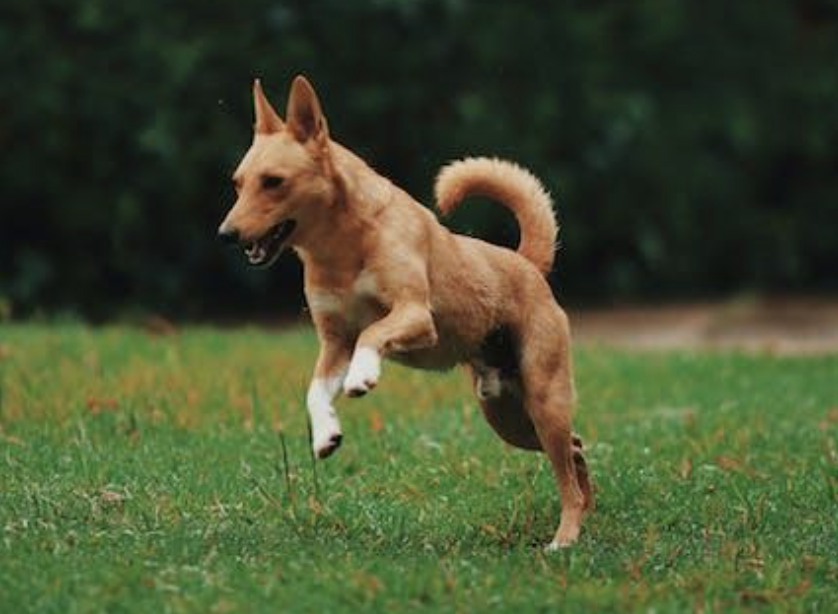

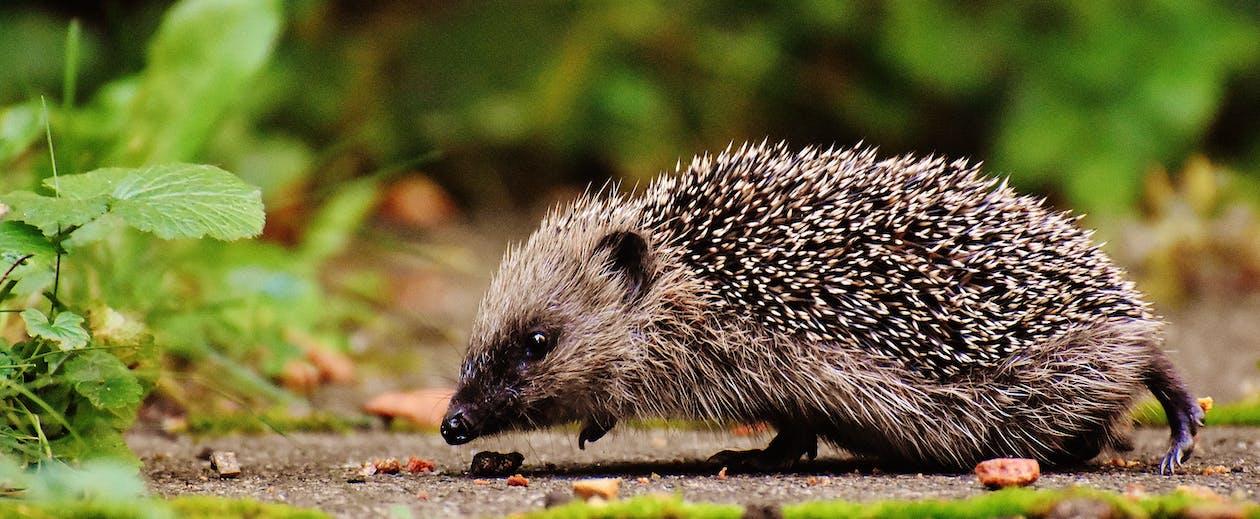
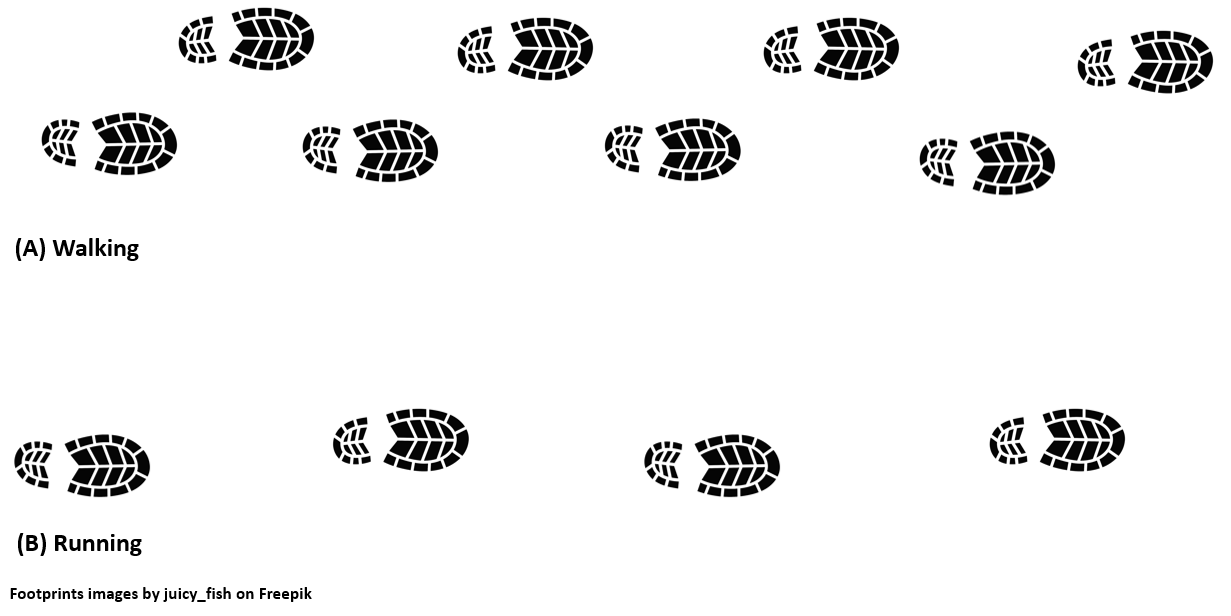
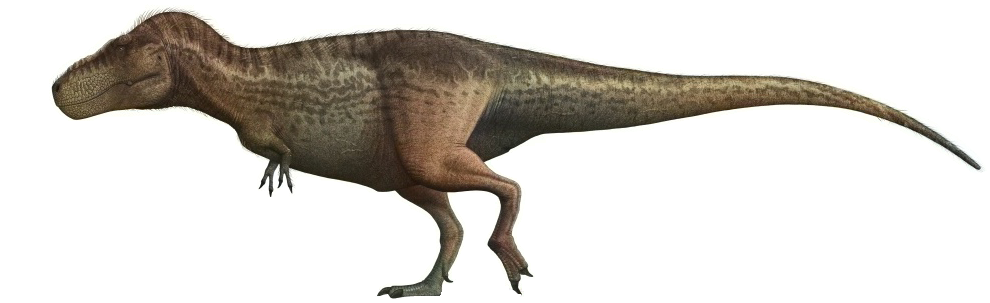

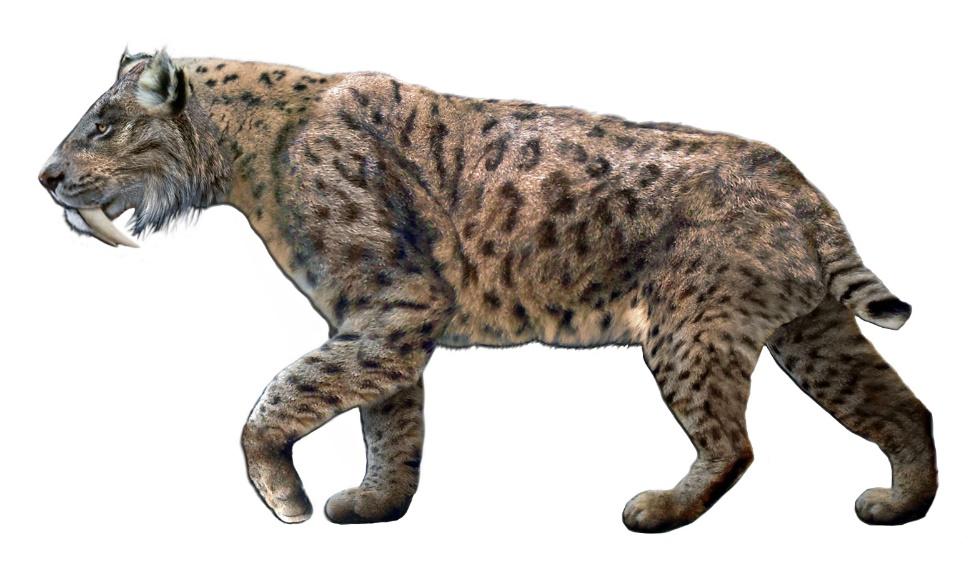
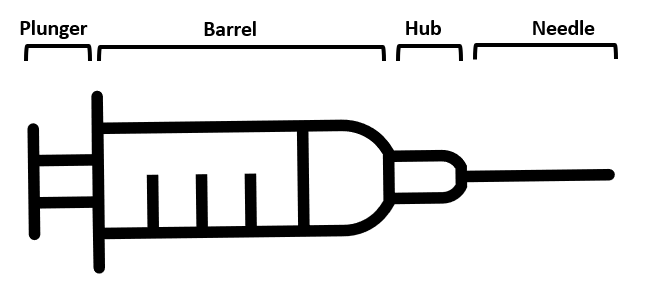
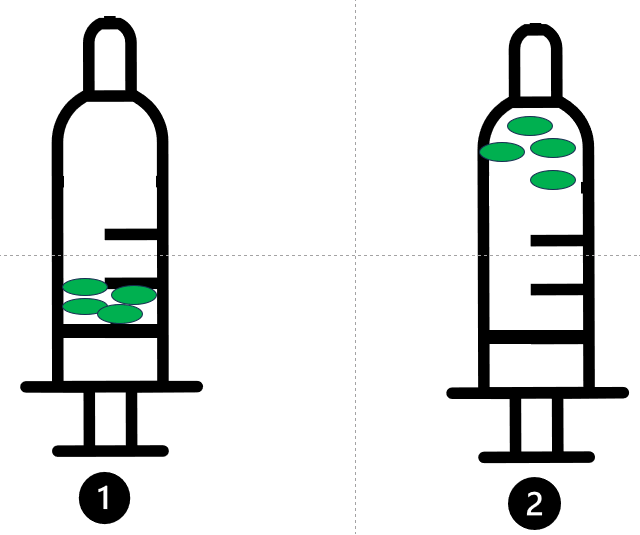
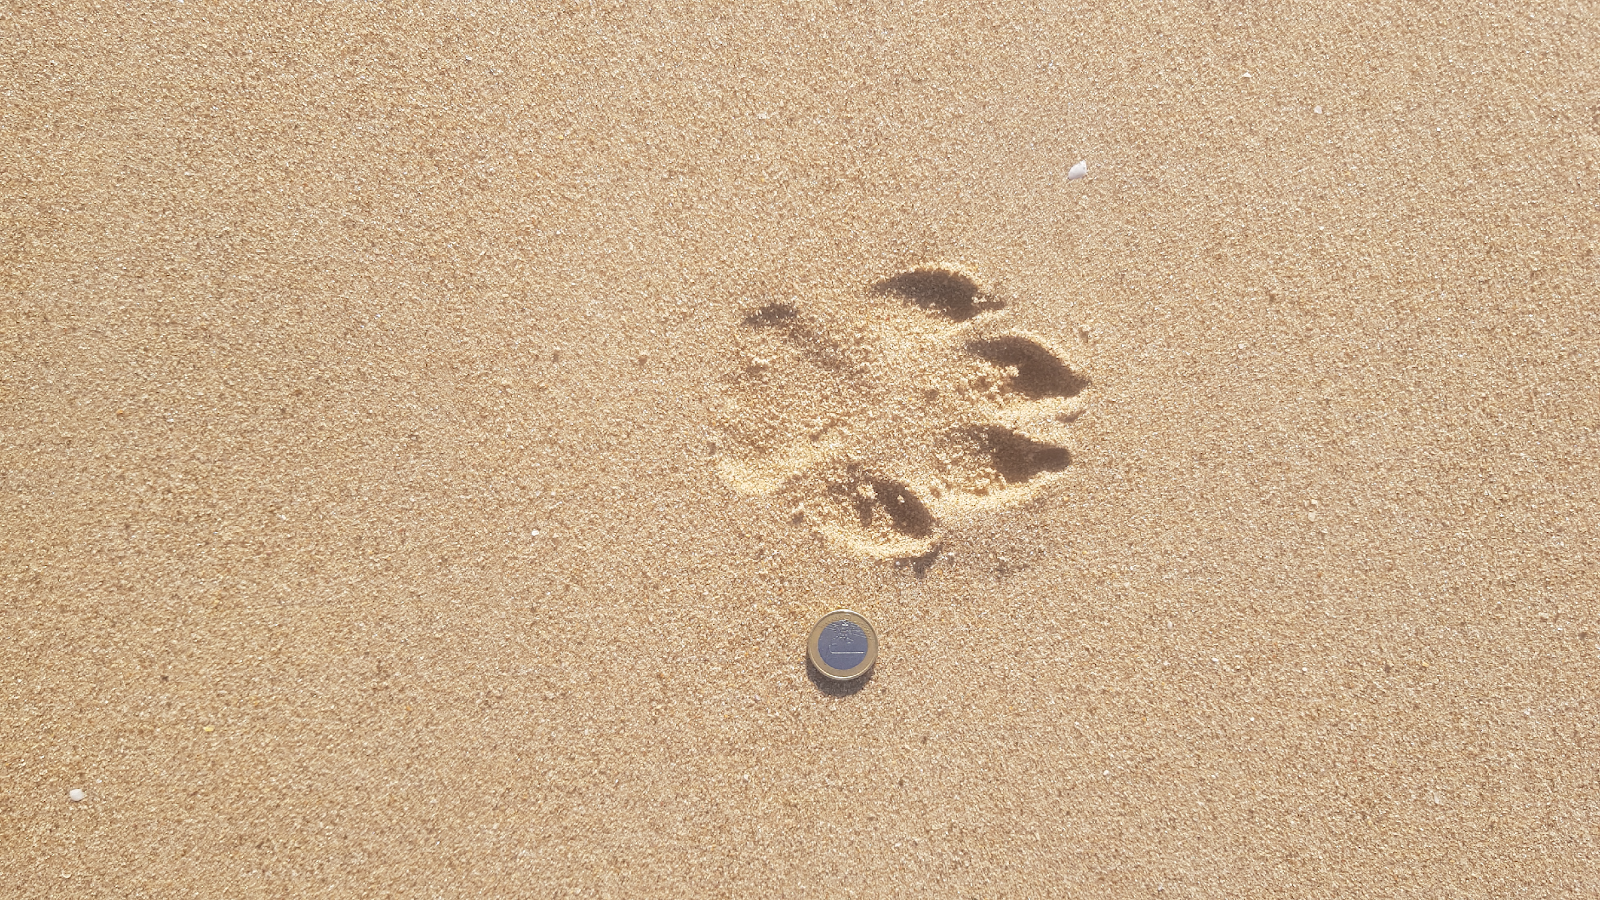
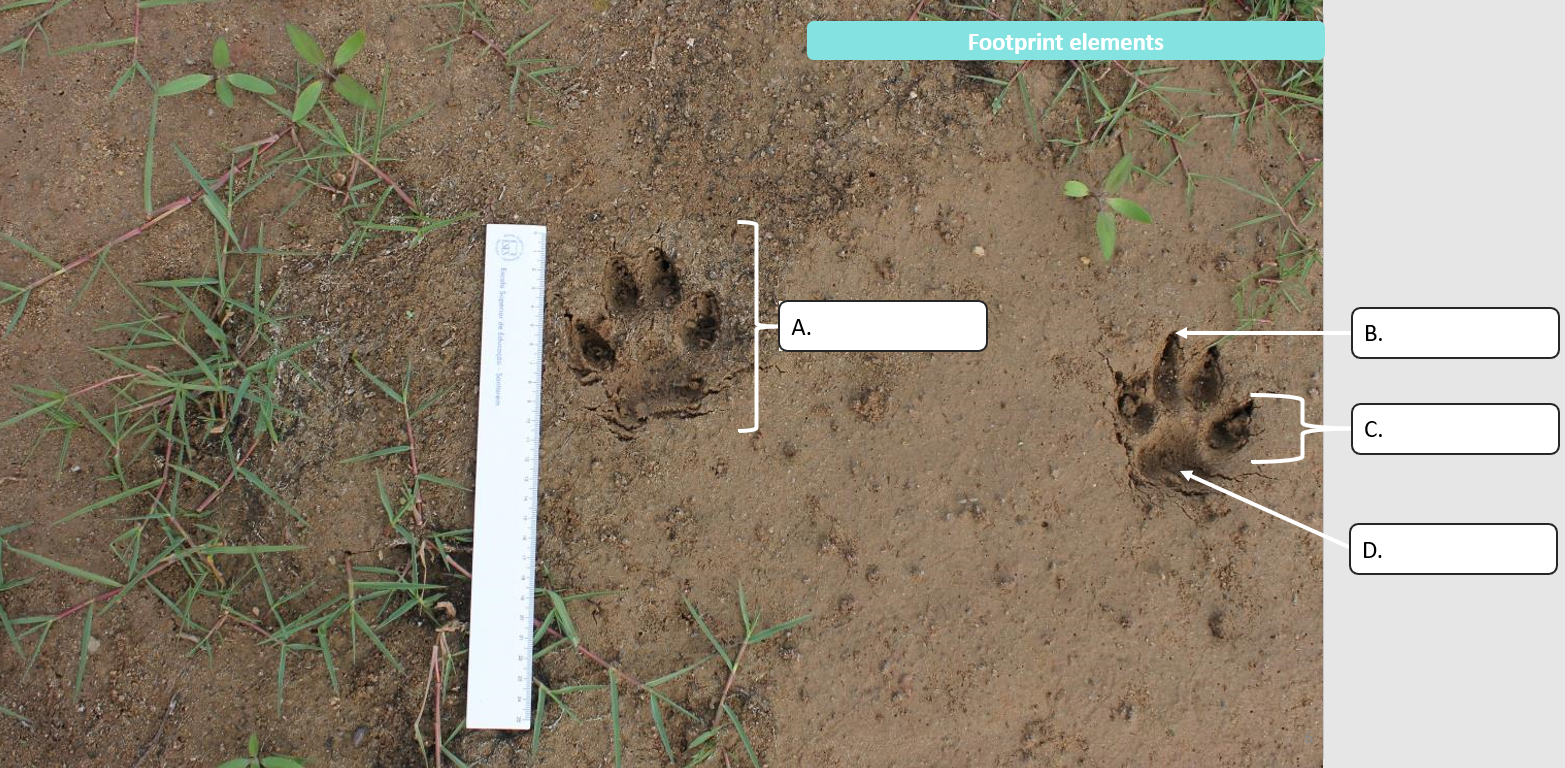
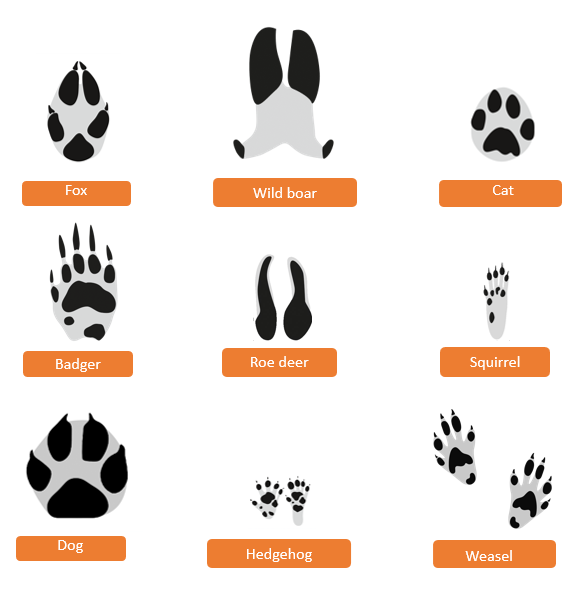
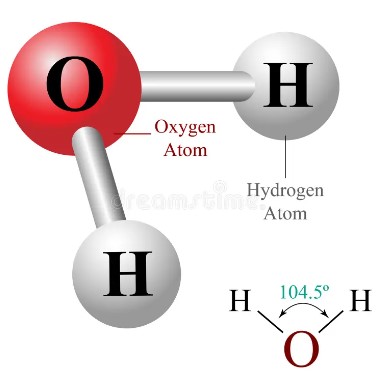
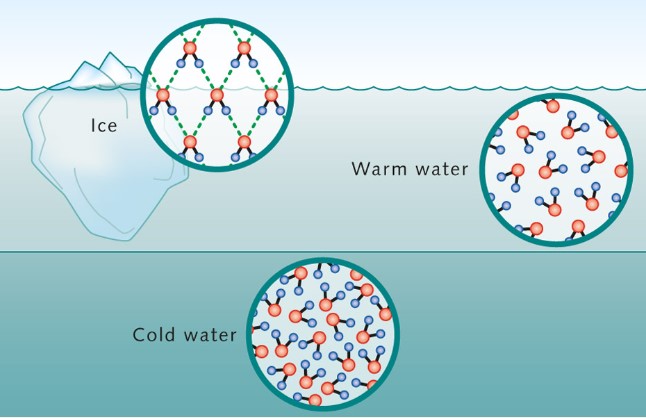
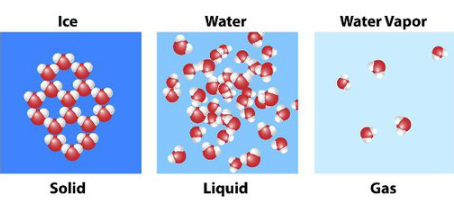
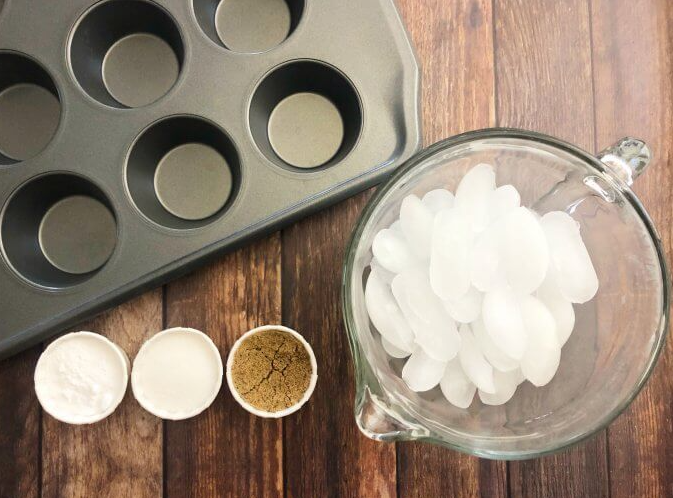
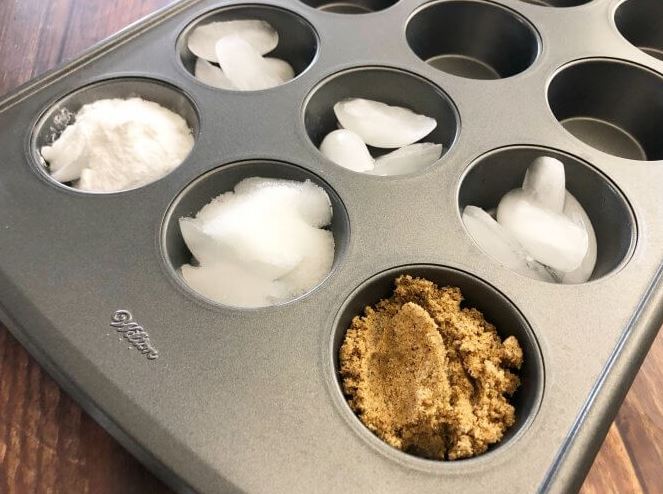


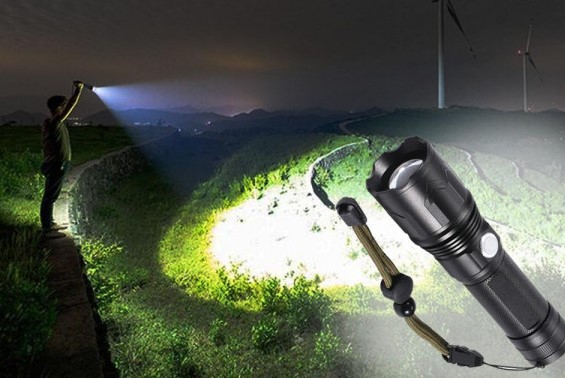

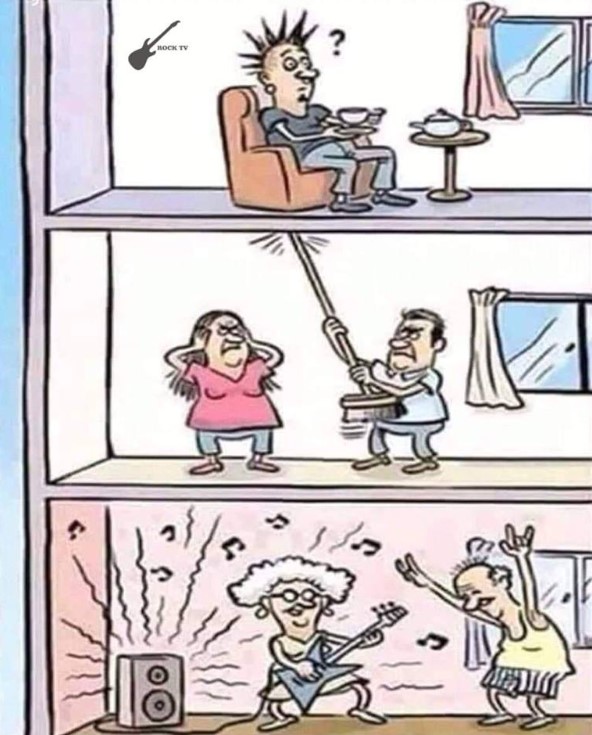


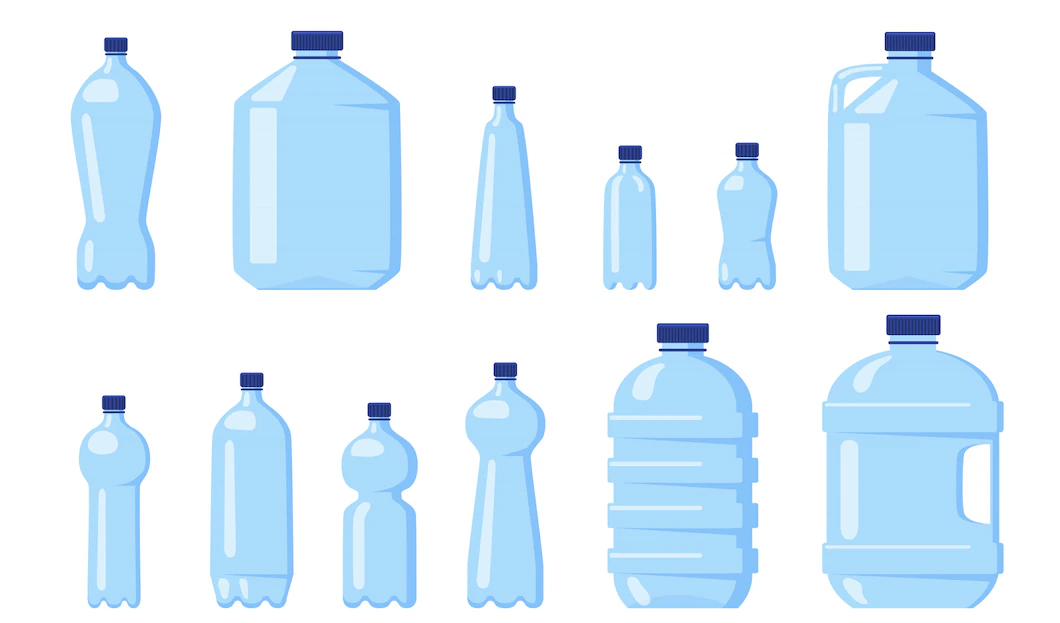
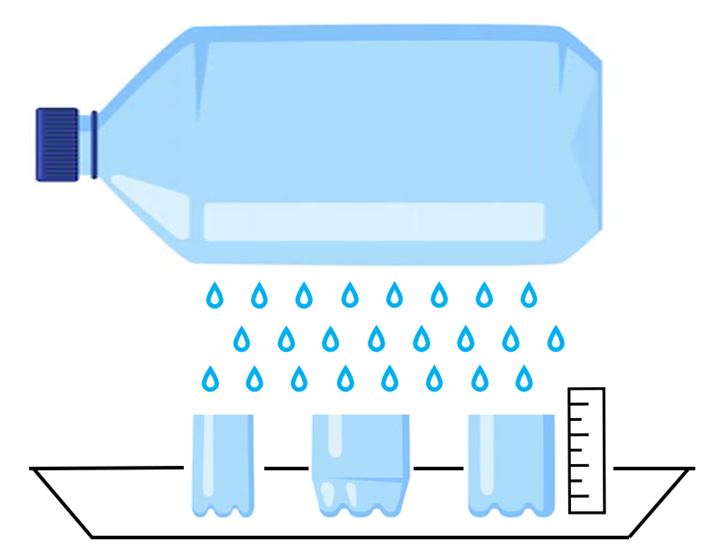
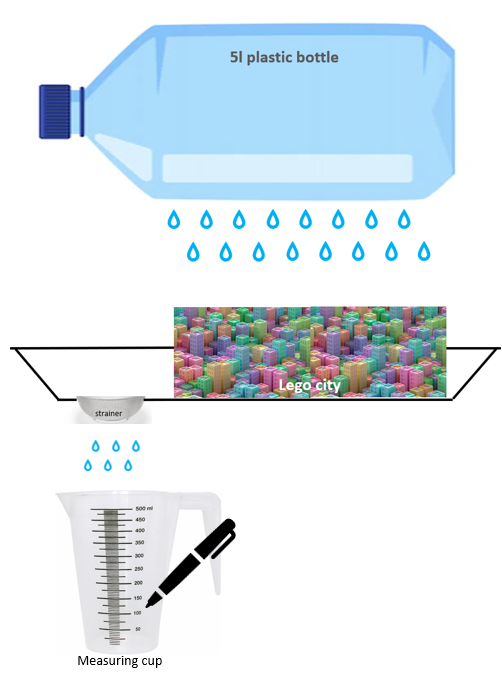
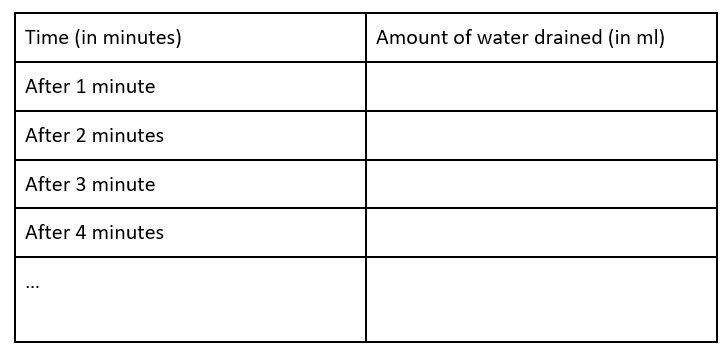
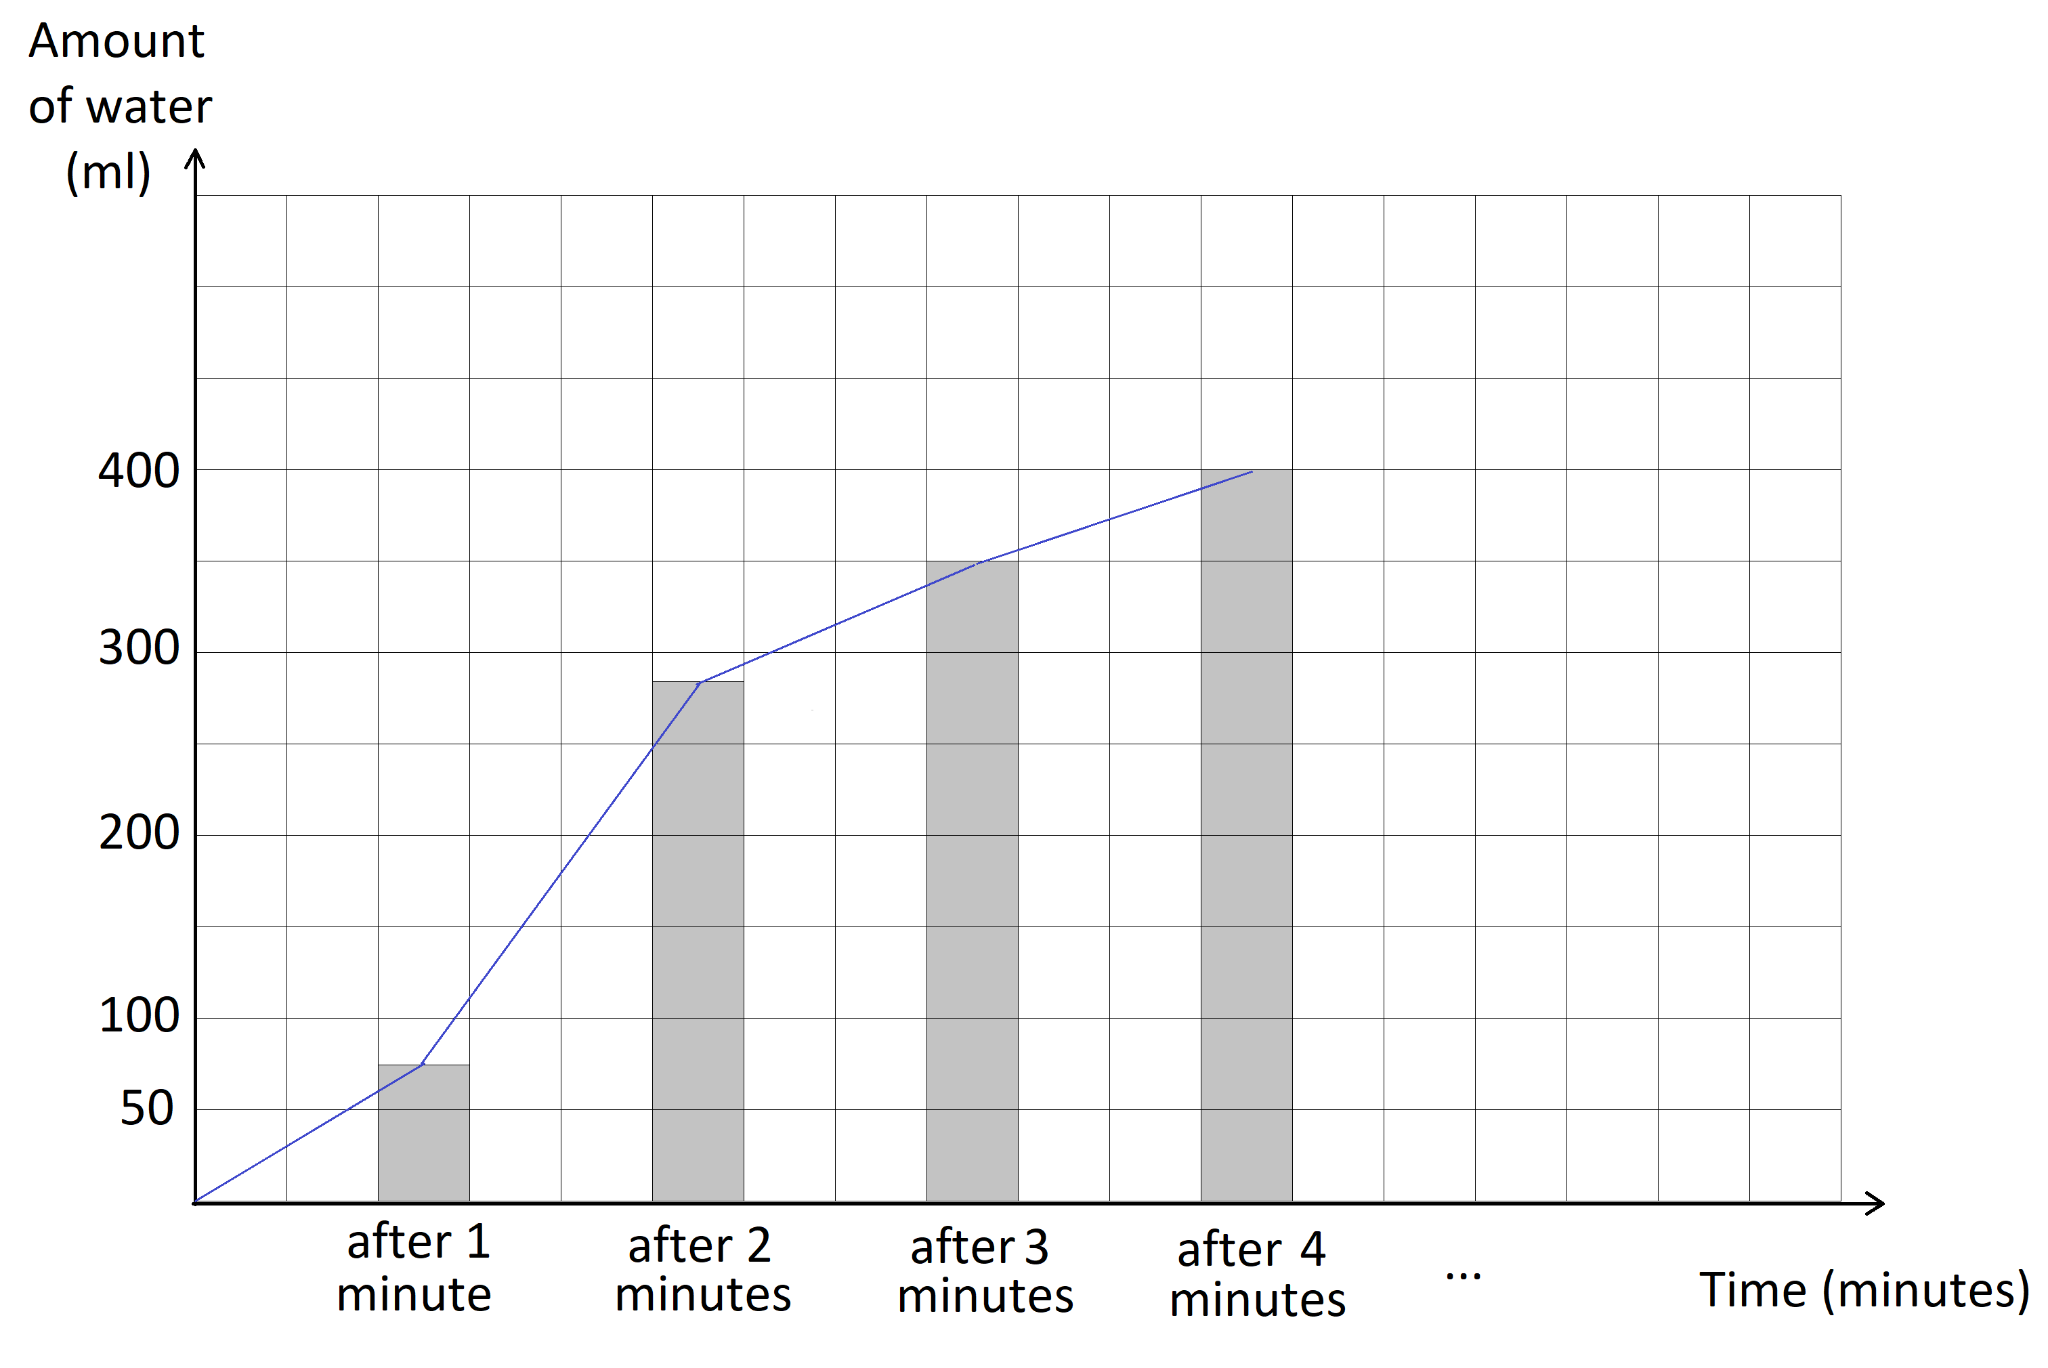


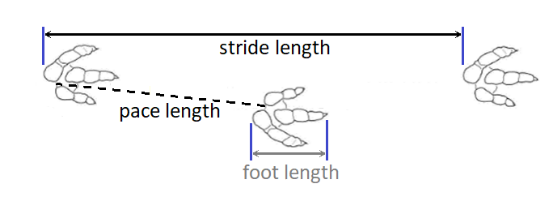

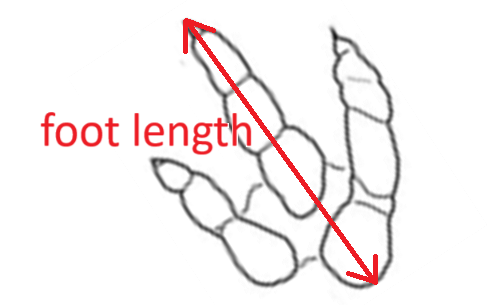
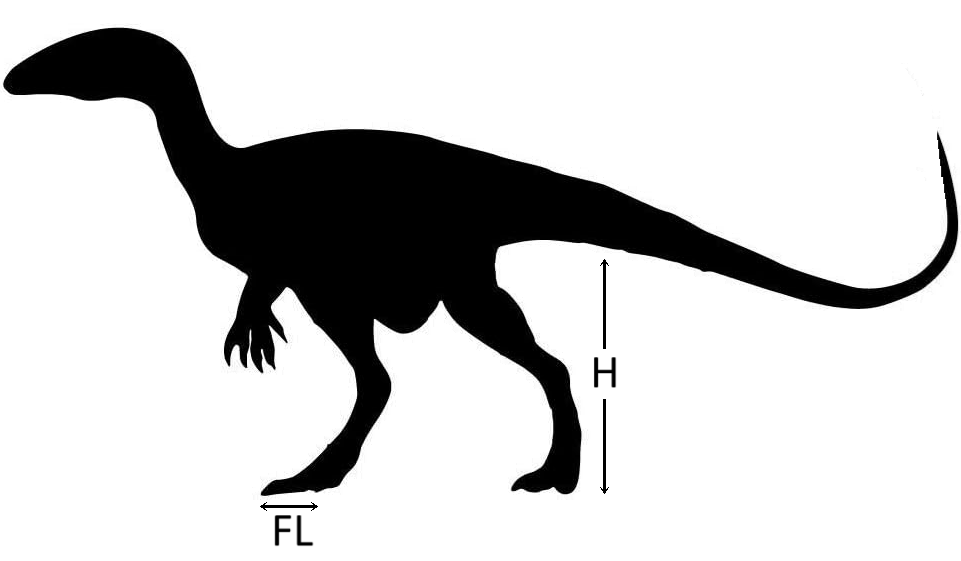

(mirror).png)